MICROPHONE | INSTRUMENT |
|
| MICROPHONE |
|
|
|
| INSTRUMENT |
| MASTER |
| DIGITAL EFFECTS |
| ||||||
GAIN 1 |
| BASS | MIDDLE |
| TREBLE | GAIN 2 |
| BASS | TREBLE | FEEDBACK | VOLUME | LEVEL | PROGRAM |
|
| KAA65 | ||||
| PIEZO | ACTIVE |
|
|
|
|
| |||||||||||||
|
|
|
|
|
|
|
|
|
|
|
|
|
| 4 | 5 | 1. | BRIGHT ROOM | |||
|
|
|
|
|
|
|
|
|
|
|
|
|
|
|
| 6 |
| |||
|
|
|
|
|
|
|
|
|
|
|
|
|
|
|
| 2. | MELLOW ROOM |
| ||
|
|
|
|
|
|
|
|
|
|
|
|
|
|
|
| 3 | 7 | 3. | BRIGHT HALL |
|
|
|
|
|
|
|
|
|
|
|
|
|
|
|
|
| 4. | MELLOW HALL |
| ||
|
|
|
|
|
|
|
|
|
|
|
|
|
|
|
|
|
| 5. | CHORUS |
|
|
|
|
|
|
|
|
|
|
|
|
|
|
|
|
| 2 | 8 | 6. | CHORUS/ROOM | POWER |
|
|
|
|
|
|
|
|
|
|
|
|
|
|
|
| 7. | CHORUS/HALL | |||
|
|
|
| EFFECTS |
|
| PHASE |
|
| EFFECTS |
| ON |
|
| ON |
| 1 |
| ||
|
|
|
|
|
|
|
|
|
|
|
| 8. | SLAPBACK |
| ||||||
|
|
|
|
|
|
|
|
|
|
|
|
|
|
|
|
|
|
| ||
|
|
|
|
|
| 6 5 W A T T M O S F E T A C O U S T I C G U I T A R A M P L I F I E R |
|
|
|
|
|
|
| |||||||
1 | 2 | 3 | 4 | 5 | 6 | 7 | 8 | 9 | 10 | 11 | 12 | 13 14 | 15 | 16 | 17 18 |
| 19 |
| 20 | 21 |
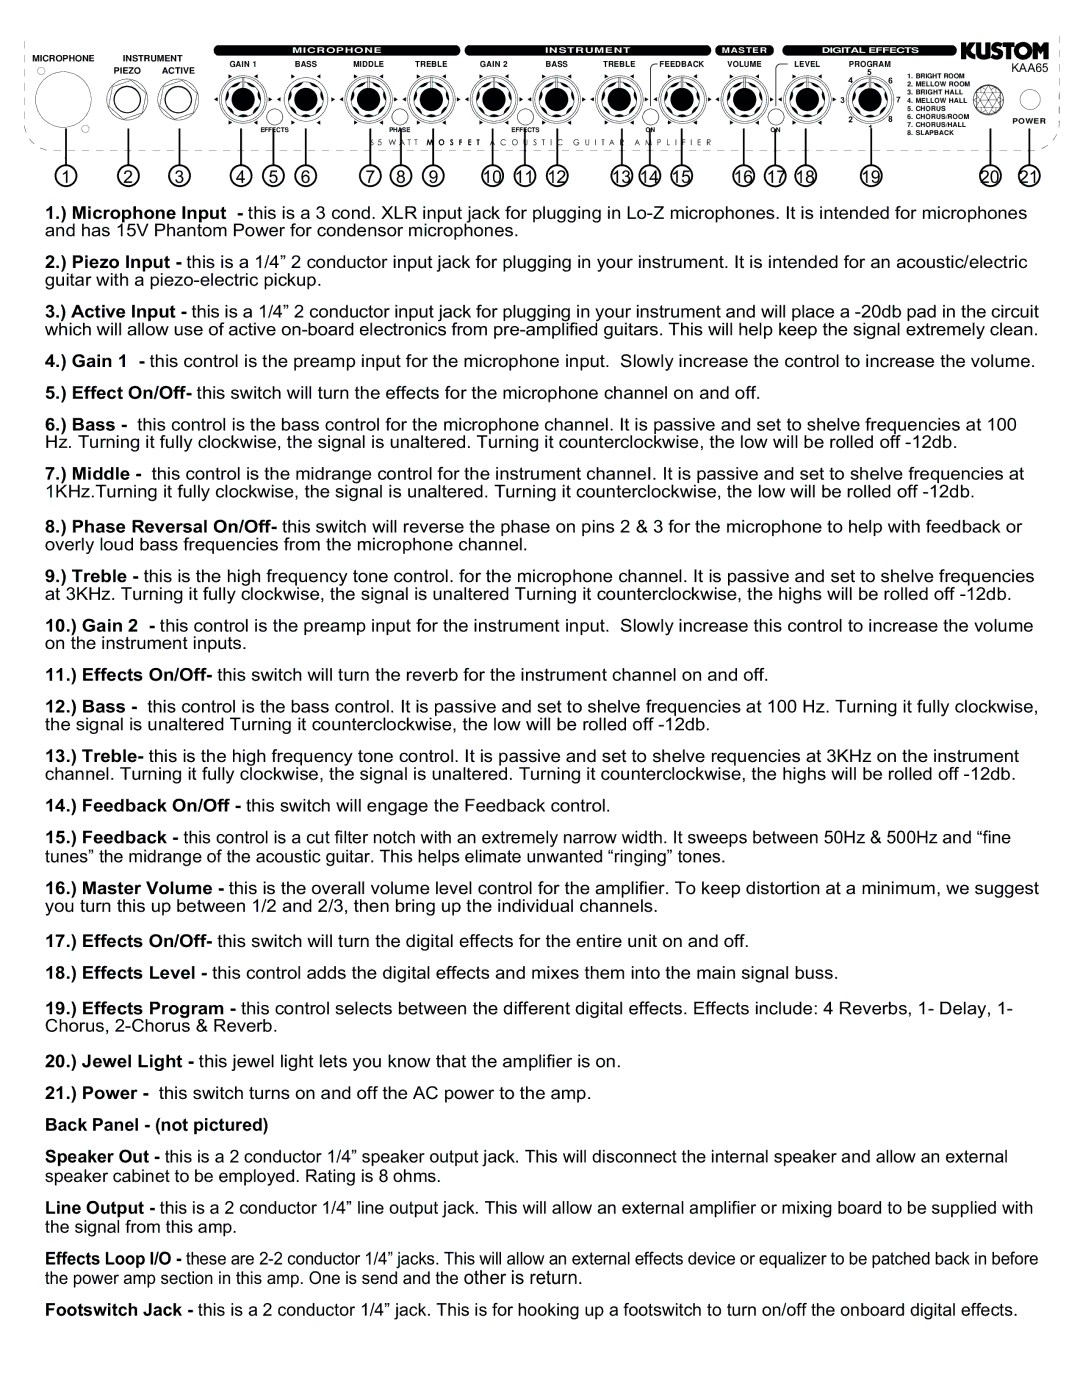
1.) Microphone Input - this is a 3 cond. XLR input jack for plugging in
2.) Piezo Input - this is a 1/4” 2 conductor input jack for plugging in your instrument. It is intended for an acoustic/electric guitar with a
3.) Active Input - this is a 1/4” 2 conductor input jack for plugging in your instrument and will place a
4.) Gain 1 - this control is the preamp input for the microphone input. Slowly increase the control to increase the volume.
5.) Effect On/Off- this switch will turn the effects for the microphone channel on and off.
6.) Bass - this control is the bass control for the microphone channel. It is passive and set to shelve frequencies at 100 Hz. Turning it fully clockwise, the signal is unaltered. Turning it counterclockwise, the low will be rolled off
7.) Middle - this control is the midrange control for the instrument channeI. It is passive and set to shelve frequencies at 1KHz.Turning it fully clockwise, the signal is unaltered. Turning it counterclockwise, the low will be rolled off
8.) Phase Reversal On/Off- this switch will reverse the phase on pins 2 & 3 for the microphone to help with feedback or overly loud bass frequencies from the microphone channel.
9.) Treble - this is the high frequency tone control. for the microphone channel. It is passive and set to shelve frequencies at 3KHz. Turning it fully clockwise, the signal is unaltered Turning it counterclockwise, the highs will be rolled off
10.) Gain 2 - this control is the preamp input for the instrument input. Slowly increase this control to increase the volume on the instrument inputs.
11.) Effects On/Off- this switch will turn the reverb for the instrument channel on and off.
12.) Bass - this control is the bass control. It is passive and set to shelve frequencies at 100 Hz. Turning it fully clockwise, the signal is unaltered Turning it counterclockwise, the low will be rolled off
13.) Treble- this is the high frequency tone control. It is passive and set to shelve requencies at 3KHz on the instrument channel. Turning it fully clockwise, the signal is unaltered. Turning it counterclockwise, the highs will be rolled off
14.) Feedback On/Off - this switch will engage the Feedback control.
15.) Feedback - this control is a cut filter notch with an extremely narrow width. It sweeps between 50Hz & 500Hz and “fine tunes” the midrange of the acoustic guitar. This helps elimate unwanted “ringing” tones.
16.) Master Volume - this is the overall volume level control for the amplifier. To keep distortion at a minimum, we suggest you turn this up between 1/2 and 2/3, then bring up the individual channels.
17.) Effects On/Off- this switch will turn the digital effects for the entire unit on and off.
18.) Effects Level - this control adds the digital effects and mixes them into the main signal buss.
19.) Effects Program - this control selects between the different digital effects. Effects include: 4 Reverbs, 1- Delay, 1- Chorus,
20.) Jewel Light - this jewel light lets you know that the amplifier is on.
21.) Power - this switch turns on and off the AC power to the amp.
Back Panel - (not pictured)
Speaker Out - this is a 2 conductor 1/4” speaker output jack. This will disconnect the internal speaker and allow an external speaker cabinet to be employed. Rating is 8 ohms.
Line Output - this is a 2 conductor 1/4” line output jack. This will allow an external amplifier or mixing board to be supplied with the signal from this amp.
Effects Loop I/O - these are
Footswitch Jack - this is a 2 conductor 1/4” jack. This is for hooking up a footswitch to turn on/off the onboard digital effects.