Editing the Digital Effects
The presets contain valid parameters under any condition. This makes Programming and Editing the same function. The word “Edit” will describe both programing and editing
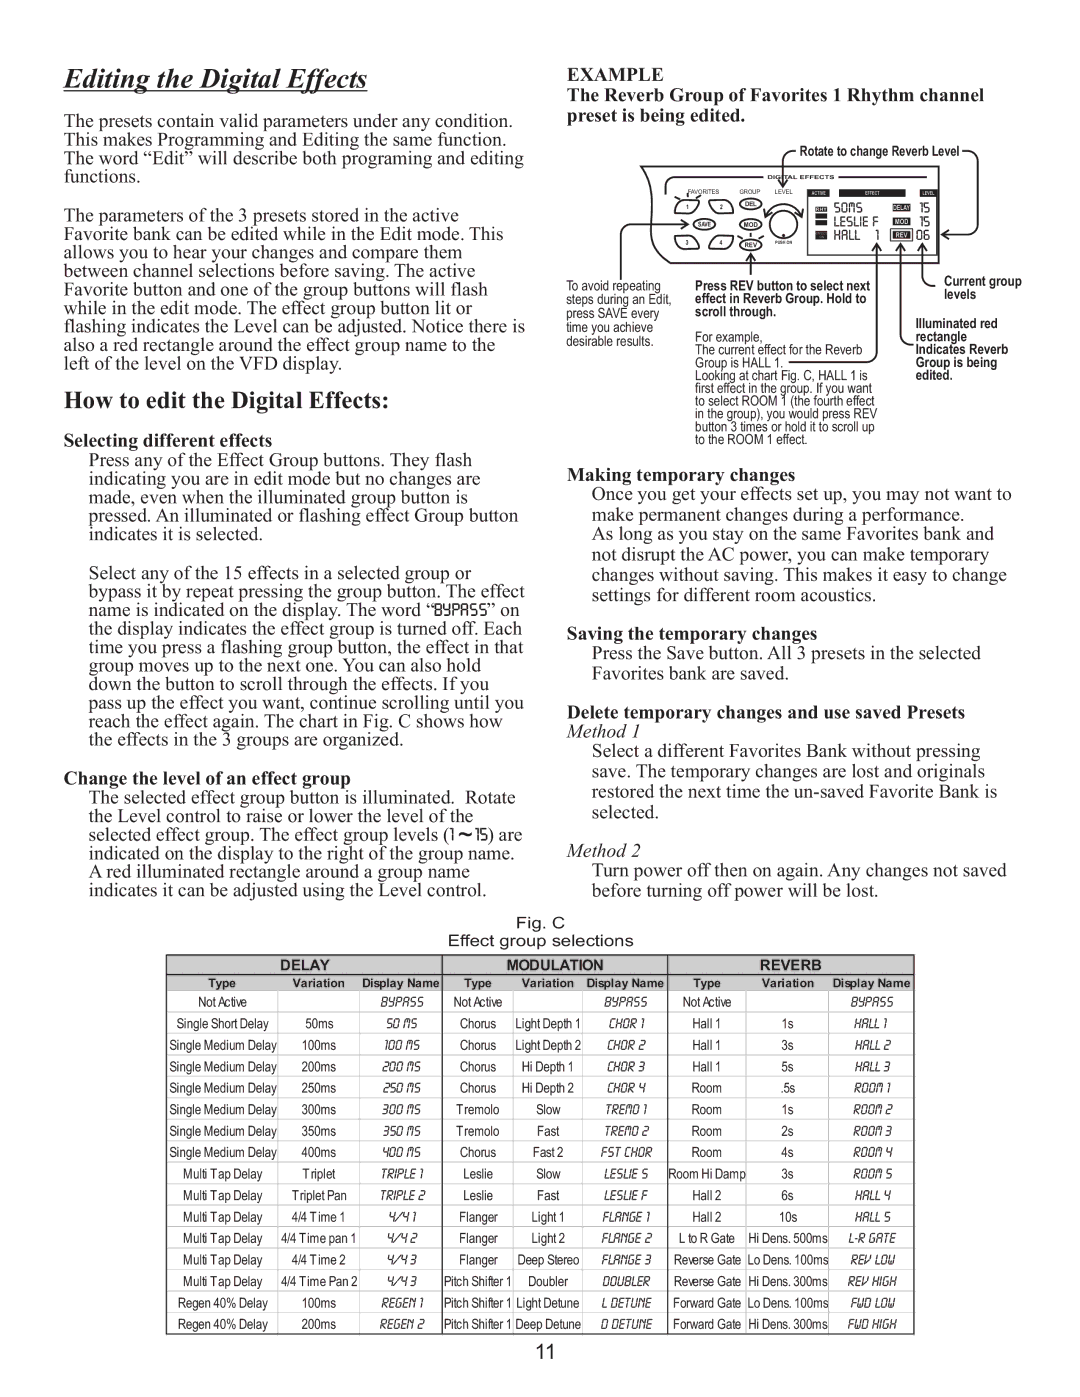
EXAMPLE
The Reverb Group of Favorites 1 Rhythm channel preset is being edited.
Rotate to change Reverb Level
functions.
The parameters of the 3 presets stored in the active Favorite bank can be edited while in the Edit mode. This allows you to hear your changes and compare them between channel selections before saving. The active Favorite button and one of the group buttons will flash while in the edit mode. The effect group button lit or flashing indicates the Level can be adjusted. Notice there is also a red rectangle around the effect group name to the left of the level on the VFD display.
How to edit the Digital Effects:
Selecting different effects
To avoid repeating steps during an Edit, press SAVE every time you achieve desirable results.
DIGITAL EFFECTS
FAVORITES GROUP LEVEL
1 | 2 | DEL |
|
|
| ||
SAVE |
| MOD |
|
3 | 4 | REV | PUSH ON |
|
|
|
Press REV button to select next effect in Reverb Group. Hold to scroll through.
For example,
The current effect for the Reverb Group is HALL 1.
Looking at chart Fig. C, HALL 1 is first effect in the group. If you want to select ROOM 1 (the fourth effect in the group), you would press REV button 3 times or hold it to scroll up to the ROOM 1 effect.
Current group levels
Illuminated red rectangle Indicates Reverb Group is being edited.
Press any of the Effect Group buttons. They flash indicating you are in edit mode but no changes are made, even when the illuminated group button is pressed. An illuminated or flashing effect Group button indicates it is selected.
Select any of the 15 effects in a selected group or bypass it by repeat pressing the group button. The effect
name is indicated on the display. The word “![]() ” on the display indicates the effect group is turned off. Each time you press a flashing group button, the effect in that group moves up to the next one. You can also hold down the button to scroll through the effects. If you pass up the effect you want, continue scrolling until you reach the effect again. The chart in Fig. C shows how the effects in the 3 groups are organized.
” on the display indicates the effect group is turned off. Each time you press a flashing group button, the effect in that group moves up to the next one. You can also hold down the button to scroll through the effects. If you pass up the effect you want, continue scrolling until you reach the effect again. The chart in Fig. C shows how the effects in the 3 groups are organized.
Change the level of an effect group
The selected effect group button is illuminated. Rotate the Level control to raise or lower the level of the
selected effect group. The effect group levels (![]() ) are indicated on the display to the right of the group name. A red illuminated rectangle around a group name indicates it can be adjusted using the Level control.
) are indicated on the display to the right of the group name. A red illuminated rectangle around a group name indicates it can be adjusted using the Level control.
Making temporary changes
Once you get your effects set up, you may not want to make permanent changes during a performance.
As long as you stay on the same Favorites bank and not disrupt the AC power, you can make temporary changes without saving. This makes it easy to change settings for different room acoustics.
Saving the temporary changes
Press the Save button. All 3 presets in the selected Favorites bank are saved.
Delete temporary changes and use saved Presets Method 1
Select a different Favorites Bank without pressing save. The temporary changes are lost and originals restored the next time the
Method 2
Turn power off then on again. Any changes not saved before turning off power will be lost.
Fig. C
Effect group selections
| DELAY |
| MODULATION |
| REVERB |
| ||
Type | Variation | Display Name | Type | Variation | Display Name | Type | Variation | Display Name |
Not Active |
| BYPASS | Not Active |
| BYPASS | Not Active |
| BYPASS |
Single Short Delay | 50ms | 50 ms | Chorus | Light Depth 1 | Chor 1 | Hall 1 | 1s | HalL 1 |
Single Medium Delay | 100ms | 100 ms | Chorus | Light Depth 2 | Chor 2 | Hall 1 | 3s | HalL 2 |
Single Medium Delay | 200ms | 200 ms | Chorus | Hi Depth 1 | Chor 3 | Hall 1 | 5s | HalL 3 |
Single Medium Delay | 250ms | 250 ms | Chorus | Hi Depth 2 | Chor 4 | Room | .5s | ROOM 1 |
Single Medium Delay | 300ms | 300 ms | T remolo | Slow | TREMO 1 | Room | 1s | ROOM 2 |
Single Medium Delay | 350ms | 350 ms | T remolo | Fast | TREMO 2 | Room | 2s | Room 3 |
Single Medium Delay | 400ms | 400 ms | Chorus | Fast 2 | FST Chor | Room | 4s | ROOM 4 |
Multi T ap Delay | T riplet | Triple 1 | Leslie | Slow | Leslie S | Room Hi Damp | 3s | ROOM 5 |
Multi T ap Delay | T riplet Pan | Triple 2 | Leslie | Fast | Leslie F | Hall 2 | 6s | HalL 4 |
Multi T ap Delay | 4/4 T ime 1 | 4/4 1 | Flanger | Light 1 | Flange 1 | Hall 2 | 10s | HalL 5 |
Multi T ap Delay | 4/4 T ime pan 1 | 4/4 2 | Flanger | Light 2 | Flange 2 | L to R Gate | Hi Dens. 500ms | |
Multi T ap Delay | 4/4 T ime 2 | 4/4 3 | Flanger | Deep Stereo | Flange 3 | Reverse Gate | Lo Dens. 100ms | Rev Low |
Multi T ap Delay | 4/4 T ime Pan 2 | 4/4 3 | Pitch Shifter 1 | Doubler | Doubler | Reverse Gate | Hi Dens. 300ms | Rev High |
Regen 40% Delay | 100ms | Regen 1 | Pitch Shifter 1 | Light Detune | L Detune | Forward Gate | Lo Dens. 100ms | Fwd Low |
Regen 40% Delay | 200ms | Regen 2 | Pitch Shifter 1 | Deep Detune | D Detune | Forward Gate | Hi Dens. 300ms | Fwd High |
11