14
data. To achieve a true temperature reading, avoid mounting where direct sunlight can reach the remote temperature sensor or Wireless Weather Station. While the remote temperature sensor is weather proof, avoid submersion in water or snow. We recommend that you mount the remote temperature sensor on an outside North-facing wall. The sending range is 330ft—obstacles such as walls, concrete, and large metal objects can reduce the range. Place both units in their desired location, and wait approximately 15 minutes before permanently mounting to ensure that there is proper reception. The Wireless Weather Station should display a temperature in the OUTDOOR LCD within 4 minutes of setting up.
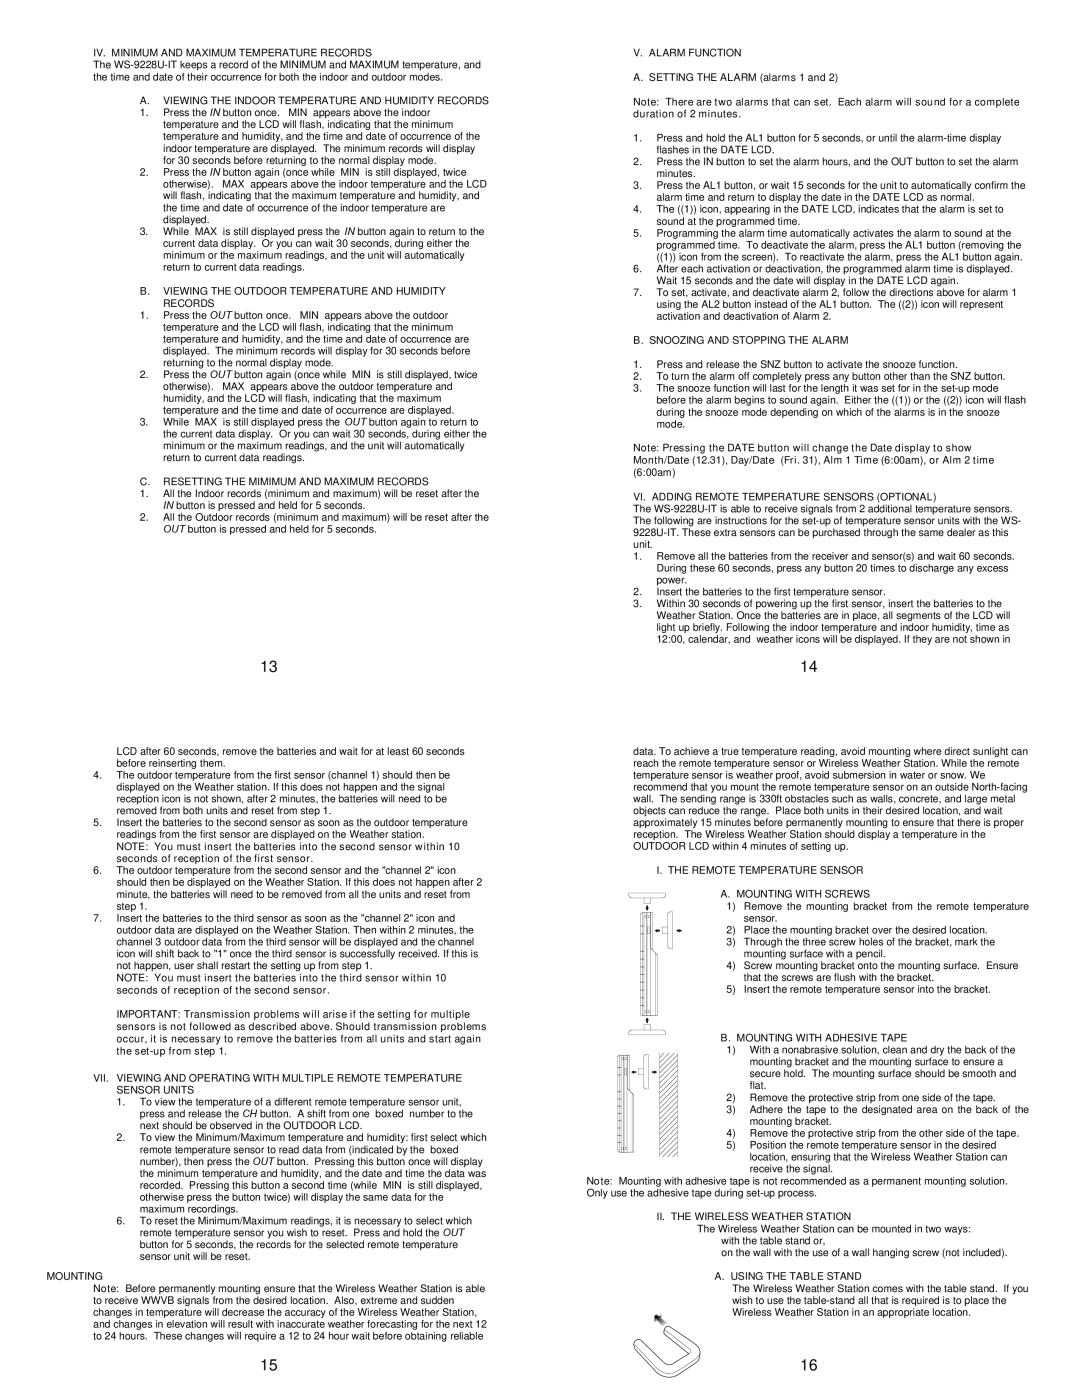
I. THE REMOTE TEMPERATURE SENSOR
Remove all the batteries from the receiver and sensor(s) and wait 60 seconds. During these 60 seconds, press any button 20 times to discharge any excess power.
Insert the batteries to the first temperature sensor.
Within 30 seconds of powering up the first sensor, insert the batteries to the Weather Station. Once the batteries are in place, all segments of the LCD will light up briefly. Following the indoor temperature and indoor humidity, time as 12:00, calendar, and weather icons will be displayed. If they are not shown in
VI. ADDING REMOTE TEMPERATURE SENSORS (OPTIONAL)
The WS-9228U-IT is able to receive signals from 2 additional temperature sensors. The following are instructions for the set-up of temperature sensor units with the WS- 9228U-IT. These extra sensors can be purchased through the same dealer as this unit.
1.
B. SNOOZING AND STOPPING THE ALARM
1. Press and release the SNZ button to activate the snooze function.
2. To turn the alarm off completely press any button other than the SNZ button.
3. The snooze function will last for the length it was set for in the set-up mode before the alarm begins to sound again. Either the ((1)) or the ((2)) icon will flash during the snooze mode depending on which of the alarms is in the snooze mode.
Note: Pressing the DATE button will change the Date display to show Month/Date (12.31), Day/Date (Fri. 31), Alm 1 Time (6:00am), or Alm 2 time (6:00am)
2.
3.
IV. MINIMUM AND MAXIMUM TEMPERATURE RECORDS
The WS-9228U-IT keeps a record of the MINIMUM and MAXIMUM temperature, and the time and date of their occurrence—for both the indoor and outdoor modes.
A.VIEWING THE INDOOR TEMPERATURE AND HUMIDITY RECORDS
1.Press the IN button once. “MIN” appears above the indoor temperature and the LCD will flash, indicating that the minimum temperature and humidity, and the time and date of occurrence of the indoor temperature are displayed. The minimum records will display for 30 seconds before returning to the normal display mode.
2.Press the IN button again (once while “MIN” is still displayed, twice otherwise). “MAX” appears above the indoor temperature and the LCD will flash, indicating that the maximum temperature and humidity, and the time and date of occurrence of the indoor temperature are displayed.
3.While “MAX” is still displayed press the IN button again to return to the current data display. Or you can wait 30 seconds, during either the minimum or the maximum readings, and the unit will automatically return to current data readings.
B.VIEWING THE OUTDOOR TEMPERATURE AND HUMIDITY
RECORDS
1.Press the OUT button once. “MIN” appears above the outdoor temperature and the LCD will flash, indicating that the minimum temperature and humidity, and the time and date of occurrence are displayed. The minimum records will display for 30 seconds before returning to the normal display mode.
2.Press the OUT button again (once while “MIN” is still displayed, twice otherwise). “MAX” appears above the outdoor temperature and humidity, and the LCD will flash, indicating that the maximum temperature and the time and date of occurrence are displayed.
3.While “MAX” is still displayed press the OUT button again to return to the current data display. Or you can wait 30 seconds, during either the minimum or the maximum readings, and the unit will automatically return to current data readings.
C.RESETTING THE MIMIMUM AND MAXIMUM RECORDS
1.All the Indoor records (minimum and maximum) will be reset after the IN button is pressed and held for 5 seconds.
2.All the Outdoor records (minimum and maximum) will be reset after the OUT button is pressed and held for 5 seconds.
V. ALARM FUNCTION
A. SETTING THE ALARM (alarms 1 and 2)
Note: There are two alarms that can set. Each alarm will sound for a complete duration of 2 minutes.
1.Press and hold the AL1 button for 5 seconds, or until the alarm-time display flashes in the DATE LCD.
2.Press the IN button to set the alarm hours, and the OUT button to set the alarm minutes.
3.Press the AL1 button, or wait 15 seconds for the unit to automatically confirm the alarm time and return to display the date in the DATE LCD as normal.
4.The ((1)) icon, appearing in the DATE LCD, indicates that the alarm is set to sound at the programmed time.
5.Programming the alarm time automatically activates the alarm to sound at the programmed time. To deactivate the alarm, press the AL1 button (removing the ((1)) icon from the screen). To reactivate the alarm, press the AL1 button again.
6.After each activation or deactivation, the programmed alarm time is displayed. Wait 15 seconds and the date will display in the DATE LCD again.
7.To set, activate, and deactivate alarm 2, follow the directions above for alarm 1— using the AL2 button instead of the AL1 button. The ((2)) icon will represent activation and deactivation of Alarm 2.
13
LCD after 60 seconds, remove the batteries and wait for at least 60 seconds before reinserting them.
4.The outdoor temperature from the first sensor (channel 1) should then be displayed on the Weather station. If this does not happen and the signal reception icon is not shown, after 2 minutes, the batteries will need to be removed from both units and reset from step 1.
5.Insert the batteries to the second sensor as soon as the outdoor temperature readings from the first sensor are displayed on the Weather station.
NOTE: You must insert the batteries into the second sensor within 10 seconds of reception of the first sensor.
6.The outdoor temperature from the second sensor and the "channel 2" icon should then be displayed on the Weather Station. If this does not happen after 2 minute, the batteries will need to be removed from all the units and reset from step 1.
7.Insert the batteries to the third sensor as soon as the "channel 2" icon and outdoor data are displayed on the Weather Station. Then within 2 minutes, the channel 3 outdoor data from the third sensor will be displayed and the channel icon will shift back to "1" once the third sensor is successfully received. If this is not happen, user shall restart the setting up from step 1.
NOTE: You must insert the batteries into the third sensor within 10 seconds of reception of the second sensor.
IMPORTANT: Transmission problems will arise if the setting for multiple sensors is not followed as described above. Should transmission problems occur, it is necessary to remove the batteries from all units and start again the set-up from step 1.
VII. VIEWING AND OPERATING WITH MULTIPLE REMOTE TEMPERATURE SENSOR UNITS
1.To view the temperature of a different remote temperature sensor unit, press and release the CH button. A shift from one “boxed” number to the next should be observed in the OUTDOOR LCD.
2.To view the Minimum/Maximum temperature and humidity: first select which remote temperature sensor to read data from (indicated by the “boxed” number), then press the OUT button. Pressing this button once will display the minimum temperature and humidity, and the date and time the data was recorded. Pressing this button a second time (while “MIN” is still displayed, otherwise press the button twice) will display the same data for the
maximum recordings.
6.To reset the Minimum/Maximum readings, it is necessary to select which remote temperature sensor you wish to reset. Press and hold the OUT button for 5 seconds, the records for the selected remote temperature sensor unit will be reset.
MOUNTING
Note: Before permanently mounting ensure that the Wireless Weather Station is able to receive WWVB signals from the desired location. Also, extreme and sudden changes in temperature will decrease the accuracy of the Wireless Weather Station, and changes in elevation will result with inaccurate weather forecasting for the next 12 to 24 hours. These changes will require a 12 to 24 hour wait before obtaining reliable
15
A. MOUNTING WITH SCREWS
1) Remove the mounting bracket from the remote temperature sensor.
2) Place the mounting bracket over the desired location.
3) Through the three screw holes of the bracket, mark the mounting surface with a pencil.
4) Screw mounting bracket onto the mounting surface. Ensure that the screws are flush with the bracket.
5) Insert the remote temperature sensor into the bracket.
B. MOUNTING WITH ADHESIVE TAPE
1)With a nonabrasive solution, clean and dry the back of the
mounting bracket and the mounting surface to ensure a
secure hold. The mounting surface should be smooth and
flat.
2) Remove the protective strip from one side of the tape.
3) Adhere the tape to the designated area on the back of the
mounting bracket.
4) Remove the protective strip from the other side of the tape.
5) Position the remote temperature sensor in the desired
location, ensuring that the Wireless Weather Station can receive the signal.
Note: Mounting with adhesive tape is not recommended as a permanent mounting solution. Only use the adhesive tape during set-up process.
II. THE WIRELESS WEATHER STATION
The Wireless Weather Station can be mounted in two ways:
with the table stand or,
on the wall with the use of a wall hanging screw (not included).
A. USING THE TABLE STAND
The Wireless Weather Station comes with the table stand. If you wish to use the table-stand all that is required is to place the Wireless Weather Station in an appropriate location.
16