GENERAL SAFETY INFORMATION

When using electrical appliances, basic precautions should always be followed to re- duce the risk of fire, electrical shock and injury to persons, including the following:

Read all instructions before using this Fan.

1.Make certain the power source conforms to the electrical requirements of the Fan.

2.Make certain that the room is equipped with a working smoke detector.

3.Use this Fan only as described in this manual. Any other use not recommended by the manufacturer may cause fire, electrical shock, or injury to persons.

4.To reduce the risk of personal injury and electric shock, the Fan should not be played with or placed where small children can reach it.

5.Unplug power cord before installing, servicing, or moving the Fan.

DO NOT DEPEND ON THE ON/OFF SWITCH AS THE SOLE MEANS OF DISCONNECTING POWER WHEN SERVICING

PASO 1: ARMADO DE LA TUBERÍA

1.Saque el conjunto de la tubería del cartón como muestra. (Figura 1)

2.Desafloje la Tuerca de Ajuste de Altura, girando en sentido contrahorario. (Figura 2)

3.Eleve la Extensión De La Tubería. (Figura 3)

4.Apriete la Tuerca de Ajuste de Altura, girando en sentido horario.

(Figura 4)

Tubería de

Extension

Tuerca de

Ajuste de

Altura

Figura 1

Figura 2

Figura 3

Figura 4

PASO 2: ENSAMBLE DEL PIE

PASO 4: ENSAMBLE DEL ASPAY REJILLA

1.Inclinarla Cabeza del Ventilador hacia atrás. Coloque la Rejilla Trasera en el Motor. (Figura 7)

2.Alinear la lengüeta de la Rejilla Trasera con la ranura en la parte superior de la cubierta delantera del Motor.

Rejilla

Motor

Trasera


Figura 7

3.Asiente la Parrilla Trasera y sujetela con la Tuerca de Plástico hacia la Derecha. Deslice la Helice en el Eje del Motor. (Figura 8) Alinear la Ranura Del Cubo de la tapa con el Pasador del eje del motor. (Figura 8A)

OR MOVING THE FAN. ALWAYS UNPLUG THE POWER CORD. ALWAYS TURN OFF AND UNPLUG FAN BEFORE LEAVING THE AREA. NEVER LEAVE CHILDREN UNATTENDED WHEN THE FAN IS ON OR PLUGGED IN.

6.This Fan must NOT be used in potentially dangerous locations such as flammable, explosive, chemical-laden or wet atmospheres where gasoline, paint or flammable liquids are used or stored.

7.DO NOT use Fan in or near a window. Rain may create an electrical hazard.

8.Completely assemble Fan, according to instructions, before connecting to power supply.

This appliance has a polarized plug (one blade is wider than the other). To reduce the risk of electric shock, this plug is intended to fit in a polarized outlet only one way. Match wide blade of plug to wide slot. Fully insert. If the plug does not fit fully in the outlet, reverse the plug. If it still does not fit, contact a qualified electrician. DO NOT attempt to defeat this safety feature.

This plug is a safety feature, to reduce the risk of fire, electric shock and personal injury. DO NOT remove, replace, repair or tamper with the originally supplied plug. If the Fan does not function properly, it may be due to the safety device incorporated in this plug. Return to an authorized service center or call 800-233-0268, Monday - Friday, between 8:00 a.m. and 5:00 p.m. EST. If the plug warning label is missing or damaged, call the toll free number for a replacement label.

9.

Where possible, avoid the use of extension cords because the extension cord may overheat and cause a fire. If you must use an extension


cord, minimize the risk of overheating by using the shortest cord possible and ensuring that it is UL listed. NEVER use a single extension


cord to operate more than one Fan. Do not plug Fan into any other cord connected device, such as a power strip, cord reel, surge protec-


tor, multiple outlet adapters or outlet-type air fresheners. The use of such devices may create a fire hazard.

10.

NEVER operate any Fan with a damaged cord or plug or after the Fan malfunctions, has been dropped or damaged in any manner.

COLOQUE LA BASE EN EL PISO

1. Utilizandounmovimientogiratorio,inserteelextremodeltubodediámetro

grande en el agujero de la Base. (Figura 5) El girar el tubo a medida que se lo empuja asegura que el tubo quede plenamente asentado en la Base.

2.Para ajustar la altura:

a)Afloje la Tuerca de Ajuste de Altura.

b)Eleve o baje el Tubo de Extensión hasta obtener la altura deseada.

c)Apriete la Tuerca de Ajuste de Altura.

Tubo de Extensión

Tuerca de Ajuste de

Altura

Parrilla Trasera

Helice

Tapa de

Ventilador


Tuerca de


Figura 8

Plastico


Pasador


Figura 8A

Ranura del


Cubo

11.

NEVER insert or allow fingers or foreign objects to enter any ventilation or exhaust opening as it may cause an electric shock or fire, or


damage the Fan. To reduce the risk of fire, DO NOT block or tamper with the Fan in any manner while it is in operation.

12.

Always place the Fan on a stable, flat, level surface when operating, to avoid the chance of the Fan overturning. Locate the Power Cord


so the Fan or other objects are not resting on it. DO NOT run Power Cord under carpeting. DO NOT cover Power Cord with throw rugs,


runners or the like. Arrange Power Cord away from room traffic and where it will not be tripped over.

13.

This Fan is not intended for use in wet or damp locations. Never locate a Fan where it may fall into a bathtub or other water container.


NEVER use Fan where flammable liquids are used or stored.

14.

NEVER use Fan outdoors.

Figura 5

Base

4. Para asegurar la Helice, enroscarla hasta que quede

apretada en el Cubo de la Tapa haciéndola girar

Hacia la Izuierda.

5. Con el cabezal del ventilador en posición vertical, alinee el Adorno

de la Parrilla Delantera de modo que quede horizontal y con el

15. This Fan is not suitable for use in agricultural facilities including areas where livestock, poultry or other animals are confined. Please refer

to National Electric Code (NEC) Article 547-7 (2002), or applicable state or local codes or standards relating to electrical requirements for

PASO 3: CONJUNTO DE LA CABEZA

lado debido hacia arriba. Empiece en la parte superior de la parrilla

y siga hacia abajo, insertando las Trabas de la Parrilla Trasera en

las Ranuras de la Parrilla Delantera. (Figura 9)

Agricultural Buildings. THIS FAN DOES NOT MEET THE REQUIRMENTS OF NEC ARTICLE 547-7 (2002).

16. This Fan is not suitable for use in hazardous locations. Please refer to National Electric Code (NEC) Article 500 or applicable state or local

codes or standards relating to electrical requirements for Hazardous locations. THIS FAN DOES NOT MEET THE REQUIRMENTS OF

NEC ARTICLE 500 (2002).

REDUCE THE RISK OF FIRE OR ELECTRIC SHOCK - DO NOT USE THIS FAN

WITH ANY SOLID STATE SPEED CONTROL DEVICES.

1.Coloque el Conjunto de Cabezal con el Collar en el Tubo de Ex- tensión. (Figura 6)

2.Sostenga firmemente el Tubo de Extensión y empuje el Conjunto de Cabezal hacia abajo con un movimiento giratorio hasta que quede asentado en el Tubo de Extensión.

Conjunto de

Cabezal

Collar

Tubo de

Extensión

Adorno

Parrilla

Delantera

Ranuras

Parrilla

SAVE THESE INSTRUCTIONS

Figura 6

Figura 9

Trabas

Trasera

Rev. A 9/07

2

2085454

Rev. A 9/07

7

2085454

Page 2
Image 2
Lasko 1825 manual Paso 1 Armado DE LA Tubería, Paso 2 Ensamble DEL PIE Paso 4 Ensamble DEL Aspay Rejilla

1825 specifications

The Lasko 1825 is a highly regarded portable fan that combines functionality, portability, and ease of use. Designed for both home and office environments, this fan ensures that you remain cool and comfortable, regardless of the heat outside.

One of the standout features of the Lasko 1825 is its compact design. With a slim profile, it can easily fit in small spaces, making it ideal for use on desks, nightstands, or in tight corners. The lightweight construction enables you to effortlessly relocate the fan from one room to another, catering to your cooling needs wherever they may arise.

Another significant aspect of the Lasko 1825 is its powerful airflow capabilities. Equipped with a robust motor, this fan provides ample circulation even in larger rooms. The adjustable tilt feature allows users to direct airflow precisely where it's needed, whether it's for personal cooling or to circulate air throughout the space.

The fan operates with multiple speed settings, typically three, giving users the flexibility to select their preferred level of cooling. Whether you're seeking a gentle breeze for relaxation or a strong gust for immediate relief, the adjustable speeds cater to varied preferences and situations.

Moreover, the Lasko 1825 is designed with user convenience in mind. It features easy-to-use controls, allowing anyone to operate the fan without any hassle. The straightforward interface means that even those who are not technologically savvy can quickly adjust settings to achieve the desired comfort level.

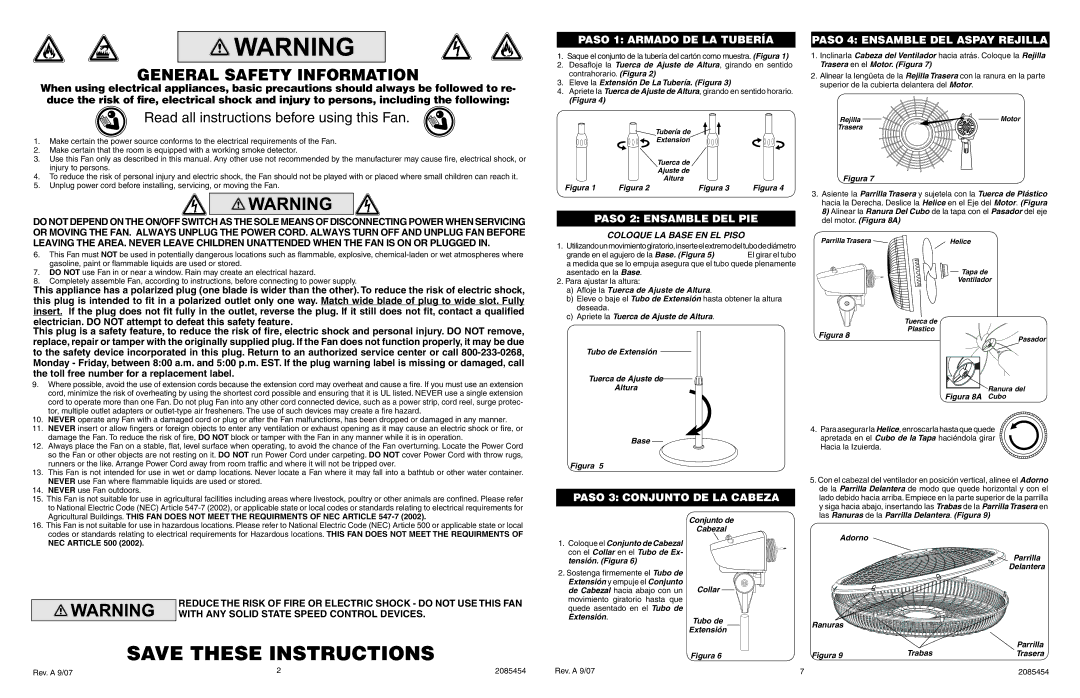
In terms of safety, the Lasko 1825 is equipped with a sturdy base to provide stability and prevent accidental tipping. The fan’s design also incorporates safety features such as thermal protection, which helps prevent overheating during long periods of use.

The ease of maintenance is another highlight. The fan's design allows for quick access for cleaning, ensuring that dust and debris do not accumulate over time and compromise airflow efficiency.

In summary, the Lasko 1825 stands out as a practical and efficient solution for personal cooling. With its compact size, strong airflow, adjustable speed settings, user-friendly controls, and safety features, it is an excellent choice for anyone looking to enhance their comfort during the warmer months. Whether for personal use or to circulate air in a room, this fan provides a blend of convenience and effectiveness that is hard to beat.