MODELO 4820
MODEL 4820
ARMADO
1.Para un armado más sencillo, deposite el Ventilador hacia abajo para que la parrilla frontal y el panel de control apunten hacia arriba.
2.Arme las Mitades de la Base de Apoyo encastrando las Puntas de la Base de Apoyo A con los Orificios para Puntas en la Base de Apoyo B. Conecte el Cable Eléctrico a través del orificio grande en el centro de la Montura de la Base de Apoyo. (Figura 1)
Cable
Eléctrico
Puntas de la Base
de Apoyo A
| Puntas |
Puntas de la Base | Llave |
| |
de Apoyo B | Figura 1 |
3.Asegure (2) #8 X 1/2” Tornillos en los dos orificios externos en la parte inferior de la Base. (Figura 2)
Montura de la |
Base de Apoyo |
4.Alinee la Montura de la Base de Apoyo con la Base del Motor, teniendo en cuenta que la ranura del cable en la parte inferior de la montura de la base de apoyo debe apuntar hacia la parte posterior del Ventilador. Adose la Montura de la Base de Apoyo a la Base del Motor con (4) Tornillos Largos M5 de 1/2”. Cerciórese de alinear la Llave del Conjunto de la Base de Soporte con la Muesca Localizadora de la Base Del Motor. (Figura 1) Suavemente tire del Cable Eléctrico para evitar que quede flojo y colóquelo en el Orificio de Colocación del Cable . (Figura 3)
| Montura de la | Base del Motor | |
|
| ||
| Base de Apoyo |
| |
|
| Orificio de | |
Tornillos |
| Colocación | |
Cable | del Cable | ||
Largos M5 |
| ||
Eléctrico | |||
de 1/2” | |||
|
| ||
|
| Figura 3 | |
OPERATION
This Fan may be operated by the manual controls located on top of the unit (as shown in Figure 4) or by the Remote Control (shown in Figure 5).
1.Remove the Fan from the carton and assemble as instructed.
2.Place the Fan on a firm, level surface.
WARNING: Plastic or rubber tabs, like the feet on this unit, may stick to hardwood floors. The unit may leave a residue that could darken, stain or leave permanent blemishes on the finish of certain hardwood floors.
3.Plug the cord set into a 120 V~ electrical outlet. Be sure plug fits tightly in outlet.
4.Turn the Fan on by pressing the Power Button (![]() ). A light will appear when the Fan is turned on. This light will remain lit until the unit is turned off. The unit will be in low speed when originally turned on.
). A light will appear when the Fan is turned on. This light will remain lit until the unit is turned off. The unit will be in low speed when originally turned on.
5.SPEEDS: Press the Fan Speed Button (![]() ) to desired speed setting. Each time the Fan Speed Button is pressed, the speed will change from low (1), to medium (2), to high (3).
) to desired speed setting. Each time the Fan Speed Button is pressed, the speed will change from low (1), to medium (2), to high (3).
6.OSCILLATION: Press the Oscillation Button (![]() ) to start and stop the oscillation function.
) to start and stop the oscillation function.
7.TIMER: The timer function allows the unit to be set to operate for a length of time from 1/2 hour to 7 1/2 hours, in increments of a 1/ 2 hour. Press the Timer Button (![]() ) to set the length of time desired. Each time the timer button is pressed, the time is increased by 1/2 hour. After reaching 7 1/2 hours, pressing the timer button once more will reset the Fan to continuous running. The lights on the front of the unit will light up appropriately with the length of time that the Fan is set for.
) to set the length of time desired. Each time the timer button is pressed, the time is increased by 1/2 hour. After reaching 7 1/2 hours, pressing the timer button once more will reset the Fan to continuous running. The lights on the front of the unit will light up appropriately with the length of time that the Fan is set for.
8.IONIZER: The ionizer function on this Fan will operated within any speed mode. Press the Ion Button ( I![]() N ) once to turn this function on and a second time to turn it off. The Fan must be ON for the ionizer to be functional. When the ionizer is turned on it will assist in the purification of the room air.
N ) once to turn this function on and a second time to turn it off. The Fan must be ON for the ionizer to be functional. When the ionizer is turned on it will assist in the purification of the room air.
9.To turn the Fan OFF, press the Power Button (![]() ) and unplug the unit from the electrical outlet.
) and unplug the unit from the electrical outlet.
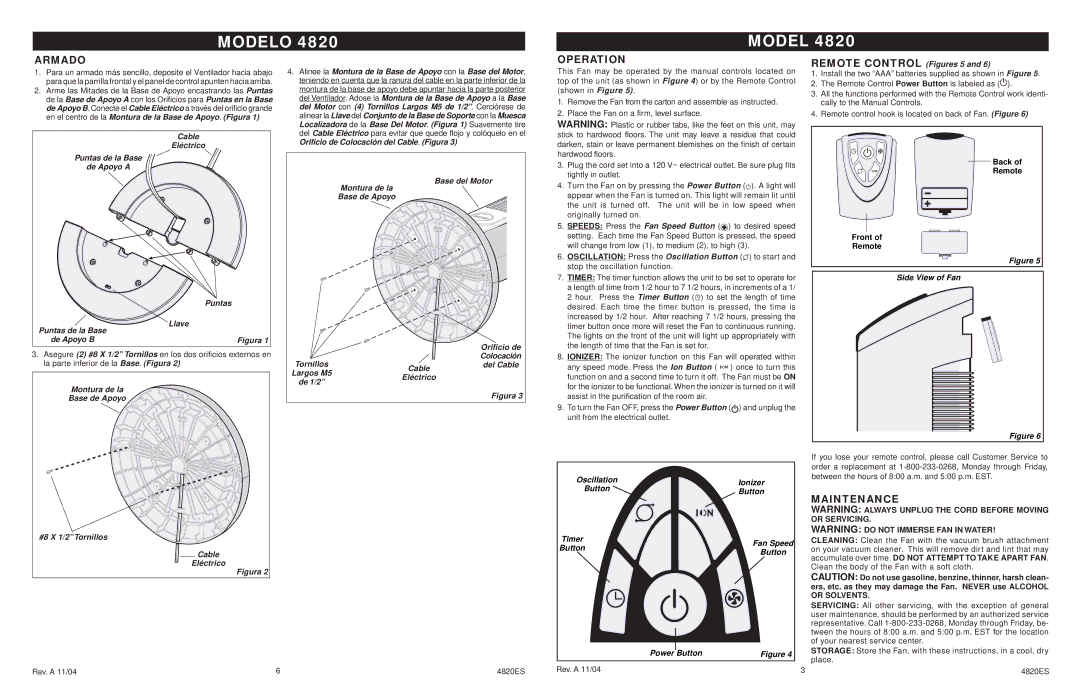
REMOTE CONTROL (Figures 5 and 6)
1.Install the two “AAA” batteries supplied as shown inFigure 5.
2.The Remote Control Power Button is labeled as (![]() ).
).
3.All the functions performed with the Remote Control work identi- cally to the Manual Controls.
4.Remote control hook is located on back of Fan. (Figure 6)
Back of
Remote
Front of
Remote
Figure 5
Side View of Fan
Figure 6
#8 X 1/2” Tornillos |
Cable |
Eléctrico |
Figura 2 |
Oscillation | Ionizer | |
Button | ||
Button | ||
| ||
Timer | Fan Speed | |
Button | ||
Button | ||
| ||
Power Button | Figure 4 |
If you lose your remote control, please call Customer Service to order a replacement at
MAINTENANCE
WARNING: ALWAYS UNPLUG THE CORD BEFORE MOVING OR SERVICING.
WARNING: DO NOT IMMERSE FAN IN WATER!
CLEANING: Clean the Fan with the vacuum brush attachment on your vacuum cleaner. This will remove dirt and lint that may accumulate over time. DO NOT ATTEMPT TO TAKE APART FAN. Clean the body of the Fan with a soft cloth.
CAUTION: Do not use gasoline, benzine, thinner, harsh clean- ers, etc. as they may damage the Fan. NEVER use ALCOHOL OR SOLVENTS.
SERVICING: All other servicing, with the exception of general user maintenance, should be performed by an authorized service representative. Call
STORAGE: Store the Fan, with these instructions, in a cool, dry place.
Rev. A 11/04 | 6 | 4820ES |
Rev. A 11/04 | 3 |
4820ES