MODEL 6251
MODELO 6251
SAFETY FEATURES
1.A
2.A thermal overload protector is built in to prevent overheating.
3.If the Heater senses that the room temperature is too high, the Heater will shut off and the display will begin to flash.To reset the unit, unplug the Heater and wait 10 minutes for the Heater to cool down.
4.After the Heater has cooled down, follow the operation instructions described in this manual.
TROUBLE SHOOTING TIPS
If your heater shuts off unexpectedly or fails to operate, the
1.Be sure the power cord is plugged into a working electrical outlet.
2.Check your Temperature setting. The Heater may be off because it has reached the desired temperature setting.
3.If your Heater runs for several minutes and shuts off repeatedly, your Heater may require cleaning. See Maintenance section below.
If you have a problem that can not be resolved by the steps listed above, contact Technical Assistance at
MAINTENANCE
To reduce the risk of electrical shock and fire please observe the following instructions.
Cleaning the Heater regularly will help to maintain its efficiency.
-Always unplug the cord before moving, servicing or cleaning.
-NEVER place the Heater in or near water. DO NOT IMMERSE HEATER IN WATER.
-Clean the Heater only with a vacuum equipped with a brush attachment; the vacuum will remove the lint and dirt from the surface of the Heater.
-Vacuum intake grills every two weeks; this will help to maintain the optimum Heater performance.
-Use a toothbrush or other soft bristle brush to gently loosen any dirt not removed by the vacuum.
-NEVER attempt to take apart the Heater.
-Clean the body of the Heater with a soft cloth only.
-NEVER use ALCOHOL or SOLVENTS such as gasoline, benzene, paint thinner, or other harsh cleaners.
SERVICING: For servicing, other than general user maintenance, please contact Customer Service at
STORAGE: Store the Heater with these instructions in the original carton in a cool, dry place.
FUNCIONAMIENTO
El Calentador puede ser operado con los controles manuales ubicados en el Calentador (como se muestra en la Figura 1).
1.Coloque el Calentador sobre una superficie firme y plana, después de su montaje según las instrucciones de este.
CUIDADO: Los tacos de plástico o hule, tales como las patas de esta unidad, pueden pegarse a la superficie de los muebles y/o a los pisos de madera. La unidad podría dejar un residuo capaz de oscurecer, manchar o dejar marcas permanentes en el acabado de ciertas superficies de muebles, incluyendo superficies de madera y/o pisos de madera.
2. Conecte el cable a un tomacorriente de 120 voltios.
Asegúrese que el enchufe encaje firmemente en el
tomacorriente.
Cuando los enchufes quedan flojos dentro de los tomacorrientes, podrían deslizarse parcial o completamente fuera del tomacorriente con el menor movimiento del cable adosado. Los tomacorrientes en este estado podrían sobrecalentarse y representar un peligro de incendio grave; si queda cubierto por una cortina o tela, el peligro de incendio es todavía mayor.
3.Al conectar el Calentador por primera vez, se oirá un “bip” y la luz de encendido se encenderá indicando que hay electricidad en la unidad. La luz de encendido permanecerá encendida hasta que el Calentador sea desconectado del tomacorriente eléctrico.
4.ENCIENDA el Calentador oprimiendo el Botón de Encendido (![]() ).
).
5.La unidad estará funcionando en Calor ALTO. (1500 vatios)
6.Oprimir el Botón (![]()
![]()
![]() ) en este punto fijará al Calentador en Calor BAJO.
) en este punto fijará al Calentador en Calor BAJO.
7.Para APAGAR el Calentador, oprima el Botón de Encendido (![]() ) y desconecte la unidad del tomacorriente eléctrico.
) y desconecte la unidad del tomacorriente eléctrico.
FUNCIÓN DE TEMPERATURA
Para ambientar la habitación a una temperatura específica, oprima el ( ![]() ) or (
) or (![]() ) hasta la posición deseada. La luz debajo de la temperatura seleccionada continuará titilando hasta que la habitación alcance la temperatura deseada.
) hasta la posición deseada. La luz debajo de la temperatura seleccionada continuará titilando hasta que la habitación alcance la temperatura deseada.
FUNCIÓN DE TEMPORIZADOR
La función temporizadora operará en cualquier modo. Con esta función podrá ajustar el tiempo de operación desde 1 a 7 horas. Cada vez que oprima el Botón Temporizador (![]() ) (Timer) el tiempo de operación aumentará 1 hora. Si oprime el Botón Temporizador (
) (Timer) el tiempo de operación aumentará 1 hora. Si oprime el Botón Temporizador (![]() ) (Timer) otra vez después de que la pantalla muestra 7 horas, el Calentador volverá a funcionar en forma continua. Una vez ajustado, el temporizador iniciará una cuenta regresiva con aumentos de 1 hora y en la pantalla se mostrará el tiempo de operación que falta. El Calentador se apagará solo cuando el tiempo determinado haya transcurrido. Puede volver a encender la unidad si oprime el Botón de Encendido (
) (Timer) otra vez después de que la pantalla muestra 7 horas, el Calentador volverá a funcionar en forma continua. Una vez ajustado, el temporizador iniciará una cuenta regresiva con aumentos de 1 hora y en la pantalla se mostrará el tiempo de operación que falta. El Calentador se apagará solo cuando el tiempo determinado haya transcurrido. Puede volver a encender la unidad si oprime el Botón de Encendido (![]() ).
).
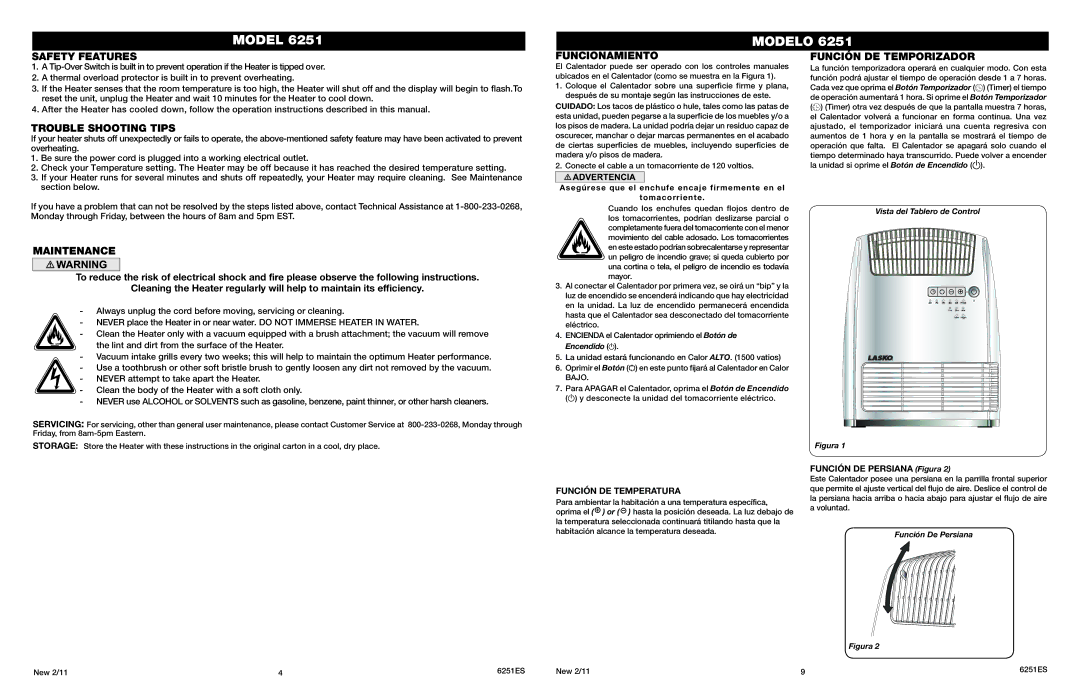
Vista del Tablero de Control
65 70 75 80 85 max
1hr 2hr 4hr
low![]()
![]() high
high
Figura 1
FUNCIÓN DE PERSIANA (Figura 2)
Este Calentador posee una persiana en la parrilla frontal superior que permite el ajuste vertical del flujo de aire. Deslice el control de la persiana hacia arriba o hacia abajo para ajustar el flujo de aire a voluntad.
Función De Persiana
New 2/11 | 4 | 6251ES |
Figura 2
New 2/11 | 9 | 6251ES |