MODELO S18300

STEP 1: PIPE ASSEMBLY


STEP 4: BLADE & GRILL ASSEMBLY

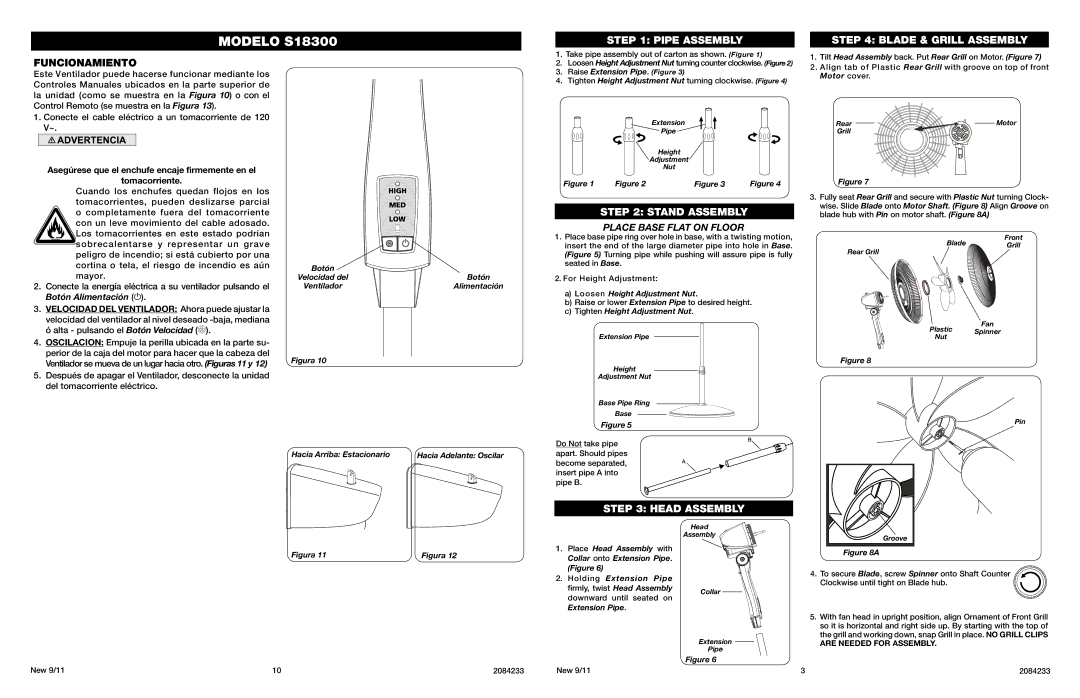
1. Take pipe assembly out of carton as shown. (Figure 1)


1. Tilt Head Assembly back. Put Rear Grill on Motor. (Figure 7)

FUNCIONAMIENTO

Este Ventilador puede hacerse funcionar mediante los Controles Manuales ubicados en la parte superior de la unidad (como se muestra en la Figura 10) o con el Control Remoto (se muestra en la Figura 13).

2. Loosen Height Adjustment Nut turning counter clockwise. (Figure 2)

2. Align tab of Plastic Rear Grill with groove on top of front

3.

Raise Extension Pipe. (Figure 3)

Motor cover.

4.

Tighten Height Adjustment Nut turning clockwise. (Figure 4)


1.Conecte el cable eléctrico a un tomacorriente de 120 V~.

Asegúrese que el enchufe encaje firmemente en el

tomacorriente.

Cuando los enchufes quedan flojos en los tomacorrientes, pueden deslizarse parcial o completamente fuera del tomacorriente con un leve movimiento del cable adosado. Los tomacorrientes en este estado podrían sobrecalentarse y representar un grave peligro de incendio; si está cubierto por una cortina o tela, el riesgo de incendio es aún mayor.

2.Conecte la energía eléctrica a su ventilador pulsando el Botón Alimentación ().

3.VELOCIDAD DEL VENTILADOR: Ahora puede ajustar la velocidad del ventilador al nivel deseado -baja, mediana ó alta - pulsando el Botón Velocidad ().

4.OSCILACION: Empuje la perilla ubicada en la parte su- perior de la caja del motor para hacer que la cabeza del Ventilador se mueva de un lugar hacia otro. (Figuras 11 y 12)

5.Después de apagar el Ventilador, desconecte la unidad del tomacorriente eléctrico.

Botón


Velocidad del

Botón

Ventilador

Alimentación

Figura 10

Extension

Pipe

Height

Adjustment

Nut

Figure 1

Figure 2

Figure 3

Figure 4

STEP 2: STAND ASSEMBLY

PLACE BASE FLAT ON FLOOR

1.Place base pipe ring over hole in base, with a twisting motion, insert the end of the large diameter pipe into hole in Base. (Figure 5) Turning pipe while pushing will assure pipe is fully seated in Base.

2.For Height Adjustment:

a)Loosen Height Adjustment Nut.

b)Raise or lower Extension Pipe to desired height.

c)Tighten Height Adjustment Nut.

Extension Pipe

Height

Adjustment Nut

Base Pipe Ring

Base


Figure 5


Do Not take pipe

B


Rear

Motor

Grill


Figure 7

3.Fully seat Rear Grill and secure with Plastic Nut turning Clock- wise. Slide Blade onto Motor Shaft. (Figure 8) Align Groove on blade hub with Pin on motor shaft. (Figure 8A)

Front

BladeGrill

Rear Grill

Fan

Plastic Spinner

Nut

Figure 8

Pin

Hacia Arriba: Estacionario

Hacia Adelante: Oscilar

apart. Should pipes


become separated,

A

insert pipe A into


pipe B.


STEP 3: HEAD ASSEMBLY

Figura 11

Figura 12

New 9/11

10

2084233

1.Place Head Assembly with Collar onto Extension Pipe.

(Figure 6)

2.Holding Extension Pipe firmly, twist Head Assembly downward until seated on Extension Pipe.

New 9/11

Head

Assembly

Collar

Extension

Pipe

Figure 6

Figure 8A

4. To secure Blade, screw Spinner onto Shaft Counter Clockwise until tight on Blade hub.

5.With fan head in upright position, align Ornament of Front Grill so it is horizontal and right side up. By starting with the top of the grill and working down, snap Grill in place. NO GRILL CLIPS

ARE NEEDED FOR ASSEMBLY.

3

2084233

Page 3
Image 3
Lasko S18300 manual Pipe Assembly Blade & Grill Assembly, Funcionamiento, Stand Assembly, Head Assembly

S18300 specifications

The Lasko S18300 is a portable, versatile fan designed to deliver exceptional airflow and comfort in a variety of settings. This fan stands out for its simplicity and effectiveness, making it a suitable addition to homes, offices, and garages alike.

One of the main features of the Lasko S18300 is its powerful motor, which delivers strong airflow, ensuring that spaces remain cool and comfortable, even during the hottest months. The fan is equipped with an adjustable head that oscillates, allowing it to distribute air more evenly across larger areas. This oscillation feature is particularly useful for refreshing air in rooms that may not have great ventilation.

Another important characteristic of the S18300 is its lightweight and portable design. Weighing in at just a few pounds, this fan can be easily moved from one room to another or even taken outdoors when needed. Its compact size also means that it can be stored away without taking up much space when not in use.

The Lasko S18300 has three speed settings, allowing users to customize airflow according to their comfort level. Whether you prefer a gentle breeze while sleeping or a stronger gust when working, this fan can accommodate varying needs. The easy-to-use control knobs are strategically placed on the front of the unit for quick adjustments.

In terms of safety, the S18300 is thoughtfully designed. It features a fused safety plug that prevents overheating, providing peace of mind for users when operating the fan for extended periods. Additionally, the fan is built with sturdy materials and has a stable base, reducing the risk of tipping over.

Energy efficiency is another benefit of the Lasko S18300. By using this fan instead of air conditioning during moderate temperatures, users can lower their energy bills while maintaining a comfortable environment.

Overall, the Lasko S18300 combines functionality and ease of use with its efficient design, making it a practical choice for anyone looking to enhance comfort in their living or work spaces.