COLUMN AND MOTOR ASSEMBLY

Locate Motor Hardware Bag to Assemble Column and Motor Assembly.

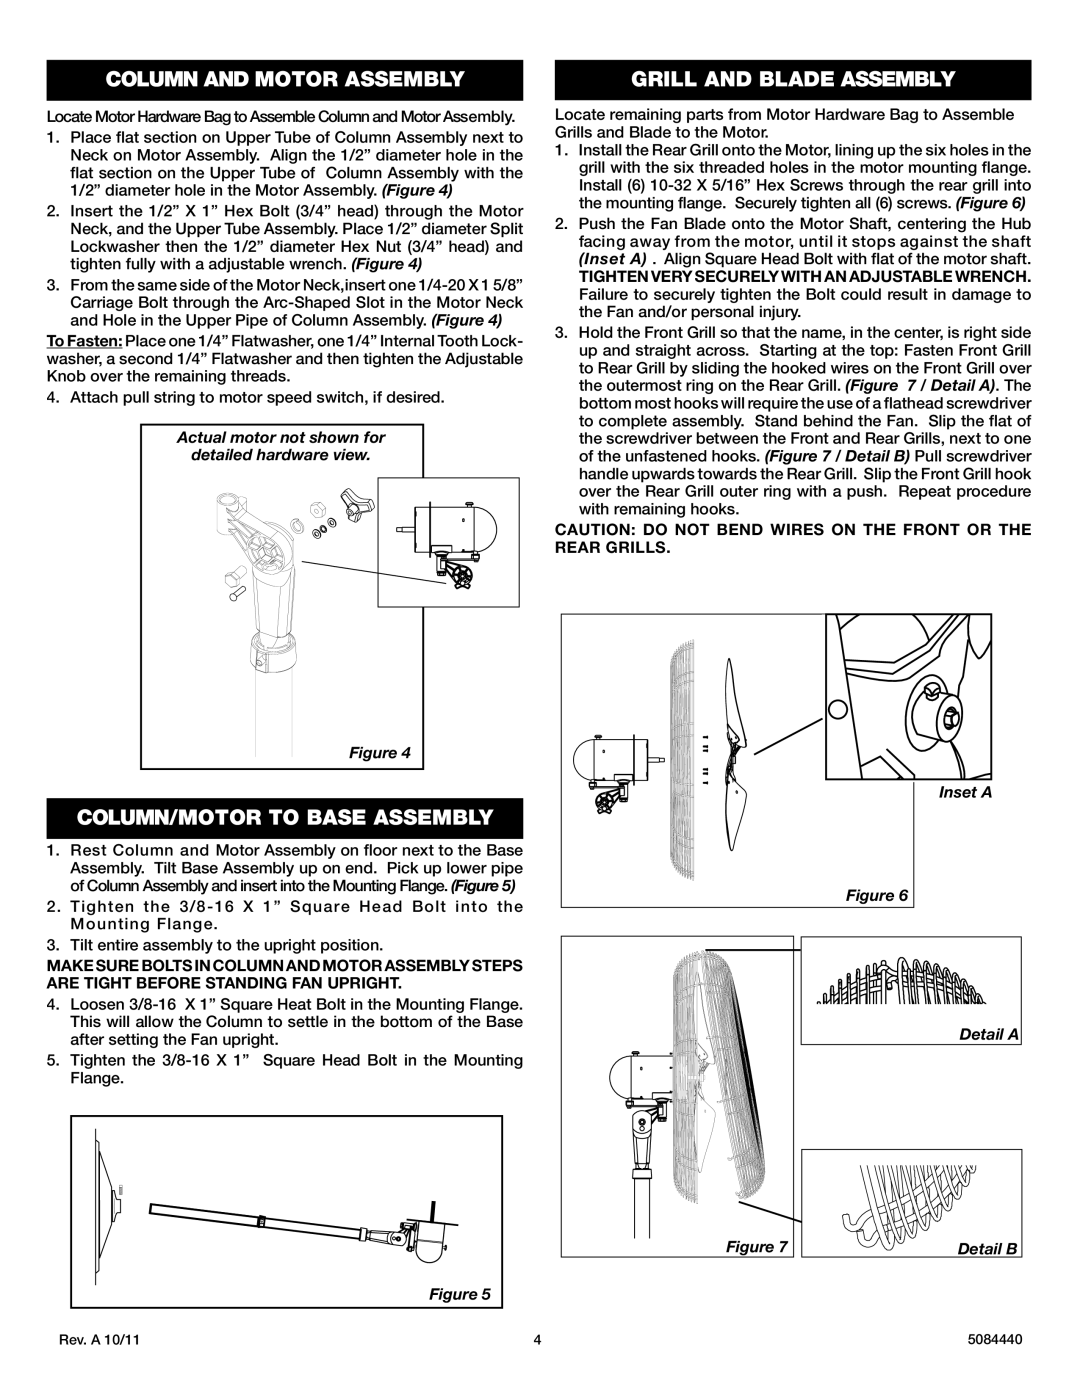
1.Place flat section on Upper Tube of Column Assembly next to Neck on Motor Assembly. Align the 1/2” diameter hole in the flat section on the Upper Tube of Column Assembly with the 1/2” diameter hole in the Motor Assembly. (Figure 4)

2.Insert the 1/2” X 1” Hex Bolt (3/4” head) through the Motor Neck, and the Upper Tube Assembly. Place 1/2” diameter Split Lockwasher then the 1/2” diameter Hex Nut (3/4” head) and tighten fully with a adjustable wrench. (Figure 4)

3.From the same side of the Motor Neck,insert one 1/4-20 X 1 5/8” Carriage Bolt through the Arc-Shaped Slot in the Motor Neck and Hole in the Upper Pipe of Column Assembly. (Figure 4)

To Fasten: Place one 1/4” Flatwasher, one 1/4” Internal Tooth Lock- washer, a second 1/4” Flatwasher and then tighten the Adjustable Knob over the remaining threads.

4. Attach pull string to motor speed switch, if desired.

Actual motor not shown for

detailed hardware view.

Figure 4

COLUMN/MOTOR TO BASE ASSEMBLY

1.Rest Column and Motor Assembly on floor next to the Base Assembly. Tilt Base Assembly up on end. Pick up lower pipe of Column Assembly and insert into the Mounting Flange. (Figure 5)

2. Tighten the 3/8-16 X 1” Square Head Bolt into the Mounting Flange.

3. Tilt entire assembly to the upright position.

MAKE SURE BOLTS IN COLUMN AND MOTOR ASSEMBLY STEPS ARE TIGHT BEFORE STANDING FAN UPRIGHT.

4.Loosen 3/8-16 X 1” Square Heat Bolt in the Mounting Flange. This will allow the Column to settle in the bottom of the Base after setting the Fan upright.

5.Tighten the 3/8-16 X 1” Square Head Bolt in the Mounting Flange.


Figure 5

Rev. A 10/11

4

GRILL AND BLADE ASSEMBLY

Locate remaining parts from Motor Hardware Bag to Assemble Grills and Blade to the Motor.

1.Install the Rear Grill onto the Motor, lining up the six holes in the grill with the six threaded holes in the motor mounting flange. Install (6) 10-32 X 5/16” Hex Screws through the rear grill into the mounting flange. Securely tighten all (6) screws. (Figure 6)

2.Push the Fan Blade onto the Motor Shaft, centering the Hub facing away from the motor, until it stops against the shaft (Inset A) . Align Square Head Bolt with flat of the motor shaft.

TIGHTEN VERY SECURELY WITH AN ADJUSTABLE WRENCH. Failure to securely tighten the Bolt could result in damage to the Fan and/or personal injury.

3.Hold the Front Grill so that the name, in the center, is right side up and straight across. Starting at the top: Fasten Front Grill to Rear Grill by sliding the hooked wires on the Front Grill over the outermost ring on the Rear Grill. (Figure 7 / Detail A). The bottom most hooks will require the use of a flathead screwdriver to complete assembly. Stand behind the Fan. Slip the flat of the screwdriver between the Front and Rear Grills, next to one of the unfastened hooks. (Figure 7 / Detail B) Pull screwdriver handle upwards towards the Rear Grill. Slip the Front Grill hook over the Rear Grill outer ring with a push. Repeat procedure with remaining hooks.

CAUTION: DO NOT BEND WIRES ON THE FRONT OR THE REAR GRILLS.

Inset A


Figure 6


Detail A

Figure 7

Detail B

5084440

Page 4
Image 4
Lasko X30400 instruction sheet Column and Motor Assembly, COLUMN/MOTOR to Base Assembly, Grill and Blade Assembly

X30400 specifications

The Lasko X30400 is a versatile and efficient tower fan that has garnered attention for its superb performance and innovative features. Designed with user convenience in mind, this fan offers a blend of comfort, functionality, and energy efficiency, making it a popular choice for households and offices alike.

One of the standout features of the Lasko X30400 is its powerful airflow capacity. With a high-velocity motor, it delivers a robust breeze that can effectively circulate air in larger spaces, ensuring that users can experience a cooling effect even in rooms with high ceilings or poor ventilation. The fan's three-speed settings allow for customizable airflow, letting users choose the intensity that best suits their comfort level.

The design of the Lasko X30400 is sleek and modern, making it an attractive addition to any environment. Its compact tower design optimizes floor space, enabling it to fit seamlessly into tight corners or small rooms without compromising on performance. The fan also includes an adjustable tilt feature, allowing users to direct airflow exactly where it's needed most.

In terms of technologies, the Lasko X30400 incorporates a built-in timer that allows users to set the fan to operate for a predetermined duration. This is particularly useful for those who prefer to fall asleep with the fan on or for energy-conscious consumers who want to avoid unnecessary power usage. Additionally, the fan operates quietly, ensuring minimal noise disruption, which is essential for use in bedrooms or quiet office environments.

For added convenience, the Lasko X30400 comes equipped with a remote control, enabling users to adjust settings from a distance. This feature enhances user comfort, particularly in larger rooms where getting up to change settings may be inconvenient.

Safety is another priority with the Lasko X30400, which includes an automatic shut-off feature in case of overheating. The sturdy base and built-in safety mechanisms ensure that the fan remains stable during operation, reducing the risk of accidents.

Overall, the Lasko X30400 tower fan represents a harmonious blend of style, technology, and practicality, making it an essential appliance for those seeking comfort and efficiency in their air circulation solutions. Whether for personal use in a bedroom, for a refreshing breeze in the living room, or for enhanced airflow in an office setting, the Lasko X30400 is a powerful ally in maintaining a comfortable environment.