LER 2062
Double Pocket Chart Stand with Storage
Assembly Instructions
R H Q
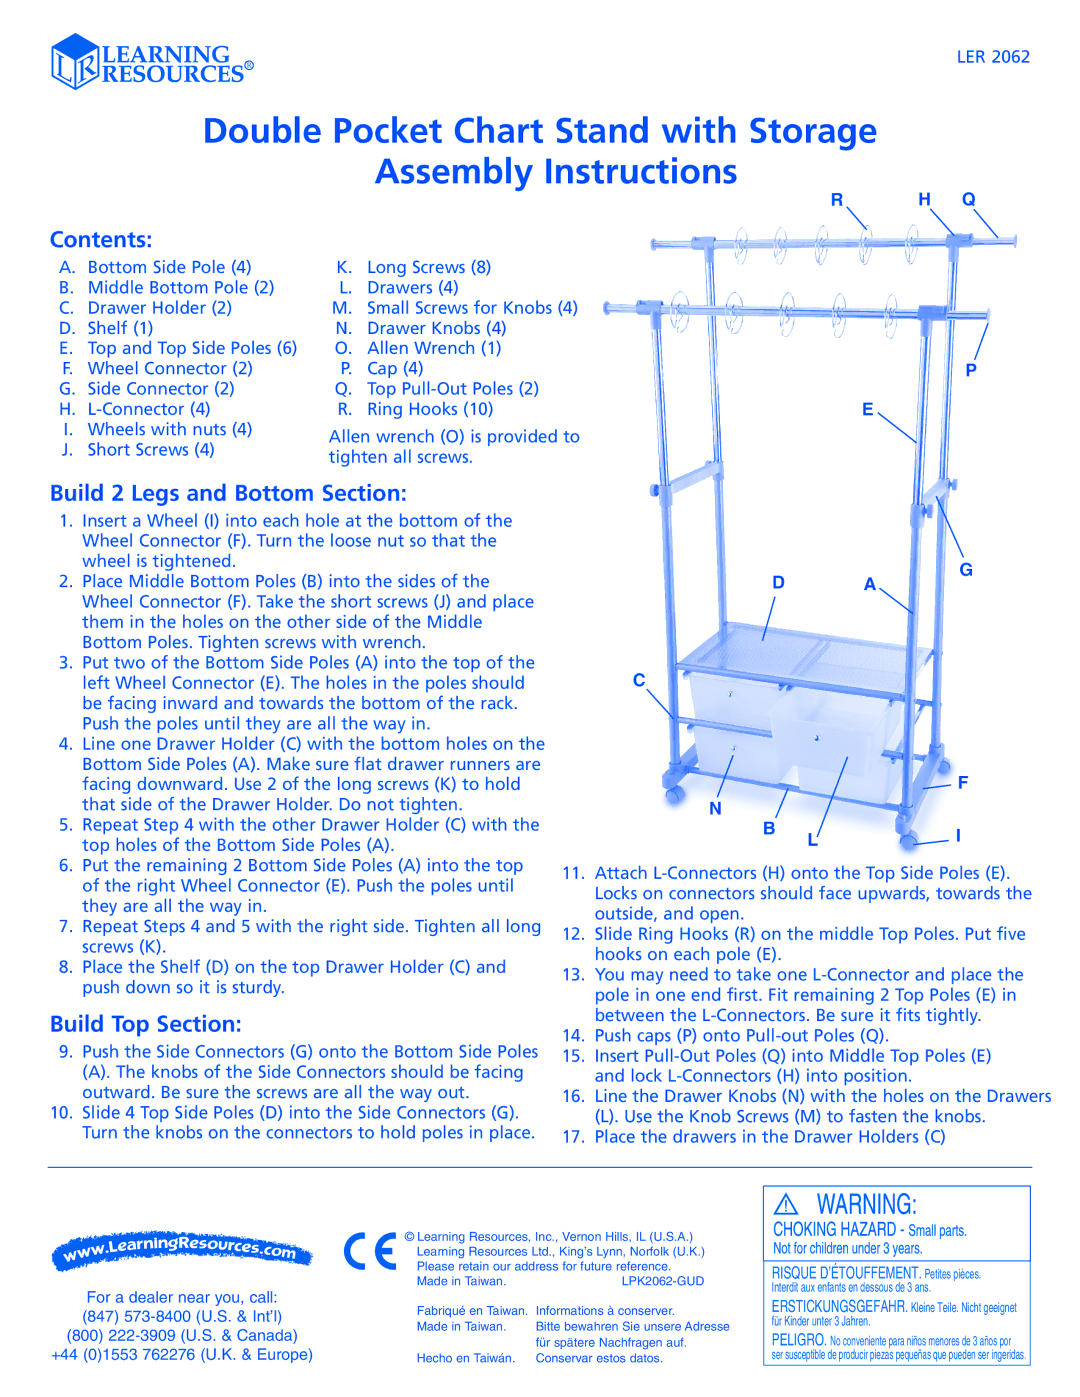
Contents:
A. | Bottom Side Pole (4) | K. | Long Screws (8) |
|
B. | Middle Bottom Pole (2) | L. | Drawers (4) |
|
C. | Drawer Holder (2) | M. | Small Screws for Knobs (4) |
|
D. | Shelf (1) | N. | Drawer Knobs (4) |
|
E. | Top and Top Side Poles (6) | O. | Allen Wrench (1) |
|
F. | Wheel Connector (2) | P. | Cap (4) | P |
G. | Side Connector (2) | Q. | Top | E |
H. | R. | Ring Hooks (10) | ||
I. | Wheels with nuts (4) | Allen wrench (O) is provided to |
| |
J. | Short Screws (4) |
| ||
tighten all screws. |
| |||
|
|
| ||
Build 2 Legs and Bottom Section:
1. | Insert a Wheel (I) into each hole at the bottom of the |
| Wheel Connector (F). Turn the loose nut so that the |
| wheel is tightened. |
2. | Place Middle Bottom Poles (B) into the sides of the |
| Wheel Connector (F). Take the short screws (J) and place |
| them in the holes on the other side of the Middle |
| Bottom Poles. Tighten screws with wrench. |
3. | Put two of the Bottom Side Poles (A) into the top of the |
| left Wheel Connector (E). The holes in the poles should |
| be facing inward and towards the bottom of the rack. |
| Push the poles until they are all the way in. |
4. | Line one Drawer Holder (C) with the bottom holes on the |
| Bottom Side Poles (A). Make sure flat drawer runners are |
D A
C
G
| facing downward. Use 2 of the long screws (K) to hold |
| that side of the Drawer Holder. Do not tighten. |
5. | Repeat Step 4 with the other Drawer Holder (C) with the |
| top holes of the Bottom Side Poles (A). |
6. | Put the remaining 2 Bottom Side Poles (A) into the top |
| of the right Wheel Connector (E). Push the poles until |
| they are all the way in. |
7. | Repeat Steps 4 and 5 with the right side. Tighten all long |
| screws (K). |
8. | Place the Shelf (D) on the top Drawer Holder (C) and |
| push down so it is sturdy. |
Build Top Section:
9.Push the Side Connectors (G) onto the Bottom Side Poles
(A). The knobs of the Side Connectors should be facing outward. Be sure the screws are all the way out.
10.Slide 4 Top Side Poles (D) into the Side Connectors (G). Turn the knobs on the connectors to hold poles in place.
![]() F
F
N
B LI
11.Attach
12.Slide Ring Hooks (R) on the middle Top Poles. Put five hooks on each pole (E).
13.You may need to take one
14.Push caps (P) onto
15.Insert
16.Line the Drawer Knobs (N) with the holes on the Drawers
(L). Use the Knob Screws (M) to fasten the knobs.
17.Place the drawers in the Drawer Holders (C)
For a dealer near you, call:
(847)
(800)
+44 (0)1553 762276 (U.K. & Europe)
© Learning Resources, Inc., Vernon Hills, IL (U.S.A.) Learning Resources Ltd., King’s Lynn, Norfolk (U.K.) Please retain our address for future reference.
Made in Taiwan. |
Fabriqué en Taiwan. Informations à conserver.
Made in Taiwan. Bitte bewahren Sie unsere Adresse für spätere Nachfragen auf.
Hecho en Taiwán. Conservar estos datos.
RISQUE D’ÉTOUFFEMENT. Petites pièces. Interdit aux enfants en dessous de 3 ans.
ERSTICKUNGSGEFAHR. Kleine Teile. Nicht geeignet für Kinder unter 3 Jahren.
PELIGRO. No conveniente para niños menores de 3 años por ser susceptible de producir piezas pequeñas que pueden ser ingeridas.