BASIC OPERATION
When PTY is selected, the radio starts to search corresponding PTY information, and stops if the
corresponding PTY information is detected.
If corresponding PTY information is not existed any more, PTY type is automatically exit to normal mode.
20.TA BUTTON(for RDS model only)
TAfunction [TRAFFICANNOUNCEMENT] BUTTON(For RDS only)
When pressed short, it is activated as TAmode on or off. When TAmode is on and traffic announcement is transmitted:
1).When the unit is in CD mode, it will switch to radio mode temporarily.
2).Temporary switch over to an EON linked station when EON detects a traffic announcement on that other program.
3).If the volume level was under the threshold point, it will be raised to the threshold point. But the user changed the volume level which was more than the threshold point(min. TA volume level),it will be set to the last level.
When pressed long , it is selected EONTA LOCAL / EONTADISTANCE mode. The purpose of this key is to reduce unwanted EON TAswitching, which EON TA information was received from current station and the radio switched to that EON linked station, but no information could not be received because the EON linked station is located too far from that area.
So the radio is switched back to current station again.
In above operation, a customer listen to a wrong program or mute sound for a while.
-EONTA LOCAL mode
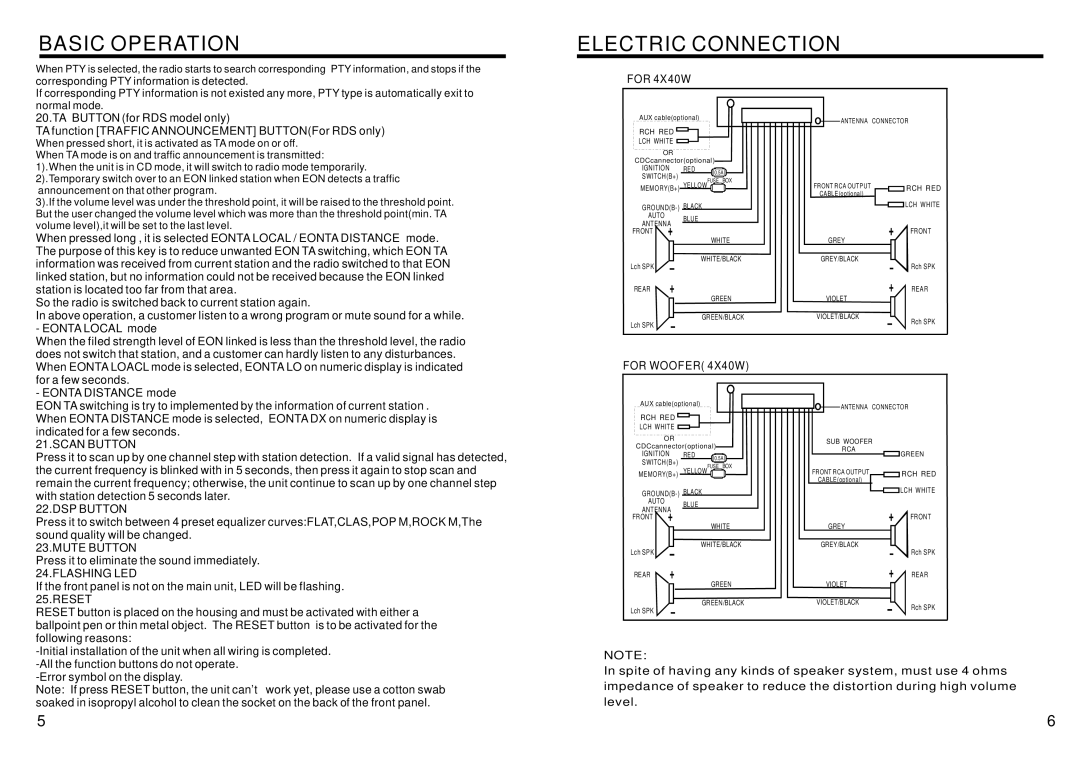
ELECTRIC CONNECTION
FOR 4X40W
AUX cable(optional) | ANTENNA CONNECTOR |
|
RCH RED ![]()
![]() LCH WHITE
LCH WHITE ![]()
OR |
|
|
|
|
CDCcannector(optional) |
|
| ||
IGNITION | RED | 0.5A |
|
|
SWITCH(B+) |
|
|
| |
|
|
|
| |
MEMORY(B+) YELLOWFUSE BOX | FRONT RCA OUTPUT | RCH RED | ||
|
|
| CABLE(optional) |
|
| LCH WHITE | |||
AUTO | BLUE |
|
|
|
ANTENNA |
|
|
| |
|
|
| FRONT | |
FRONT |
| WHITE | GREY | |
|
|
| ||
Lch SPK |
| WHITE/BLACK | GREY/BLACK | Rch SPK |
|
|
| ||
REAR |
| GREEN | VIOLET | REAR |
|
|
| ||
Lch SPK |
| GREEN/BLACK | VIOLET/BLACK | Rch SPK |
|
|
| ||
|
|
|
| |
When the filed strength level of EON linked is less than the threshold level, the radio does not switch that station, and a customer can hardly listen to any disturbances. When EONTALOACL mode is selected, EONTALO on numeric display is indicated for a few seconds.
-EONTA DISTANCE mode
EON TAswitching is try to implemented by the information of current station . When EONTADISTANCE mode is selected, EONTADX on numeric display is indicated for a few seconds.
21.SCAN BUTTON
Press it to scan up by one channel step with station detection. If a valid signal has detected, the current frequency is blinked with in 5 seconds, then press it again to stop scan and remain the current frequency; otherwise, the unit continue to scan up by one channel step with station detection 5 seconds later.
22.DSP BUTTON
Press it to switch between 4 preset equalizer curves:FLAT,CLAS,POP M,ROCK M,The sound quality will be changed.
23.MUTE BUTTON
Press it to eliminate the sound immediately.
24.FLASHING LED
If the front panel is not on the main unit, LED will be flashing.
25.RESET
RESET button is placed on the housing and must be activated with either a ballpoint pen or thin metal object. The RESET button is to be activated for the following reasons:
FOR WOOFER( 4X40W)
AUX cable(optional)
RCH RED ![]()
![]() LCH WHITE
LCH WHITE ![]()
OR
CDCcannector(optional)
IGNITION RED ![]()
![]() 0.5A
0.5A
SWITCH(B+) BOX MEMORY(B+) YELLOWFUSE ![]()
AUTO BLUE
ANTENNA
FRONT
WHITE
WHITE/BLACK
Lch SPK
REAR
GREEN
GREEN/BLACK
Lch SPK
![]() ANTENNA CONNECTOR
ANTENNA CONNECTOR
SUB WOOFER
RCA
GREEN
FRONT RCA OUTPUT | RCH RED |
CABLE(optional) |
|
| LCH WHITE |
FRONT
GREY
GREY/BLACK
Rch SPK
REAR
VIOLET
VIOLET/BLACK | Rch SPK |
|
Note: If press RESET button, the unit can't work yet, please use a cotton swab soaked in isopropyl alcohol to clean the socket on the back of the front panel.
NOTE:
In spite of having any kinds of speaker system, must use 4 ohms impedance of speaker to reduce the distortion during high volume level.
5 | 6 |
