8

Step 6. Route the Class 0 air duct out the back wall or side wall, up through the ceiling or floor joists to an outside wall. The air duct should be located above snow level.

Note: If the fireplace is installed against an inside wall, the Class 0 air duct may be ex- tended into a ventilated attic space at least 18" (457 mm) above the attic floor. Secure the duct hood to a vertical post with the inlet positioned downward. Ensure nothing blocks the hood opening. This air duct must never terminate higher than the chimney.

Step 7. Cut or frame hole through the outside wall for the installation of the duct inlet hood. A 4 ¹⁄₄" (114 mm) diameter hole is sufficient. Feed the loose end of the flexible air duct through the hole cut for the inlet hood and attach to collar on inlet hood using two (2) screws. Insert hood into opening. Secure in place with nails driven through holes in hood flange. Seal with noncombustible waterproof silicon type caulking. If additional air duct is needed, use Class 0 metallic air duct.

Step 8. Fireplace should be secured to side framing members using the full length nailing tabs at the top and bottom of the fireplace front face. Use 8d nails or equivalent (Figure 17 ).

8d Nail Or

Equivalent

Figure 17

Note: The nailing tabs and the area directly behind the nailing tabs are exempt from the clearances described on page 5. Maintain at least 1/2" clearance from the firebox wrapper to the framing at the closest point of contact, directly adjacent to the flange.

INSTALLING THE CHIMNEY SYSTEM

Step 1. Before continuing, check the operation of the damper, as described on page 4, (refer to Figure 3 ).

Step 2. Using standard construction framing techniques, construct opening for chimney route up through the ceiling(s) and roof or through an outside chase.

Framing must maintain adequate minimum air space clearance at all times.

CAUTION: ALLOW MINIMUM 2" (51 MM)

CHIMNEY AIR SPACE TO COMBUSTIBLE FRAMING MEMBERS THROUGHOUT VERTI- CAL OR OFFSET CHIMNEY INSTALLATION (SEE **NOTE ).

A minimum 2" (51 mm) air space must be reserved for all combustible materials ex- tending for any continuous length surround- ing the chimney (See **Note).

Reference Figures 14 and 15 and charts Fram- ing Dimensions for Ceiling and Roof, which specify minimum ceiling and roof dimensions.

To determine chimney center line in new con- struction, use plumb line from roof or ceiling above fireplace to center of flue collar on fireplace.

For remodeling, plumb to center of flue collar from ceiling above, drive nail through ceiling from below to mark position, then mark and cut to passage from above ceiling (around nail) (Figure 18 ). Then plumb from ceiling or roof level directly above hole which has just been completed.

Plumb Line

Figure 18

NOTE: DIAGRAMS & ILLUSTRATIONS NOT TO SCALE.

Note: If installing the optional collar duct kit, it should be installed after the chimney has been attached to the flue collar.

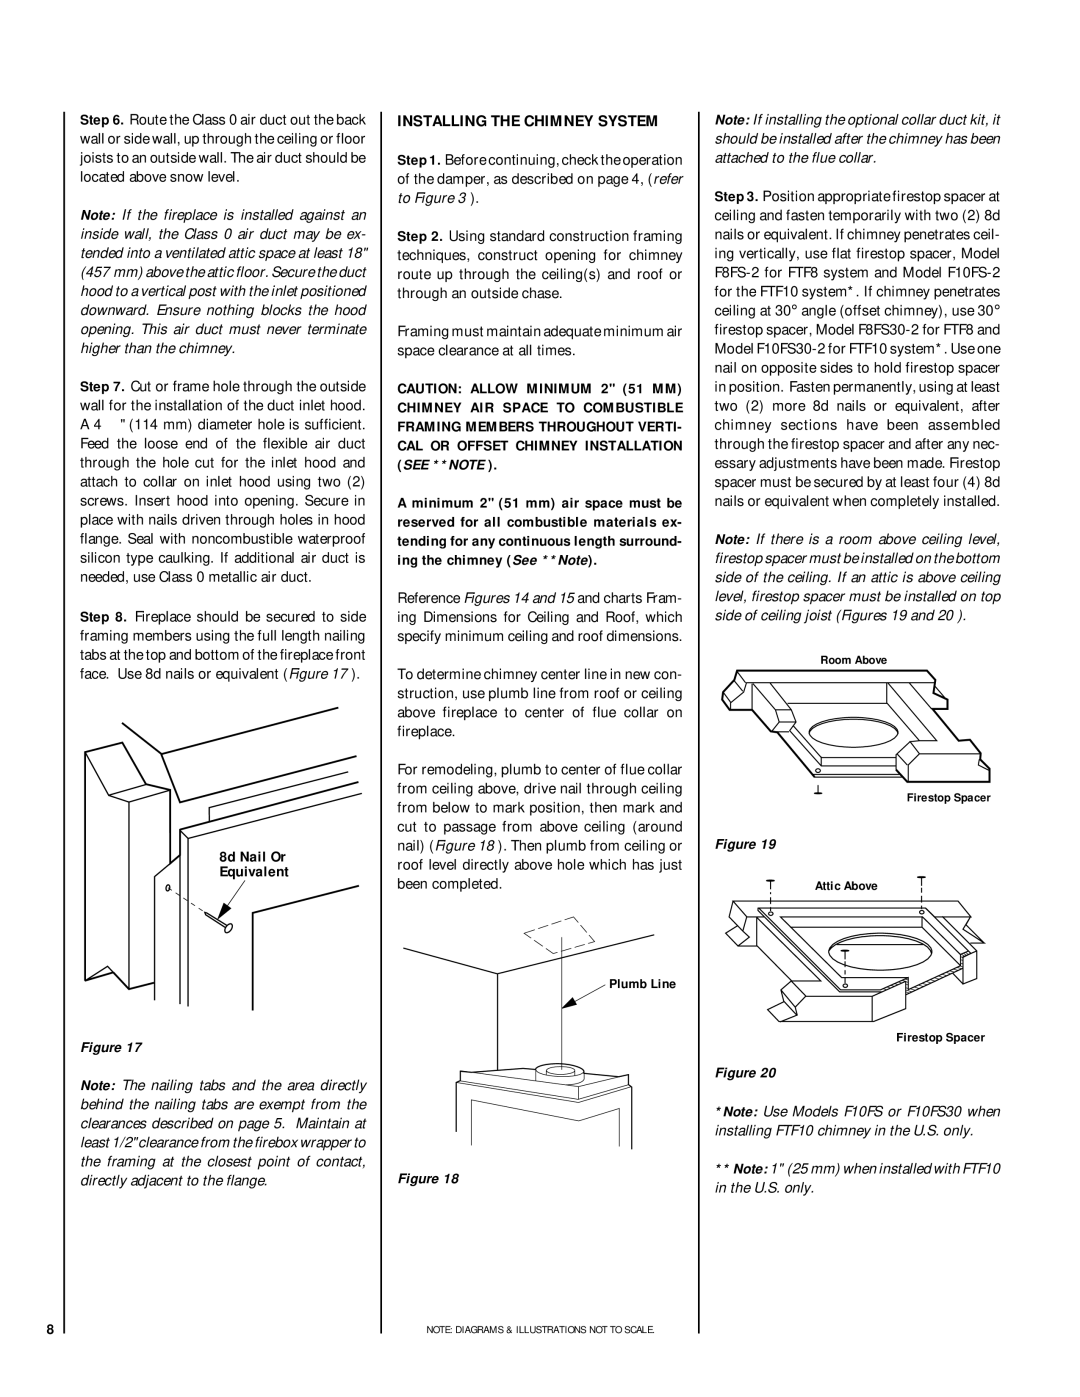
Step 3. Position appropriate firestop spacer at ceiling and fasten temporarily with two (2) 8d nails or equivalent. If chimney penetrates ceil- ing vertically, use flat firestop spacer, Model F8FS-2 for FTF8 system and Model F10FS-2 for the FTF10 system*. If chimney penetrates ceiling at 30° angle (offset chimney), use 30° firestop spacer, Model F8FS30-2 for FTF8 and Model F10FS30-2 for FTF10 system*. Use one nail on opposite sides to hold firestop spacer in position. Fasten permanently, using at least two (2) more 8d nails or equivalent, after chimney sections have been assembled through the firestop spacer and after any nec- essary adjustments have been made. Firestop spacer must be secured by at least four (4) 8d nails or equivalent when completely installed.

Note: If there is a room above ceiling level, firestop spacer must be installed on the bottom side of the ceiling. If an attic is above ceiling level, firestop spacer must be installed on top side of ceiling joist (Figures 19 and 20 ).

Room Above

Firestop Spacer

Figure 19

Attic Above

Firestop Spacer

Figure 20

*Note: Use Models F10FS or F10FS30 when installing FTF10 chimney in the U.S. only.

**Note: 1" (25 mm) when installed with FTF10 in the U.S. only.

Page 8
Image 8
Lennox Hearth CR-3835R Installing the Chimney System, 8d Nail Or Equivalent, Room Above Firestop Spacer Attic Above

CR-3835R specifications

The Lennox Hearth CR-3835R is a contemporary gas fireplace that exemplifies modern design and advanced technology, creating an ideal centerpiece for any stylish living space. This model seamlessly combines aesthetic appeal with functional efficiency, making it a sought-after choice for homeowners looking to enhance their interiors.

One of the standout features of the CR-3835R is its impressive heat output. With a heating capacity of up to 35,000 BTUs, this fireplace effectively warms up areas ranging from 1,000 to 1,500 square feet, ensuring comfort during chilly months. The adjustable flame height allows users to customize the ambiance according to their preferences, providing a cozy atmosphere or a striking visual display.

The CR-3835R boasts an advanced design that incorporates a sealed firebox. This feature not only improves energy efficiency but also ensures that outdoor air doesn't compromise indoor air quality. The fireplace utilizes an electronic ignition system, which enhances convenience and reliability. With the ability to operate even during power failures, the CR-3835R is a dependable addition to any home.

Another notable characteristic of the Lennox Hearth CR-3835R is its use of high-quality materials. The fireplace is constructed with durable steel and features a refined glass front, allowing an unobstructed view of the flames. The elegant design is complemented by customizable finishing options, enabling users to select styles that align with their interior decor.

In terms of safety, the CR-3835R includes features such as a built-in safety shut-off valve, providing peace of mind for homeowners. The fireplace is also certified for use in a variety of settings, including conventional and direct vent applications. This versatility makes it suitable for a range of installation options.

Moreover, the Lennox Hearth CR-3835R is designed with user-friendly controls, including remote operation capabilities. This function allows for effortless adjustment of settings from the comfort of one's seat, adding an extra layer of convenience to the overall experience.

In summary, the Lennox Hearth CR-3835R combines stylish design, high efficiency, and advanced technology. Its impressive heat output, customizable features, and user-friendly operation make it an excellent choice for those seeking a modern gas fireplace that enhances both comfort and aesthetics in their home. With the CR-3835R, homeowners can enjoy the warmth and ambiance of a traditional fireplace, redefined for contemporary living.