Step 4c | ||
|
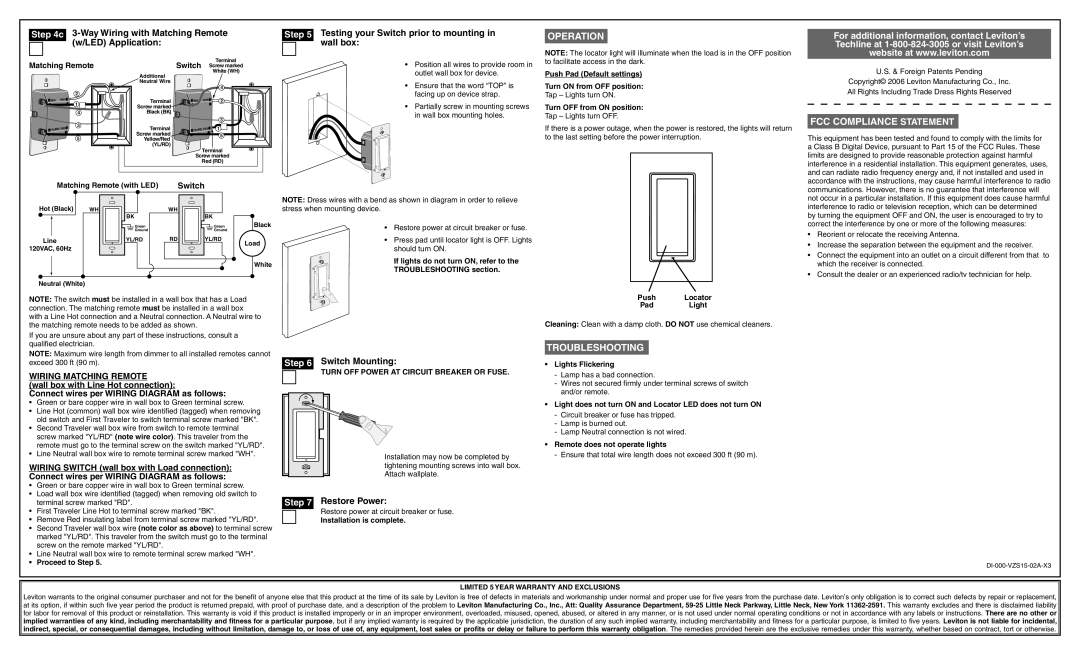
| (w/LED) Application: |
|
| |
Step 5 | Testing your Switch prior to mounting in | |
|
| wall box: |
|
| |
OPERATION
For additional information, contact Leviton’s Techline at
Matching Remote
2
BK | WH |
| 1 |
| 4 |
| 3 |
YL/RD | RD |
| 5 |
Terminal
Switch Screw marked
White (WH)
Additional
Neutral Wire
4
Terminal | BK | WH | 2 |
Screw marked |
|
|
|
Black (BK) |
|
|
|
|
|
| 3 |
Terminal | YL/RD RD | 1 |
Screw marked |
| 5 |
Yellow/Red |
| |
|
| |
(YL/RD) |
|
|
Terminal
Screw marked
Red (RD)
• Position all wires to provide room in |
outlet wall box for device. |
• Ensure that the word “TOP” is |
facing up on device strap. |
• Partially screw in mounting screws |
in wall box mounting holes. |
NOTE: The locator light will illuminate when the load is in the OFF position to facilitate access in the dark.
Push Pad (Default settings)
Turn ON from OFF position:
Tap – Lights turn ON.
Turn OFF from ON position:
Tap – Lights turn OFF.
If there is a power outage, when the power is restored, the lights will return to the last setting before the power interruption.
website at www.leviton.com
U.S. & Foreign Patents Pending
Copyright© 2006 Leviton Manufacturing Co., Inc.
All Rights Including Trade Dress Rights Reserved
FCC COMPLIANCE STATEMENT
This equipment has been tested and found to comply with the limits for a Class B Digital Device, pursuant to Part 15 of the FCC Rules. These limits are designed to provide reasonable protection against harmful interference in a residential installation. This equipment generates, uses, and can radiate radio frequency energy and, if not installed and used in accordance with the instructions, may cause harmful interference to radio
Matching Remote (with LED) | Switch |
communications. However, there is no guarantee that interference will
Hot (Black)
Line 120VAC, 60Hz
WH | WH |
BK
![]() Green
Green
![]() Ground
Ground
YL/RD RD
BK
![]() Green
Green ![]() Ground
Ground
YL/RD
Black
Load
White
NOTE: Dress wires with a bend as shown in diagram in order to relieve stress when mounting device.
•Restore power at circuit breaker or fuse.
•Press pad until locator light is OFF. Lights should turn ON.
If lights do not turn ON, refer to the
TROUBLESHOOTING section.
not occur in a particular installation. If this equipment does cause harmful interference to radio or television reception, which can be determined by turning the equipment OFF and ON, the user is encouraged to try to correct the interference by one or more of the following measures:
•Reorient or relocate the receiving Antenna.
•Increase the separation between the equipment and the receiver.
•Connect the equipment into an outlet on a circuit different from that to which the receiver is connected.
•Consult the dealer or an experienced radio/tv technician for help.
Neutral (White)
NOTE: The switch must be installed in a wall box that has a Load connection. The matching remote must be installed in a wall box with a Line Hot connection and a Neutral connection. A Neutral wire to the matching remote needs to be added as shown.
If you are unsure about any part of these instructions, consult a qualified electrician.
NOTE: Maximum wire length from dimmer to all installed remotes cannot exceed 300 ft (90 m).
WIRING MATCHING REMOTE
(wall box with Line Hot connection):
Connect wires per WIRING DIAGRAM as follows:
•Green or bare copper wire in wall box to Green terminal screw.
•Line Hot (common) wall box wire identified (tagged) when removing old switch and First Traveler to switch terminal screw marked "BK".
•Second Traveler wall box wire from switch to remote terminal screw marked "YL/RD" (note wire color). This traveler from the remote must go to the terminal screw on the switch marked "YL/RD".
•Line Neutral wall box wire to remote terminal screw marked "WH".
WIRING SWITCH (wall box with Load connection): Connect wires per WIRING DIAGRAM as follows:
Step 6 Switch Mounting:
TURN OFF POWER AT CIRCUIT BREAKER OR FUSE.
Installation may now be completed by tightening mounting screws into wall box. Attach wallplate.
Push Locator
Pad Light
Cleaning: Clean with a damp cloth. DO NOT use chemical cleaners.
TROUBLESHOOTING
•Lights Flickering
-Lamp has a bad connection.
-Wires not secured firmly under terminal screws of switch and/or remote.
•Light does not turn ON and Locator LED does not turn ON
-Circuit breaker or fuse has tripped.
-Lamp is burned out.
-Lamp Neutral connection is not wired.
•Remote does not operate lights
-Ensure that total wire length does not exceed 300 ft (90 m).
•Green or bare copper wire in wall box to Green terminal screw.
•Load wall box wire identified (tagged) when removing old switch to terminal screw marked "RD".
•First Traveler Line Hot to terminal screw marked "BK".
•Remove Red insulating label from terminal screw marked "YL/RD".
•Second Traveler wall box wire (note color as above) to terminal screw marked "YL/RD". This traveler from the switch must go to the terminal screw on the remote marked "YL/RD".
•Line Neutral wall box wire to remote terminal screw marked "WH".
•Proceed to Step 5.
Step 7 Restore Power:
Restore power at circuit breaker or fuse.
Installation is complete.
LIMITED 5 YEAR WARRANTY AND EXCLUSIONS
Leviton warrants to the original consumer purchaser and not for the benefit of anyone else that this product at the time of its sale by Leviton is free of defects in materials and workmanship under normal and proper use for five years from the purchase date. Leviton’s only obligation is to correct such defects by repair or replacement, at its option, if within such five year period the product is returned prepaid, with proof of purchase date, and a description of the problem to Leviton Manufacturing Co., Inc., Att: Quality Assurance Department,