LCD TV
Page
FCC Notice
Important Safety Instructions
Safety Instructions
Disconnecting Device from Mains
Exposed to dripping or splashing and no
Grounding
Contents
External Control Through RS-232C
Clock Setting
On Disposal
Accessories
Preparation
Preparation
Input Menu Enter Volume Channel
Front Panel Information
Button + Buttons
Menu Button
Volume +
Buttons
Enter Button
Image shown may differ from your TV
Back Panel Information
Preparation Audio OUT
Audio RGB/DVI
ANTENNA/CABLE
Digital Audio OUT Optical
Assemble the TV as shown
Stand Installation
Cushioned surface to protect the screen from damage
Stand Body Cover Base
How to remove
Cable Management
Connect the cables as necessary
Vesa Wall Mounting
Desktop Pedestal Installation
Protection Cover
Protection Cover
Hinge Body
Insert the Protection Cover into the TV
Screw Provided as parts of the product
Attaching the TV to a Desk Only 26LG30
Antenna Analog or Digital
Antenna or Cable Connection
How to use
External Equipment Setup
HD Receiver Setup
How to connect
45.00 60.00 1920x1080i 33.72 59.94
External Equipment Setup
480p
44.96
45.00 60.00
Hdmi Connection
Connect the digital set-top box to HDMI/DVI Jack on the TV
HDMI-DTV
Or 3 jack on the TV
Connect the digital set-top box to HDMI/DVI IN1
DVI to Hdmi Connection
19/22LG30, 19/22LG31 26LG30
DVD Setup
Video Connection
External Equipment Setup
Hdmi Connection
Antenna Connection
VCR Setup
Composite RCA Connection
Antenna Cable Udio
You can listen to the sound through the headphone
Other A/V Source Setup Only 26LG30
Analog
Digital
Connect audio outputs to the TV’s Audio OUT jacks
VGA D-Sub 15 pin Connection
PC Setup
Audio RGB/DVI
59.94 800x600
Only RGB-PC mode
720x400
640x480
Select Screen RGB-PC
Screen Setup for PC mode
Selecting Resolution
Select Resolution
Yes
Auto Configure
Select Auto config
Can adjust the Position, S i z e or Phase
Adjustment for screen Position, Size, and Phase
Enter Select Reset
Screen Reset Reset to original factory values
Remote Control Functions
Watching TV / Channel Control
Watching TV / Channel Control
Flashbk
Installing Batteries
Volume Adjustment
Turning on TV
Channel Selection
Control
Quick Menu
Select Home Mode
Initial Setting
Mode setting
Time setting
You can also adjust Initial Setting in the Option menu
Option setting
Auto Tuning
Start Auto Tuning
For USAFor Canada
ON-SCREEN Menus Selection
Watching
TV / Channel Control
Channel Setup
Auto Scan Auto Tuning
Auto Tuning
Watching TV
Add/Delete Channel Manual Tuning
Select Manual Tuning
Manual Tuning
Channel Edit
Channel Editing
Input List
With using Option menu With using Input button
Input Label
Input Label
Picture Control
Picture Size Aspect Ratio Control
Picture Control
Set by program
Sport, or Game
Preset Picture Settings
Picture Mode Preset
Are not adjustable
Color Tone Preset
Medium
Advanced Control
Select Backlight, Contrast, Brightness
Manual Picture Adjustment
Picture Mode User Mode
Picture
Off
Picture Improvement Technology
Low
Advanced Control Black Darkness Level
Menu Select Picture
Select Black
Advanced Control EYE Care Only 26LG30
Advanced Control Advanced Control Gamma
Advanced Control Real Cinema
Reset
Picture Reset
Select Reset
Initialize the adjusted value
Select Power Indicator
Power Indicator
Menu Select Option
Auto Volume Off Balance
Sound & Language Control
Sound & Language Control
Preset Sound Settings Sound Mode
Sound
Language Control
Sound Setting Adjustment User Mode
Select Balance
Balance
TV Speaker Off
Turn the TV speakers off if using external audio equipment
Audio Reset
STEREO/SAP Broadcast Setup
Analog TV
Digital TV
Audio Language
Select Option Select Language Select Audio
Language English English Menu
ON-SCREEN Menus Language Selection
Menus can be shown on the screen in the selected language
Language English
Text
Caption Mode
Analog Broadcasting System Captions
Caption
Digital Broadcasting System Captions
Select CC1-4, Text1-4, or Service1
Caption Option
Digital Option
Custom G
Time Setting
Time Setting
Clock Setting
Auto Clock Setup
Manual Clock Setup
Return to the previous menu Return to TV viewing
Clock Feb/21/2008 F Manual
Auto ON/OFF Time Setting
Setting
Time
Sleep Timer Setting
Sleep Time turns the TV off at the preset time
Sleep Timer Off
Auto SHUT-OFF Setting
Auto Sleep Off
Auto Sleep
Chip rating and categories
SET Password & Lock System
Setting up Your Password
Parental Control / Ratings
Parental Control / Rating
Select Lock Input the password Select Lock System
Is enable
Lock System
Set Password
Set Password
Change the password by inputting a new password twice
Input the password Select Set password
Block Channel
Channel Blocking
Movie & TV Rating
Movie Rating Mpaa Only for USA
Control / Rating
TV Rating-Children Age
TV Rating Children Only for USA
TV-PG, TV-14, TV-MA
TV Rating General Only for USA
Select block options
TV-PG,TV-14
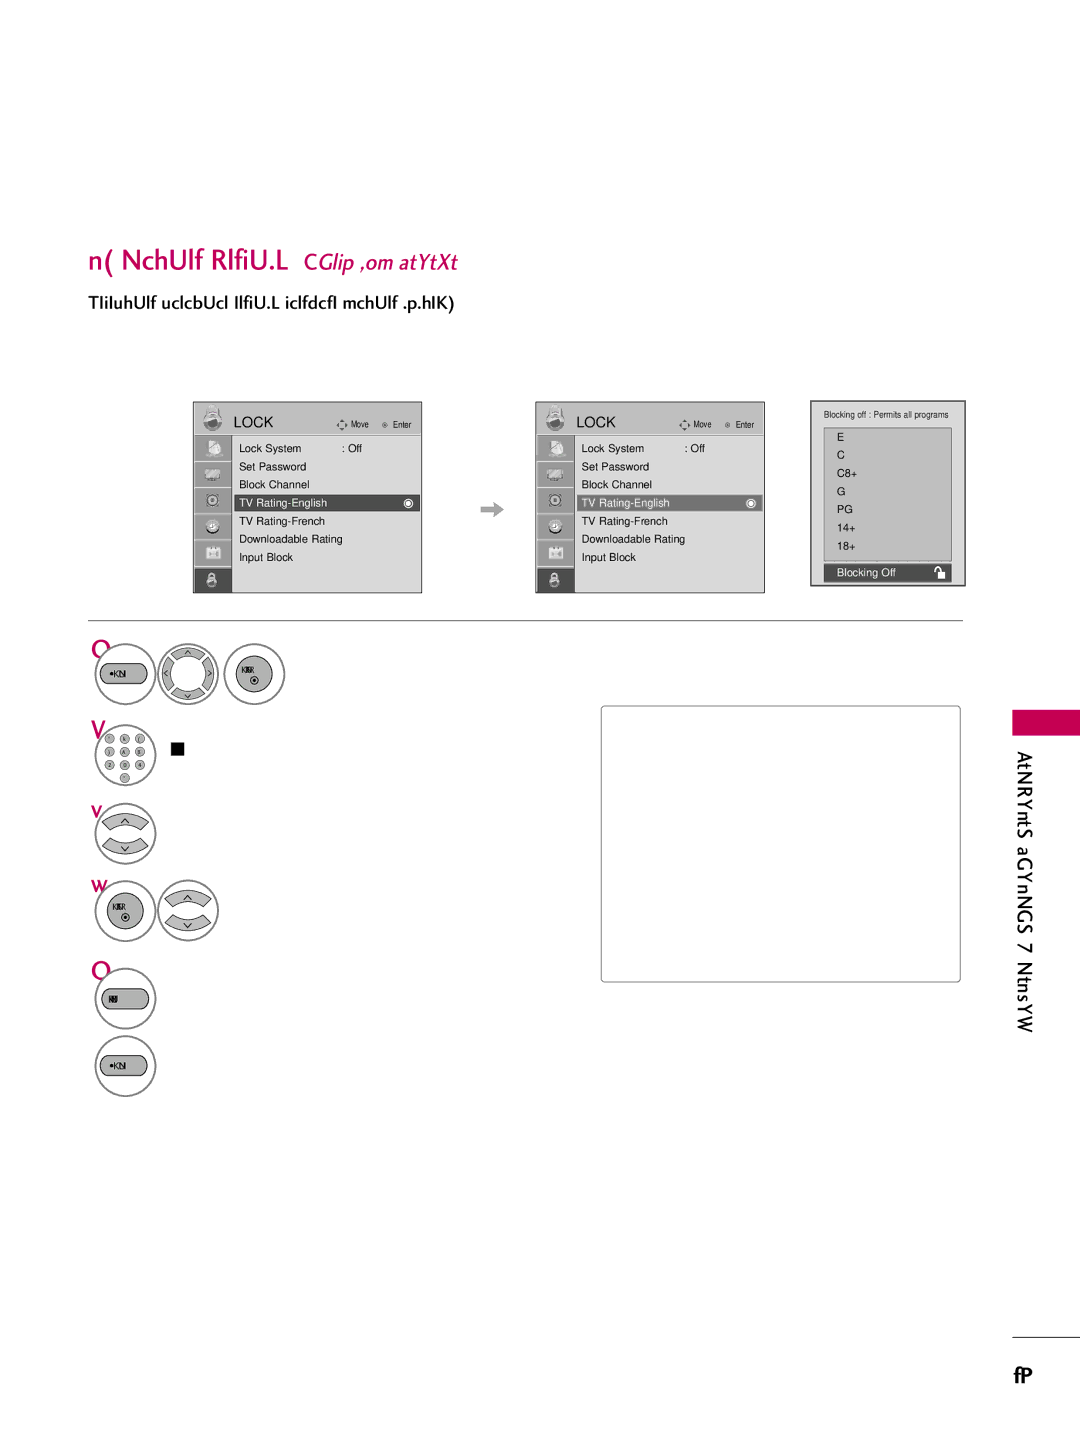
TV Rating English Only for Canada
Selecting canadian english language rating system
TV Rating-English
Select E, G, 8ans+, 13ans+
TV Rating French Only for Canada
Selecting canadian french language rating system
Parental
Downloadable Rating
Downloadable Rating
Enables you to block an input
External Input Blocking
Input Block
KEY Lock
Return to TV viewing While viewing the TV
Key Lock Off
Appendix
Troubleshooting
Remote control Doesn’t work Power is suddenly Turned off
Appendix
Vertical bar or stripe on Background
Picture OK & No sound No output from one Speakers
Extended Absence
Maintenance
Cleaning the Screen
Cleaning the Cabinet
Models
Product Specifications
RS-232C Setup
Communication Parameters
GND
Set ID
RS-232C Configurations
Either cable below can be used
RXD TXD GND DTR DSR RTS CTS
Transmission / Receiving Protocol
Command Reference List
Set ID DataCr
Data 00 Lock off Data 01 Lock on
Step
Version 2, June
GNU General Public License
101
102
103
GNU Lesser General Public License
105
106
107
108
Mozilla Public License
110
111
112
113