CX265B_Bell_Eng_QSG1.1_090513.qxd 5/15/09 10:06 AM Page 1
ENGLISH
LG265 Quick Reference Guide
Some of content in this user guide may be different from your phone depending on the software of the phone or your service provider. Features and specifications might be subject to change without prior notice.
Getting Started With Your Phone
Installing the Battery | Removing the Battery | |
1 . Remove the battery cover by sliding it | 1 | . Turn off the phone, then push the bat- |
upward. Align the battery with the ter- |
| tery cover from down to up such as |
minals near the bottom of the phone. |
| shown below. |
Align the battery cover then slide it | 2 | . While holding the battery cover, lift |
downward until it clicks into place. |
| and remove the battery cover. |
| 3 | . Lift the top of the battery out using |
|
| the fingertip cutouts, then remove it. |
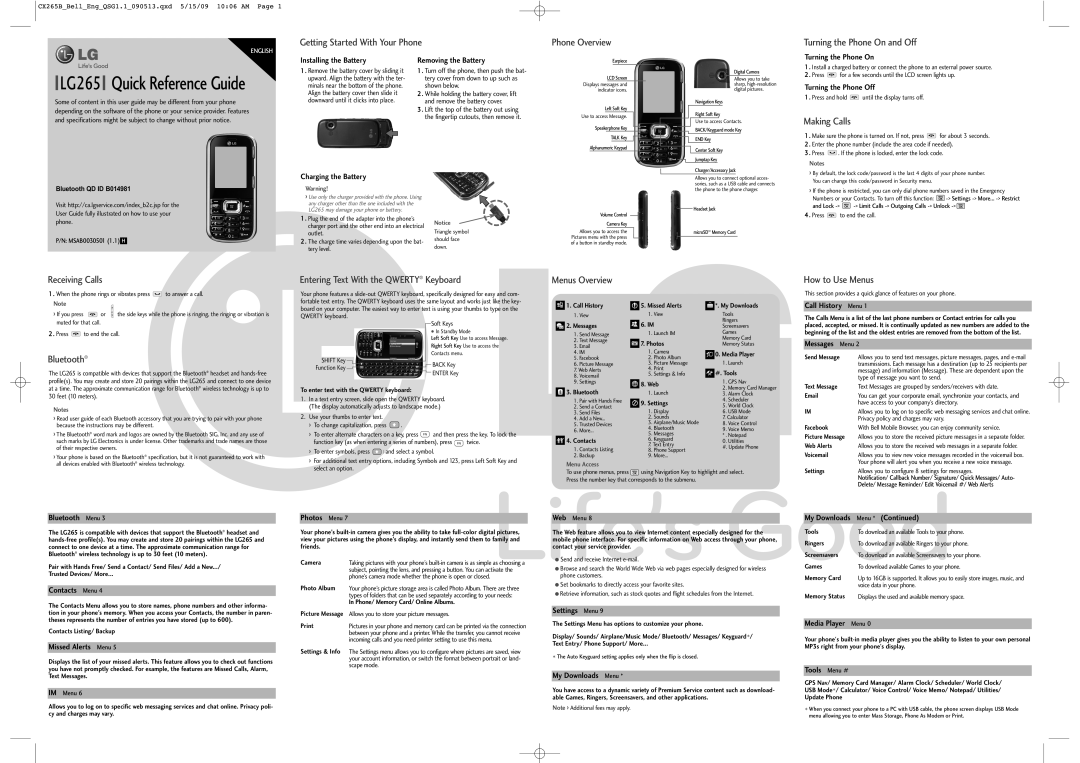
Phone Overview
Earpiece
LCD Screen
Displays messages and indicator icons.
Left Soft Key
Use to access Message.
Speakerphone Key
TALK Key
Alphanumeric Keypad
Digital Camera
Allows you to take sharp,
Navigation Keys
Right Soft Key
Use to access Contacts.
BACK/Keyguard mode Key
END Key
Center Soft Key
Jumptap Key
Charger/Accessory Jack
Turning the Phone On and Off
Turning the Phone On
1 . Install a charged battery or connect the phone to an external power source.
2 . Press ![]() for a few seconds until the LCD screen lights up.
for a few seconds until the LCD screen lights up.
Turning the Phone Off
1 . Press and hold ![]() until the display turns off.
until the display turns off.
Making Calls
1 . Make sure the phone is turned on. If not, press ![]() for about 3 seconds.
for about 3 seconds.
2 . Enter the phone number (include the area code if needed).
3 . Press ![]() . If the phone is locked, enter the lock code.
. If the phone is locked, enter the lock code.
Notes
› By default, the lock code/password is the last 4 digits of your phone number. |
Bluetooth QD ID B014981
Visit http://ca.lgservice.com/index_b2c.jsp for the User Guide fully illustrated on how to use your phone.
P/N: MSAB0030501 (1.1) H
Charging the Battery
Warning!
›Use only the charger provided with the phone. Using any charger other than the one included with the LG265 may damage your phone or battery.
1 . Plug the end of the adapter into the phone’s charger port and the other end into an electrical outlet.
2 . The charge time varies depending upon the bat- tery level.
Notice
Triangle symbol should face down.
Volume Control
Camera Key
Allows you to access the Pictures menu with the press of a button in standby mode.
Allows you to connect optional acces- sories, such as a USB cable and connects the phone to the phone charger.
Headset Jack
microSD™ Memory Card
You can change this code/password in Security menu. |
| |
› If the phone is restricted, you can only dial phone numbers saved in the Emergency | ||
Numbers or your Contacts. To turn off this function: | ||
and Lock | ||
4 . Press ![]() to end the call.
to end the call.
Receiving Calls
1 . When the phone rings or vibrates press | to answer a call. | ||
Note |
|
|
|
› If you press | or | the side keys while the phone is ringing, the ringing or vibration is | |
muted for that call. |
|
|
|
2 . Press ![]() to end the call.
to end the call.
Bluetooth®
The LG265 is compatible with devices that support the Bluetooth® headset and
Notes
›Read user guide of each Bluetooth accessory that you are trying to pair with your phone because the instructions may be different.
›The Bluetooth® word mark and logos are owned by the Bluetooth SIG, Inc. and any use of such marks by LG Electronics is under license. Other trademarks and trade names are those of their respective owners.
›Your phone is based on the Bluetooth® specification, but it is not guaranteed to work with all devices enabled with Bluetooth® wireless technology.
Bluetooth Menu 3
The LG265 is compatible with devices that support the Bluetooth® headset and
Pair with Hands Free/ Send a Contact/ Send Files/ Add a New.../
Trusted Devices/ More...
Contacts Menu 4
The Contacts Menu allows you to store names, phone numbers and other informa- tion in your phone’s memory. When you access your Contacts, the number in paren- theses represents the number of entries you have stored (up to 600).
Contacts Listing/ Backup
Missed Alerts Menu 5
Displays the list of your missed alerts. This feature allows you to check out functions you have not promptly checked. For example, the features are Missed Calls, Alarm, Text Messages.
IM Menu 6
Allows you to log on to specific web messaging services and chat online. Privacy poli- cy and charges may vary.
Entering Text With the QWERTY® Keyboard
Your phone features a
Soft Keys
|
|
|
|
|
|
| ● In Standby Mode | |
|
|
|
|
|
|
| Left Soft Key Use to access Message. | |
|
|
|
|
|
|
| Right Soft Key Use to access the | |
SHIFT Key |
|
|
|
|
|
| Contacts menu. | |
|
|
|
|
|
|
| BACK Key | |
Function Key |
|
|
|
|
|
| ENTER Key | |
|
|
|
|
|
|
|
| |
|
|
|
|
|
|
|
| |
To enter text with the QWERTY keyboard:
1.In a text entry screen, slide open the QWERTY keyboard. (The display automatically adjusts to landscape mode.)
2.Use your thumbs to enter text.
›To change capitalization, press ![]() .
.
›To enter alternate characters on a key, press ![]() and then press the key. To lock the
and then press the key. To lock the
function key (as when entering a series of numbers), press ![]() twice.
twice.
›To enter symbols, press ![]() and select a symbol.
and select a symbol.
›For additional text entry options, including Symbols and 123, press Left Soft Key and select an option.
Photos Menu 7
Your phone’s
Camera | Taking pictures with your phone’s |
| subject, pointing the lens, and pressing a button. You can activate the |
| phone’s camera mode whether the phone is open or closed. |
Photo Album | Your phone’s picture storage area is called Photo Album. There are three |
| types of folders that can be used separately according to your needs: |
| In Phone/ Memory Card/ Online Albums. |
Picture Message Allows you to store your picture messages.
Pictures in your phone and memory card can be printed via the connection | |
| between your phone and a printer. While the transfer, you cannot receive |
| incoming calls and you need printer setting to use this menu. |
Settings & Info The Settings menu allows you to configure where pictures are saved, view your account information, or switch the format between portrait or land- scape mode.
Menus Overview
| 1. Call History |
| 5. Missed Alerts |
| *. My Downloads | |||
|
|
| ||||||
1. | View | 1. | View |
| Tools | |||
| 2. Messages |
| 6. IM |
| Ringers | |||
|
|
| Screensavers | |||||
1. | Send Message | 1. | Launch IM |
| Games | |||
2. | Text Message |
| 7. Photos |
| Memory Card | |||
3. |
|
| Memory Status | |||||
1. | Camera |
|
|
| ||||
4. | IM |
| 0. Media Player | |||||
| ||||||||
5. | 2. | Photo Album |
| |||||
6. | Picture Message | 3. | Picture Message | 1. | Launch | |||
| 7. Web Alerts | 4. |
| #. Tools | ||||
8. | Voicemail | 5. | Settings & Info |
| ||||
9. | Settings |
| 8. Web | 1. | GPS Nav | |||
| ||||||||
|
|
|
| 2. | Memory Card Manager | |||
| 3. Bluetooth | 1. | Launch | 3. | Alarm Clock | |||
1. | Pair with Hands Free |
| 9. Settings | 4. | Scheduler | |||
| ||||||||
2. | Send a Contact |
| 5. | World Clock | ||||
|
|
| ||||||
3. | Send Files | 1. | Display | 6. | USB Mode | |||
4. | Add a New... | 2. | Sounds |
| 7. Calculator | |||
5. | Trusted Devices | 3. | Airplane/Music Mode | 8. | Voice Control | |||
6. | More... | 4. | Bluetooth | 9. | Voice Memo | |||
| 4. Contacts | 5. | Messages |
| * . Notepad | |||
| 6. | Keyguard | 0. | Utilities | ||||
| 1. | Contacts Listing |
| 7. Text Entry |
| #. Update Phone | ||
8. | Phone Support |
| ||||||
|
|
| ||||||
2. | Backup | 9. | More... |
|
|
| ||
Menu Access
To use phone menus, press ![]() using Navigation Key to highlight and select. Press the number key that corresponds to the submenu.
using Navigation Key to highlight and select. Press the number key that corresponds to the submenu.
Web Menu 8
The Web feature allows you to view Internet content especially designed for the mobile phone interface. For specific information on Web access through your phone, contact your service provider.
●Send and receive Internet
●Browse and search the World Wide Web via web pages especially designed for wireless phone customers.
●Set bookmarks to directly access your favorite sites.
●Retrieve information, such as stock quotes and flight schedules from the Internet.
Settings Menu 9
The Settings Menu has options to customize your phone.
Display/ Sounds/ Airplane/Music Mode/ Bluetooth/ Messages/ Keyguard*/
Text Entry/ Phone Support/ More...
*The Auto Keyguard setting applies only when the flip is closed.
My Downloads Menu *
You have access to a dynamic variety of Premium Service content such as download- able Games, Ringers, Screensavers, and other applications.
Note › Additional fees may apply.
How to Use Menus
This section provides a quick glance of features on your phone.
Call History Menu 1
The Calls Menu is a list of the last phone numbers or Contact entries for calls you placed, accepted, or missed. It is continually updated as new numbers are added to the beginning of the list and the oldest entries are removed from the bottom of the list.
Messages Menu 2
Send Message | Allows you to send text messages, picture messages, pages, and |
| transmissions. Each message has a destination (up to 25 recipients per |
| message) and information (Message). These are dependent upon the |
| type of message you want to send. |
Text Message | Text Messages are grouped by senders/receivers with date. |
You can get your corporate email, synchronize your contacts, and | |
| have access to your company’s directory. |
IM | Allows you to log on to specific web messaging services and chat online. |
| Privacy policy and charges may vary. |
With Bell Mobile Browser, you can enjoy community service. | |
Picture Message | Allows you to store the received picture messages in a separate folder. |
Web Alerts | Allows you to store the received web messages in a separate folder. |
Voicemail | Allows you to view new voice messages recorded in the voicemail box. |
| Your phone will alert you when you receive a new voice message. |
Settings | Allows you to configure 8 settings for messages. |
| Notification/ Callback Number/ Signature/ Quick Messages/ Auto- |
| Delete/ Message Reminder/ Edit Voicemail #/ Web Alerts |
My Downloads | Menu * (Continued) |
Tools | To download an available Tools to your phone. |
Ringers | To download an available Ringers to your phone. |
Screensavers | To download an available Screensavers to your phone. |
Games | To download available Games to your phone. |
Memory Card | Up to 16GB is supported. It allows you to easily store images, music, and |
| voice data in your phone. |
Memory Status | Displays the used and available memory space. |
Media Player Menu 0
Your phone's
Tools Menu #
GPS Nav/ Memory Card Manager/ Alarm Clock/ Scheduler/ World Clock/ USB Mode*/ Calculator/ Voice Control/ Voice Memo/ Notepad/ Utilities/
Update Phone
*When you connect your phone to a PC with USB cable, the phone screen displays USB Mode menu allowing you to enter Mass Storage, Phone As Modem or Print.