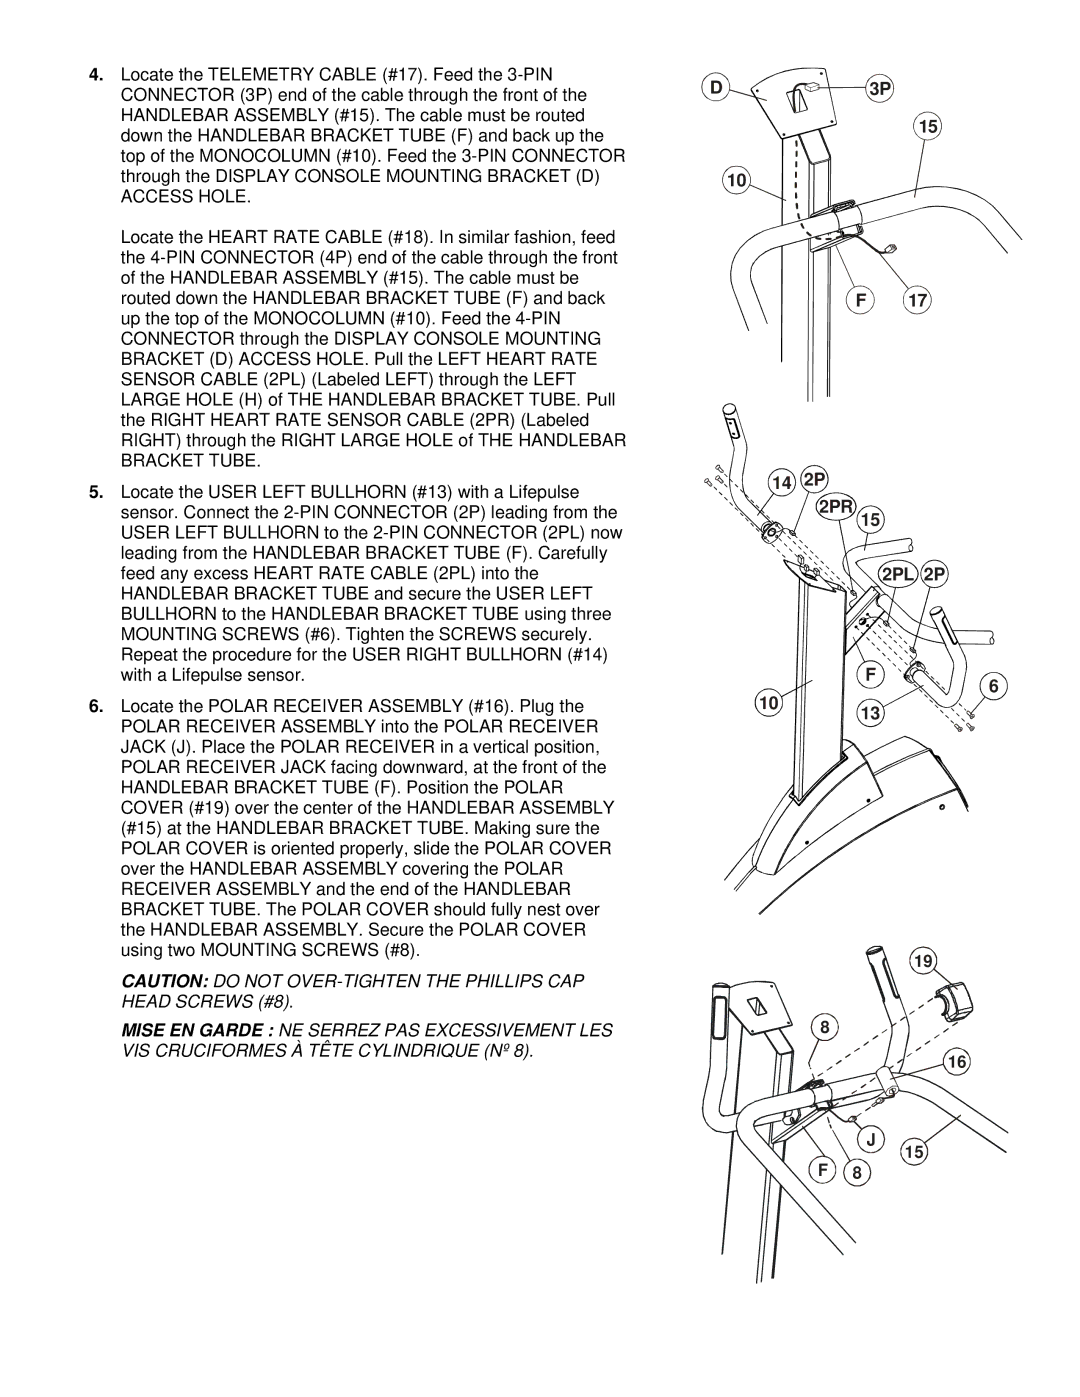
4. Locate the TELEMETRY CABLE (#17). Feed the |
CONNECTOR (3P) end of the cable through the front of the |
HANDLEBAR ASSEMBLY (#15). The cable must be routed |
down the HANDLEBAR BRACKET TUBE (F) and back up the |
top of the MONOCOLUMN (#10). Feed the |
through the DISPLAY CONSOLE MOUNTING BRACKET (D) |
ACCESS HOLE. |
Locate the HEART RATE CABLE (#18). In similar fashion, feed |
the |
of the HANDLEBAR ASSEMBLY (#15). The cable must be |
routed down the HANDLEBAR BRACKET TUBE (F) and back |
up the top of the MONOCOLUMN (#10). Feed the |
CONNECTOR through the DISPLAY CONSOLE MOUNTING |
BRACKET (D) ACCESS HOLE. Pull the LEFT HEART RATE |
SENSOR CABLE (2PL) (Labeled LEFT) through the LEFT |
LARGE HOLE (H) of THE HANDLEBAR BRACKET TUBE. Pull |
the RIGHT HEART RATE SENSOR CABLE (2PR) (Labeled |
RIGHT) through the RIGHT LARGE HOLE of THE HANDLEBAR |
BRACKET TUBE. |
5. Locate the USER LEFT BULLHORN (#13) with a Lifepulse |
sensor. Connect the |
USER LEFT BULLHORN to the |
leading from the HANDLEBAR BRACKET TUBE (F). Carefully |
feed any excess HEART RATE CABLE (2PL) into the |
HANDLEBAR BRACKET TUBE and secure the USER LEFT |
BULLHORN to the HANDLEBAR BRACKET TUBE using three |
MOUNTING SCREWS (#6). Tighten the SCREWS securely. |
Repeat the procedure for the USER RIGHT BULLHORN (#14) |
with a Lifepulse sensor. |
6. Locate the POLAR RECEIVER ASSEMBLY (#16). Plug the |
POLAR RECEIVER ASSEMBLY into the POLAR RECEIVER |
JACK (J). Place the POLAR RECEIVER in a vertical position, |
POLAR RECEIVER JACK facing downward, at the front of the |
HANDLEBAR BRACKET TUBE (F). Position the POLAR |
COVER (#19) over the center of the HANDLEBAR ASSEMBLY |
(#15) at the HANDLEBAR BRACKET TUBE. Making sure the |
POLAR COVER is oriented properly, slide the POLAR COVER |
over the HANDLEBAR ASSEMBLY covering the POLAR |
RECEIVER ASSEMBLY and the end of the HANDLEBAR |
BRACKET TUBE. The POLAR COVER should fully nest over |
the HANDLEBAR ASSEMBLY. Secure the POLAR COVER |
using two MOUNTING SCREWS (#8). |
D | 3P |
15
10
F 17
14 2P 2PR 15


 2PL 2P
| F | 6 |
10 |
| |
13 |
| |
|
|
CAUTION: DO NOT |
HEAD SCREWS (#8). |
MISE EN GARDE : NE SERREZ PAS EXCESSIVEMENT LES |
VIS CRUCIFORMES À TÊTE CYLINDRIQUE (Nº 8). |
8
J
F 8
19
16
15
