B-10OPERATION

C. CONNECT LEADS AND CABLES ON THE MACHINE

FIGURE B.14

B-10


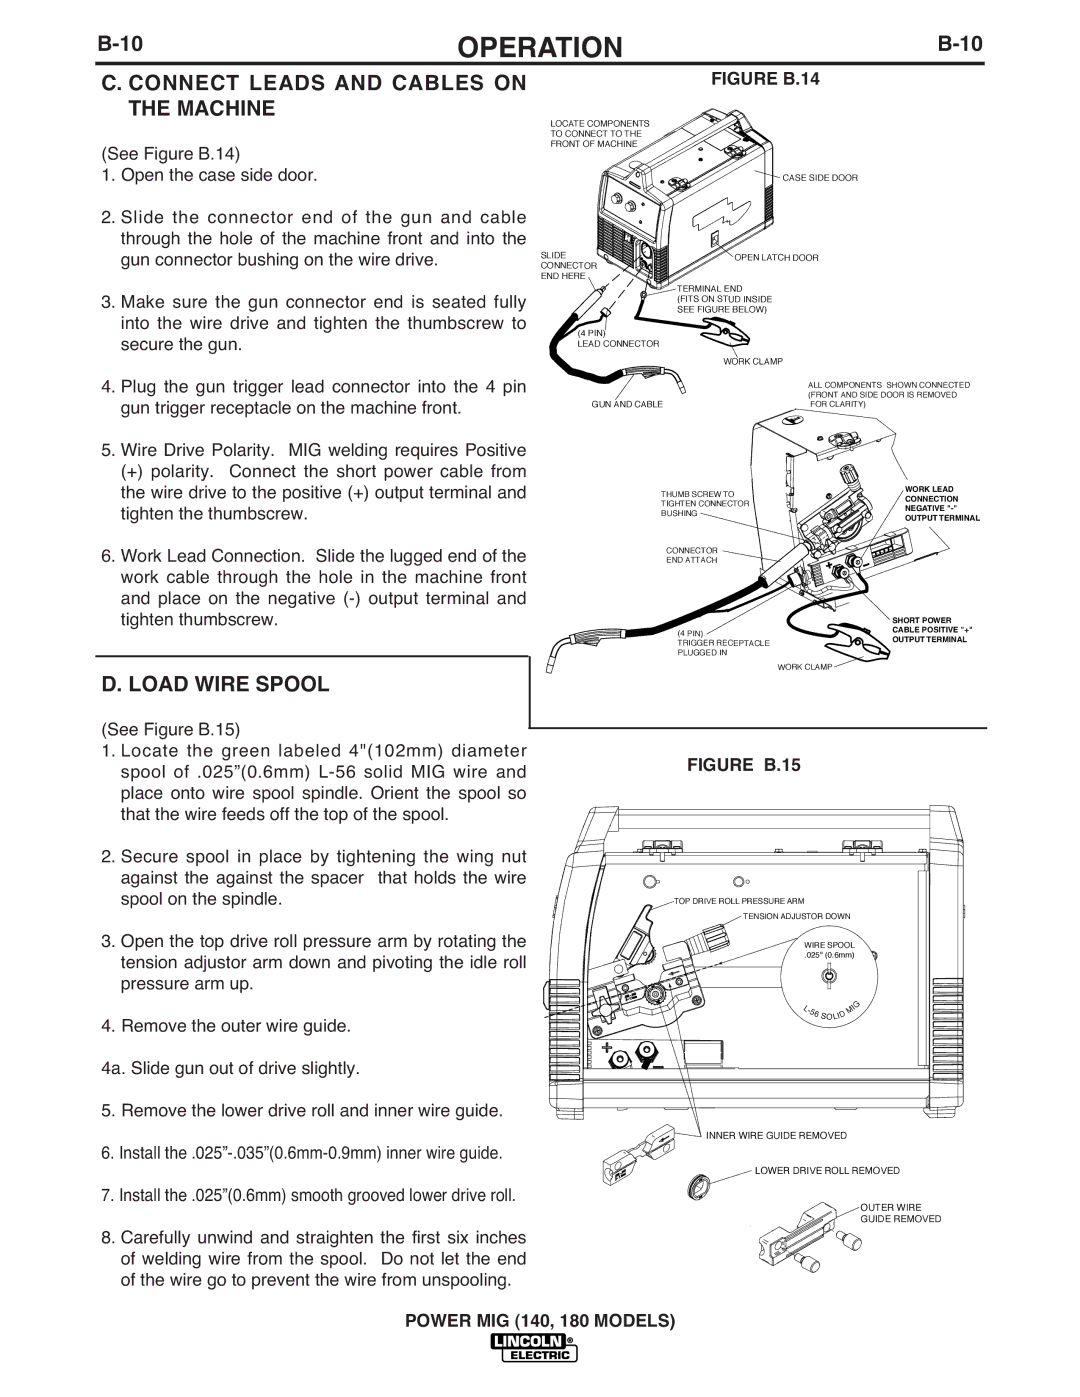
(See Figure B.14)

1. Open the case side door.

2. Slide the connector end of the gun and cable through the hole of the machine front and into the gun connector bushing on the wire drive.

3. Make sure the gun connector end is seated fully into the wire drive and tighten the thumbscrew to secure the gun.

4. Plug the gun trigger lead connector into the 4 pin gun trigger receptacle on the machine front.

5. Wire Drive Polarity. MIG welding requires Positive

(+) polarity. Connect the short power cable from the wire drive to the positive (+) output terminal and tighten the thumbscrew.

6. Work Lead Connection. Slide the lugged end of the work cable through the hole in the machine front and place on the negative (-) output terminal and tighten thumbscrew.

D. LOAD WIRE SPOOL

LOCATE COMPONENTS

TO CONNECT TO THE

FRONT OF MACHINE


CASE SIDE DOOR

SLIDE

OPEN LATCH DOOR

CONNECTOR


END HERE

TERMINAL END


(FITS ON STUD INSIDE


SEE FIGURE BELOW)

(4 PIN)


LEAD CONNECTOR


WORK CLAMP


ALL COMPONENTS SHOWN CONNECTED

GUN AND CABLE

(FRONT AND SIDE DOOR IS REMOVED

FOR CLARITY)

THUMB SCREW TO

WORK LEAD

CONNECTION

TIGHTEN CONNECTOR

NEGATIVE "-"

BUSHING

OUTPUT TERMINAL


CONNECTOR


END ATTACH


SHORT POWER

(4 PIN)

CABLE POSITIVE "+"

OUTPUT TERMINAL

TRIGGER RECEPTACLE


PLUGGED IN


WORK CLAMP

(See Figure B.15)

1. Locate the green labeled 4"(102mm) diameter spool of .025”(0.6mm) L-56 solid MIG wire and place onto wire spool spindle. Orient the spool so that the wire feeds off the top of the spool.

2. Secure spool in place by tightening the wing nut against the against the spacer that holds the wire spool on the spindle.

3. Open the top drive roll pressure arm by rotating the tension adjustor arm down and pivoting the idle roll pressure arm up.

4. Remove the outer wire guide.

4a. Slide gun out of drive slightly.

5. Remove the lower drive roll and inner wire guide.

6. Install the .025”-.035”(0.6mm-0.9mm) inner wire guide.

7. Install the .025”(0.6mm) smooth grooved lower drive roll.

8. Carefully unwind and straighten the first six inches of welding wire from the spool. Do not let the end of the wire go to prevent the wire from unspooling.

POWER MIG (140,

FIGURE B.15

TOP DRIVE ROLL PRESSURE ARM

TENSION ADJUSTOR DOWN

WIRE SPOOL

.025" (0.6mm)

L


IG

-


M


5


6

D


S OLI


INNER WIRE GUIDE REMOVED

LOWER DRIVE ROLL REMOVED

OUTER WIRE

GUIDE REMOVED

180 MODELS)

Page 23
Image 23
Lincoln Electric 140, 180 manual 10OPERATION, Connect Leads and Cables on the Machine

180, 140 specifications

Lincoln Electric is a well-known name in the welding industry, and the Lincoln Electric 140 and 180 models continue to set the standard for reliable, user-friendly welding equipment. These machines are popular among hobbyists, DIY enthusiasts, and professionals alike due to their performance, portability, and innovative features.

The Lincoln Electric 140 offers a compact design tailored for both novice and experienced welders. With a maximum output of 140 amps, this versatile MIG welder can handle a range of projects, including welding mild steel, stainless steel, and aluminum. It operates on 120V standard household current, making it accessible for home use. One of its standout features is its variable voltage control, which allows the user to adjust the output for optimal welding based on the material thickness. Additionally, the machine features a quick-change drive roll system that simplifies the process of switching wire types, ensuring that you can adapt to different materials effortlessly.

Meanwhile, the Lincoln Electric 180 takes things a step further, providing a robust 180-amp output that allows for welding thicker materials. This model operates on 230V, which makes it suitable for heavier-duty applications. The 180 model is equipped with an advanced digital display that provides real-time feedback on voltage and wire speed, aiding welders in achieving precision in their work. Its durable construction ensures reliability, and the built-in thermal overload protection serves as a safeguard against overheating, prolonging the machine's lifespan.

Both models incorporate Lincoln Electric's patented Infinite Voltage and Wire Speed Control, allowing for fine-tuning of settings for a wide variety of welding tasks. They come with a spool gun compatibility feature, expanding their usability for aluminum welding with ease. The ergonomic design and lightweight construction facilitate mobility, making them ideal for both shop and field work.

In summary, the Lincoln Electric 140 and 180 welders offer users the perfect blend of performance and convenience. Their innovative technologies, user-friendly interfaces, and versatile features make them excellent additions to any welding toolkit, catering to various skill levels and project requirements. Whether for occasional home projects or more demanding professional tasks, these welders deliver exceptional quality, efficiency, and reliability that Lincoln Electric is renowned for.