Lincoln Electric IM810 manual GUN Installation, Work Cable Installation

Models: IM810

1 36
Download 36 pages 11.33 Kb
Page 11
Image 11

A-4

INSTALLATION

A-4


Work Cable Installation

Refer to Figure A.2.

1.Open the wire feed section door on the right side of the Pro-MIG 175.

2.Pass the end of the work cable that has the termi- nal lug with the smaller hole through the Work Cable Access Hole (1) in the case front.

3.Route the cable under and around the back of the Wire Feed Gearbox (6).

4.For GMAW Only: Refer to Figure A.2. As deliv- ered, the machine is connected for positive elec- trode polarity. This is the appropriate configuration for the GMAW (MIG) process. To complete installa- tion, use the provided wing nut to connect the work cable’s terminal lug to the negative (–) output ter- minal (5) located above the Wire Feed Gearbox

(6). Make sure that both wing nuts are tight.

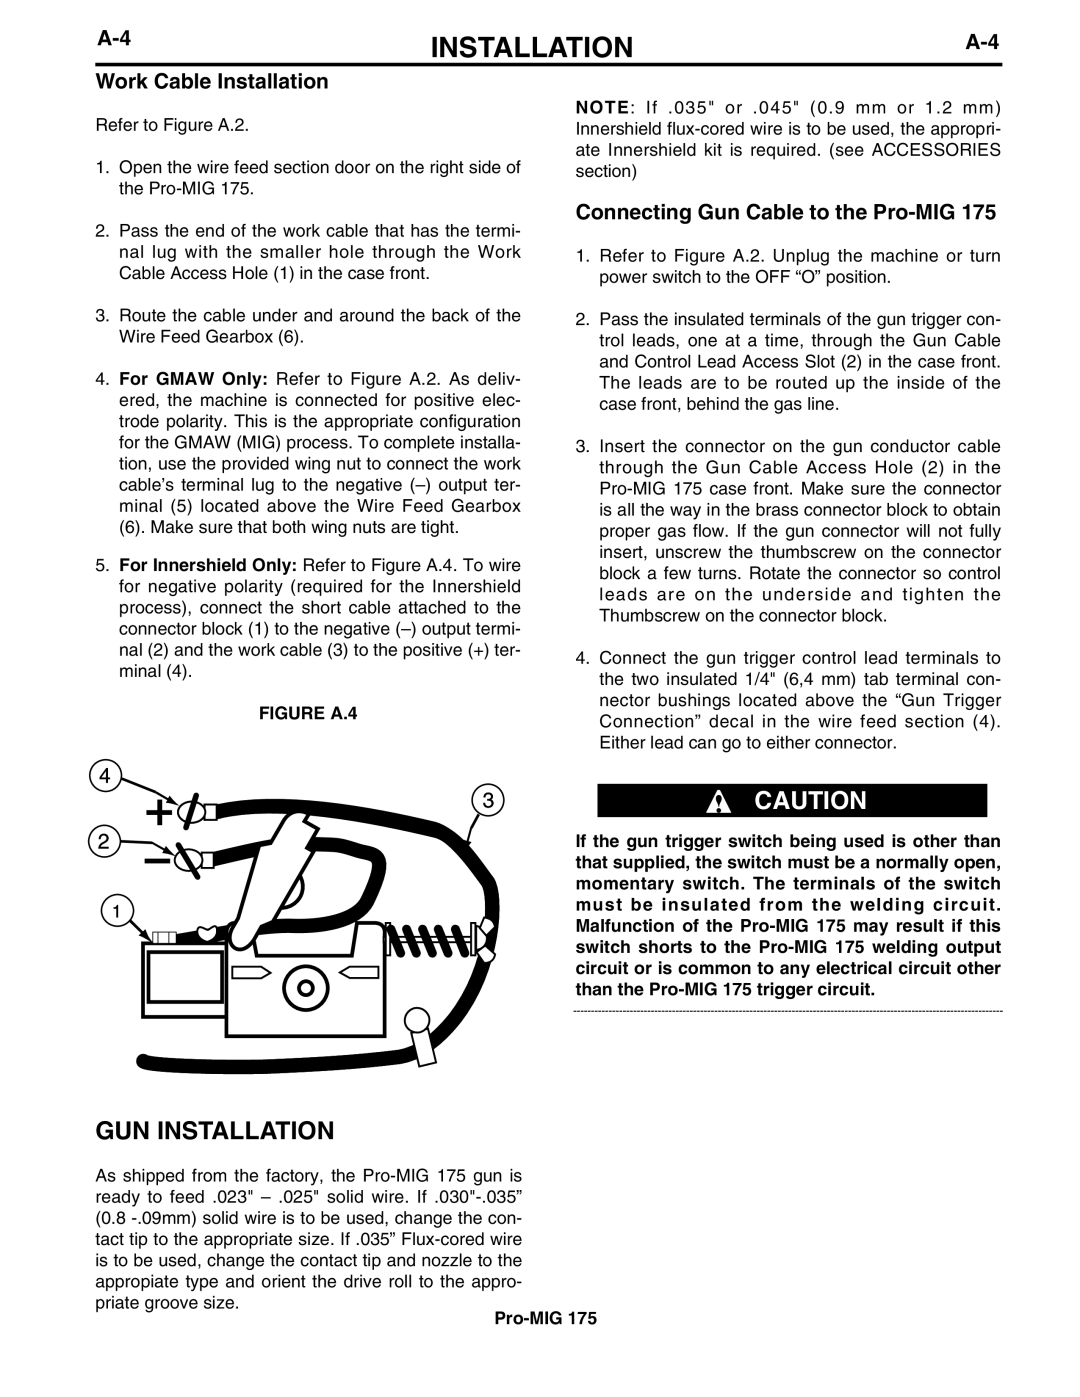
5.For Innershield Only: Refer to Figure A.4. To wire for negative polarity (required for the Innershield process), connect the short cable attached to the connector block (1) to the negative (–) output termi- nal (2) and the work cable (3) to the positive (+) ter- minal (4).

FIGURE A.4

4

3 2

1

NOTE: If .035" or .045" (0.9 mm or 1.2 mm) Innershield flux-cored wire is to be used, the appropri- ate Innershield kit is required. (see ACCESSORIES section)

Connecting Gun Cable to the Pro-MIG 175

1.Refer to Figure A.2. Unplug the machine or turn power switch to the OFF “O” position.

2.Pass the insulated terminals of the gun trigger con- trol leads, one at a time, through the Gun Cable and Control Lead Access Slot (2) in the case front. The leads are to be routed up the inside of the case front, behind the gas line.

3.Insert the connector on the gun conductor cable through the Gun Cable Access Hole (2) in the Pro-MIG 175 case front. Make sure the connector is all the way in the brass connector block to obtain proper gas flow. If the gun connector will not fully insert, unscrew the thumbscrew on the connector block a few turns. Rotate the connector so control leads are on the underside and tighten the Thumbscrew on the connector block.

4.Connect the gun trigger control lead terminals to the two insulated 1/4" (6,4 mm) tab terminal con- nector bushings located above the “Gun Trigger Connection” decal in the wire feed section (4). Either lead can go to either connector.

CAUTION

If the gun trigger switch being used is other than that supplied, the switch must be a normally open, momentary switch. The terminals of the switch must be insulated from the welding circuit. Malfunction of the Pro-MIG 175 may result if this switch shorts to the Pro-MIG 175 welding output circuit or is common to any electrical circuit other than the Pro-MIG 175 trigger circuit.

GUN INSTALLATION

As shipped from the factory, the Pro-MIG 175 gun is ready to feed .023" – .025" solid wire. If .030"-.035” (0.8 -.09mm) solid wire is to be used, change the con- tact tip to the appropriate size. If .035” Flux-cored wire is to be used, change the contact tip and nozzle to the appropiate type and orient the drive roll to the appro- priate groove size.

Pro-MIG 175

Page 11
Image 11
Lincoln Electric IM810 manual GUN Installation, Work Cable Installation, Connecting Gun Cable to the Pro-MIG

IM810 specifications

The Lincoln Electric IM810 is a highly regarded industrial inverter-based welding machine that offers unparalleled performance and versatility for a variety of welding applications. Known for its robust design and advanced technology, the IM810 is ideal for professionals in industries such as construction, shipbuilding, and manufacturing.

One of the standout features of the IM810 is its advanced inverter technology, which provides a significant reduction in weight and size compared to traditional welding machines. This makes the unit highly portable and easy to handle in different working environments. Despite its compact design, the IM810 does not compromise on power, delivering impressive output capabilities to tackle even the most demanding welding tasks.

The IM810 supports a range of welding processes, including MIG, TIG, and stick welding. This versatility allows users to switch between different types of welding applications with ease, making it a valuable tool for technicians who need to adapt to various projects. Moreover, its dual voltage capability enables operation on both 120V and 230V power supply, increasing its usability in different settings.

Another key feature is the machine’s user-friendly interface. The IM810 is equipped with an intuitive digital display that makes it easy for users to monitor settings and adjust parameters on the fly. This helps to streamline the welding process and improve efficiency. Additionally, the machine includes a range of pre-set programs for different materials and thicknesses, enabling users to achieve optimal results with minimal setup time.

The IM810 is also designed with durability in mind. Constructed from high-quality materials, it can withstand the rigors of industrial environments. Its heavy-duty construction ensures long-lasting performance, while built-in thermal overload protection safeguards the machine against overheating, extending its lifespan.

With a focus on safety, the IM810 incorporates various features to protect both the operator and the equipment. These include a sturdy roll cage for physical protection and advanced cooling systems that maintain optimal operating temperatures.

In summary, the Lincoln Electric IM810 is a versatile, powerful, and durable welding machine that combines advanced technology with user-friendly features. Its ability to handle multiple welding processes, coupled with its portability and safety features, makes it an essential tool for professionals who demand quality and reliability on the job.