INSTALLATION | ||
|
|
|
INSTALLATION
![]() WARNING
WARNING
FALLING EQUIPMENT can cause injury.
• Do not lift this machine using lift bail if it is equipped with a heavy
•accessory such as trailer or gas cylinder.
•Lift only with equipment of adequate lifting capacity.
•Be sure machine is stable when lifting.
The machine should be located in a clean, dry place where there is free circulation of clean air, such that air movement entering the front and exiting the back will not be restricted. Dirt and dust that can be drawn into the machine should be kept to a minimum. Failure to observe these precautions can result in excessive operating temperatures and nuisance shutdown of the machine.
The Idealarc R3R welders can be stacked three high when the following precautions are observed:
1.Be sure the bottom machine is on a firm, level sur- face suitable for the total weight [up to 1340 pounds (608 kg)] of the stacked machines.
2.Stack the machines with the fronts flush. Be certain the pins on the top front corners of the lower machines fit through the holes in the base rails of the upper machines.
3.No unit heavier than the bottom unit should be stacked on top of it. For example, an R3R
INPUT POWER CONNECTION
![]() WARNING
WARNING
ELECTRIC SHOCK can kill.
•Have an electrician install and ser- vice this equipment.
•Turn the input power off at the fuse box before working on equipment.
•Do not touch electrically hot parts.
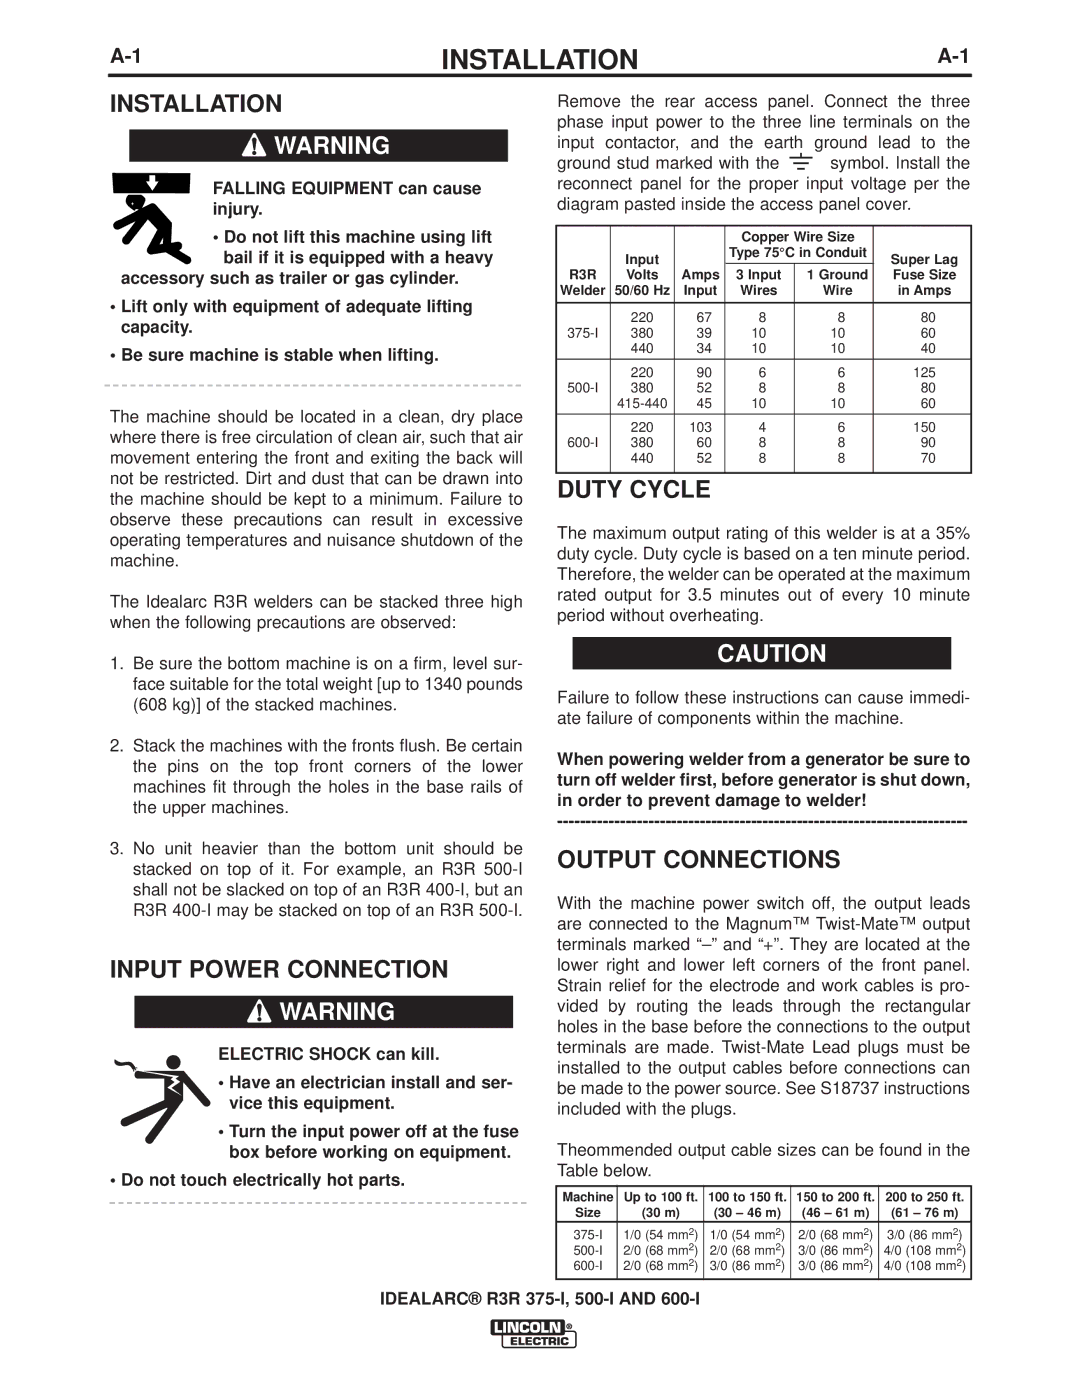
Remove the rear access panel. Connect the three phase input power to the three line terminals on the input contactor, and the earth ground lead to the
ground stud marked with the ![]() symbol. Install the reconnect panel for the proper input voltage per the diagram pasted inside the access panel cover.
symbol. Install the reconnect panel for the proper input voltage per the diagram pasted inside the access panel cover.
|
|
| Copper Wire Size |
|
| |
| Input |
| Type 75°C in Conduit |
| Super Lag | |
|
|
|
|
| ||
R3R | Volts | Amps | 3 Input | 1 Ground |
| Fuse Size |
Welder | 50/60 Hz | Input | Wires | Wire |
| in Amps |
|
|
|
|
|
|
|
| 220 | 67 | 8 | 8 | 80 | |
380 | 39 | 10 | 10 | 60 | ||
| 440 | 34 | 10 | 10 | 40 | |
|
|
|
|
|
| |
| 220 | 90 | 6 | 6 | 125 | |
380 | 52 | 8 | 8 | 80 | ||
| 45 | 10 | 10 | 60 | ||
|
|
|
|
|
| |
| 220 | 103 | 4 | 6 | 150 | |
380 | 60 | 8 | 8 | 90 | ||
| 440 | 52 | 8 | 8 | 70 | |
|
|
|
|
|
|
|
DUTY CYCLE
The maximum output rating of this welder is at a 35% duty cycle. Duty cycle is based on a ten minute period. Therefore, the welder can be operated at the maximum rated output for 3.5 minutes out of every 10 minute period without overheating.
![]() CAUTION
CAUTION
Failure to follow these instructions can cause immedi- ate failure of components within the machine.
When powering welder from a generator be sure to turn off welder first, before generator is shut down, in order to prevent damage to welder!
OUTPUT CONNECTIONS
With the machine power switch off, the output leads are connected to the Magnum™
Theommended output cable sizes can be found in the Table below.
Machine | Up to 100 ft. | 100 to 150 ft. | 150 to 200 ft. | 200 to 250 ft. |
Size | (30 m) | (30 – 46 m) | (46 – 61 m) | (61 – 76 m) |
1/0 (54 mm2) | 1/0 (54 mm2) | 2/0 (68 mm2) | 3/0 (86 mm2) | |
2/0 (68 mm2) | 2/0 (68 mm2) | 3/0 (86 mm2) | 4/0 (108 mm2) | |
2/0 (68 mm2) | 3/0 (86 mm2) | 3/0 (86 mm2) | 4/0 (108 mm2) |
IDEALARC® R3R