Instant EtherFast® Series
Powering On an Ethernet Switch
Plug in an Ethernet Switch's AC power cable. The Switch will first run a diag- nostic
When data is transmitted or received, the Link/Act LEDs will flicker.
Reading an Ethernet Switch’s LED Display
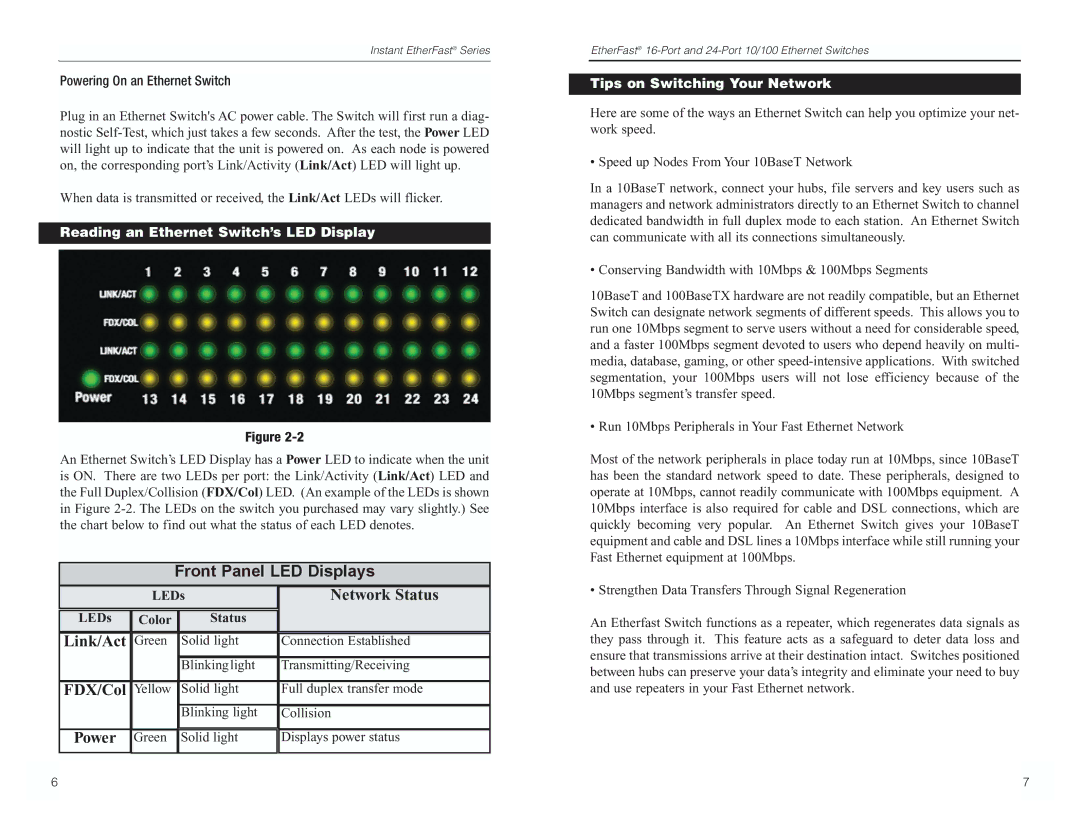
Figure
An Ethernet Switch’s LED Display has a Power LED to indicate when the unit is ON. There are two LEDs per port: the Link/Activity (Link/Act) LED and the Full Duplex/Collision (FDX/Col) LED. (An example of the LEDs is shown in Figure
Front Panel LED Displays
| LEDs | Network Status | |||
|
|
|
|
|
|
LEDs | Color | Status |
| ||
Link/Act | Green | Solid light | Connection Established | ||
|
|
| Blinkinglight | Transmitting/Receiving | |
|
|
|
|
|
|
FDX/Col | Yellow | Solid light | Full duplex transfer mode | ||
|
|
| Blinking light | Collision | |
|
|
|
|
|
|
Power | Green |
| Solid light |
| Displays power status |
|
|
|
|
|
|
EtherFast®
Tips on Switching Your Network
Here are some of the ways an Ethernet Switch can help you optimize your net- work speed.
• Speed up Nodes From Your 10BaseT Network
In a 10BaseT network, connect your hubs, file servers and key users such as managers and network administrators directly to an Ethernet Switch to channel dedicated bandwidth in full duplex mode to each station. An Ethernet Switch can communicate with all its connections simultaneously.
• Conserving Bandwidth with 10Mbps & 100Mbps Segments
10BaseT and 100BaseTX hardware are not readily compatible, but an Ethernet Switch can designate network segments of different speeds. This allows you to run one 10Mbps segment to serve users without a need for considerable speed, and a faster 100Mbps segment devoted to users who depend heavily on multi- media, database, gaming, or other
• Run 10Mbps Peripherals in Your Fast Ethernet Network
Most of the network peripherals in place today run at 10Mbps, since 10BaseT has been the standard network speed to date. These peripherals, designed to operate at 10Mbps, cannot readily communicate with 100Mbps equipment. A 10Mbps interface is also required for cable and DSL connections, which are quickly becoming very popular. An Ethernet Switch gives your 10BaseT equipment and cable and DSL lines a 10Mbps interface while still running your Fast Ethernet equipment at 100Mbps.
• Strengthen Data Transfers Through Signal Regeneration
An Etherfast Switch functions as a repeater, which regenerates data signals as they pass through it. This feature acts as a safeguard to deter data loss and ensure that transmissions arrive at their destination intact. Switches positioned between hubs can preserve your data’s integrity and eliminate your need to buy and use repeaters in your Fast Ethernet network.
6 |
| 7 |
|
|
|