WARNING
All three of the thermostat models shown above control line voltage (125/250 VAC) directly. Do not attempt to install these unless you are completely familiar with house wiring. If proper precautions are not followed, a risk of electric shock may exist, possibly causing severe injury or death. Disconnect power supply prior to removing existing thermostat or installing this one. Do not connect to voltages different than the ratings listed above.
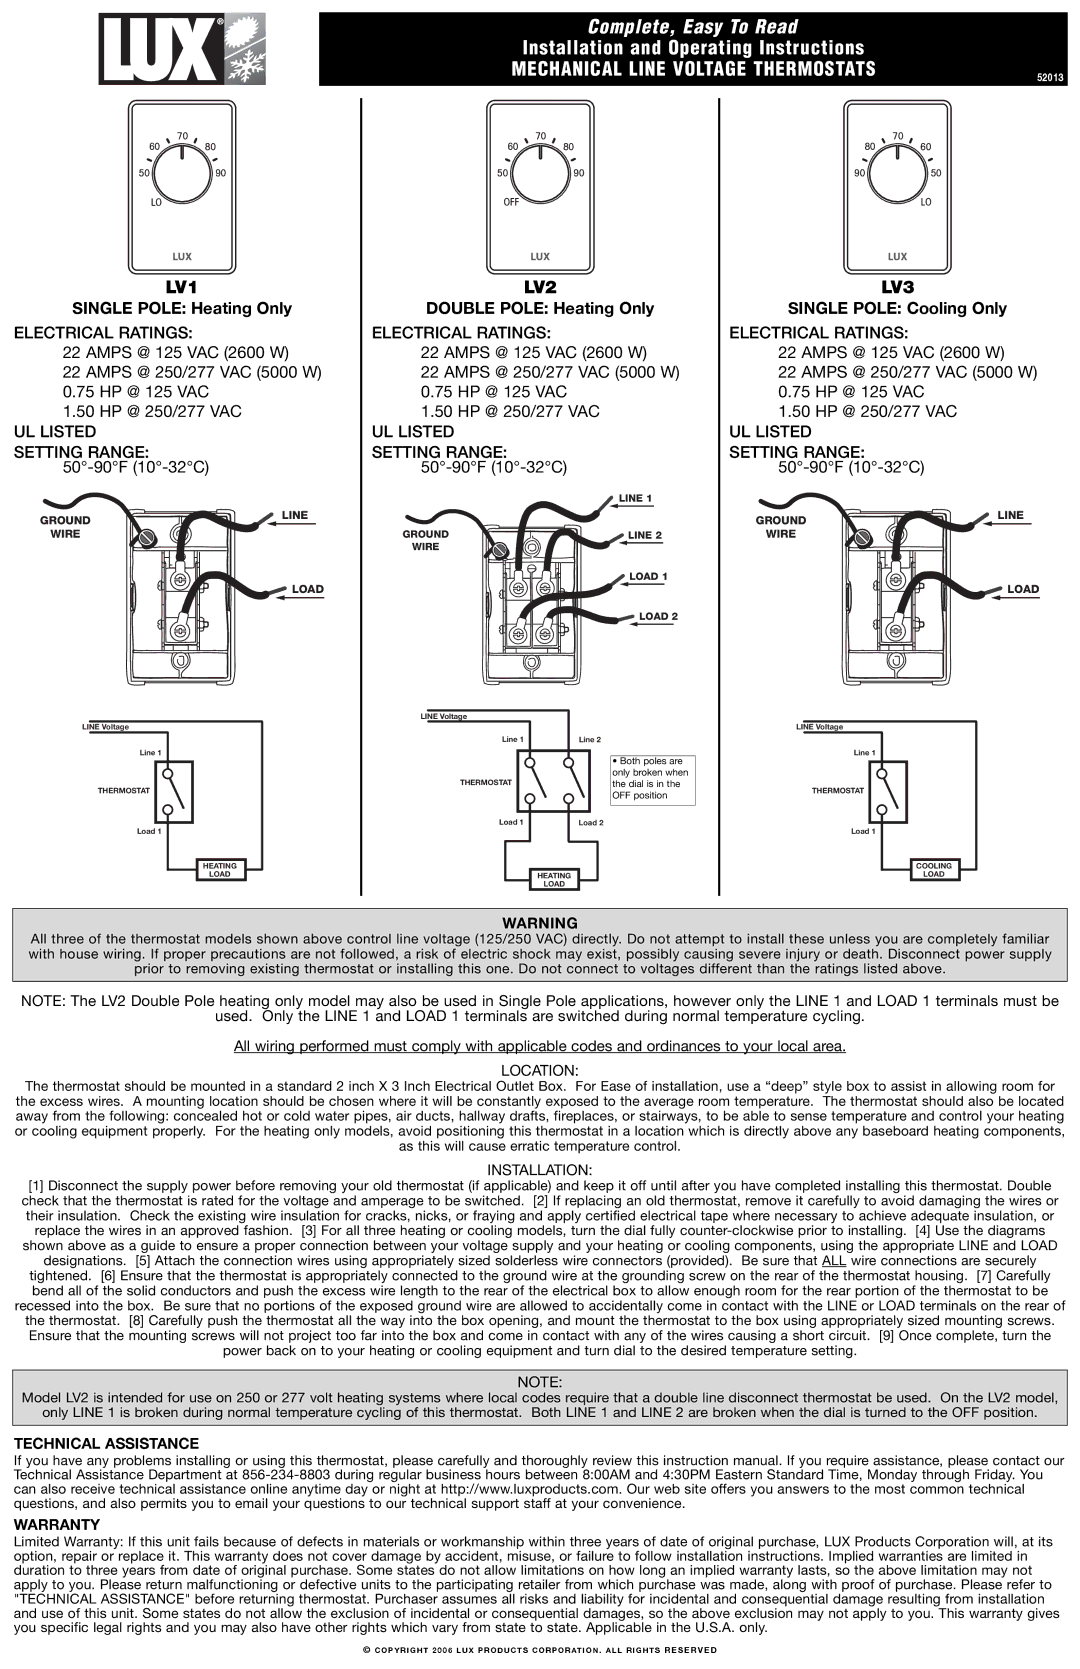
NOTE: The LV2 Double Pole heating only model may also be used in Single Pole applications, however only the LINE 1 and LOAD 1 terminals must be
used. Only the LINE 1 and LOAD 1 terminals are switched during normal temperature cycling.
All wiring performed must comply with applicable codes and ordinances to your local area.
LOCATION:
The thermostat should be mounted in a standard 2 inch X 3 Inch Electrical Outlet Box. For Ease of installation, use a “deep” style box to assist in allowing room for the excess wires. A mounting location should be chosen where it will be constantly exposed to the average room temperature. The thermostat should also be located away from the following: concealed hot or cold water pipes, air ducts, hallway drafts, fireplaces, or stairways, to be able to sense temperature and control your heating or cooling equipment properly. For the heating only models, avoid positioning this thermostat in a location which is directly above any baseboard heating components, as this will cause erratic temperature control.
INSTALLATION:
[1]Disconnect the supply power before removing your old thermostat (if applicable) and keep it off until after you have completed installing this thermostat. Double check that the thermostat is rated for the voltage and amperage to be switched. [2] If replacing an old thermostat, remove it carefully to avoid damaging the wires or their insulation. Check the existing wire insulation for cracks, nicks, or fraying and apply certified electrical tape where necessary to achieve adequate insulation, or
replace the wires in an approved fashion. [3] For all three heating or cooling models, turn the dial fully counter-clockwise prior to installing. [4] Use the diagrams shown above as a guide to ensure a proper connection between your voltage supply and your heating or cooling components, using the appropriate LINE and LOAD designations. [5] Attach the connection wires using appropriately sized solderless wire connectors (provided). Be sure that ALL wire connections are securely tightened. [6] Ensure that the thermostat is appropriately connected to the ground wire at the grounding screw on the rear of the thermostat housing. [7] Carefully bend all of the solid conductors and push the excess wire length to the rear of the electrical box to allow enough room for the rear portion of the thermostat to be
recessed into the box. Be sure that no portions of the exposed ground wire are allowed to accidentally come in contact with the LINE or LOAD terminals on the rear of the thermostat. [8] Carefully push the thermostat all the way into the box opening, and mount the thermostat to the box using appropriately sized mounting screws. Ensure that the mounting screws will not project too far into the box and come in contact with any of the wires causing a short circuit. [9] Once complete, turn the power back on to your heating or cooling equipment and turn dial to the desired temperature setting.
NOTE:
Model LV2 is intended for use on 250 or 277 volt heating systems where local codes require that a double line disconnect thermostat be used. On the LV2 model,
only LINE 1 is broken during normal temperature cycling of this thermostat. Both LINE 1 and LINE 2 are broken when the dial is turned to the OFF position.
TECHNICAL ASSISTANCE
If you have any problems installing or using this thermostat, please carefully and thoroughly review this instruction manual. If you require assistance, please contact our Technical Assistance Department at 856-234-8803 during regular business hours between 8:00AM and 4:30PM Eastern Standard Time, Monday through Friday. You can also receive technical assistance online anytime day or night at http://www.luxproducts.com. Our web site offers you answers to the most common technical questions, and also permits you to email your questions to our technical support staff at your convenience.
WARRANTY
Limited Warranty: If this unit fails because of defects in materials or workmanship within three years of date of original purchase, LUX Products Corporation will, at its option, repair or replace it. This warranty does not cover damage by accident, misuse, or failure to follow installation instructions. Implied warranties are limited in duration to three years from date of original purchase. Some states do not allow limitations on how long an implied warranty lasts, so the above limitation may not apply to you. Please return malfunctioning or defective units to the participating retailer from which purchase was made, along with proof of purchase. Please refer to "TECHNICAL ASSISTANCE" before returning thermostat. Purchaser assumes all risks and liability for incidental and consequential damage resulting from installation and use of this unit. Some states do not allow the exclusion of incidental or consequential damages, so the above exclusion may not apply to you. This warranty gives you specific legal rights and you may also have other rights which vary from state to state. Applicable in the U.S.A. only.
© COPYRIGHT 2006 LUX PRODUCTS CORPORATION . ALL RIGHTS R E S E R V E D