CMOS Setup / Boot Procedure

CMOS Setup / Boot Procedure

Turn power on.

Press the DEL key the instant that video is displayed (during the memory test).

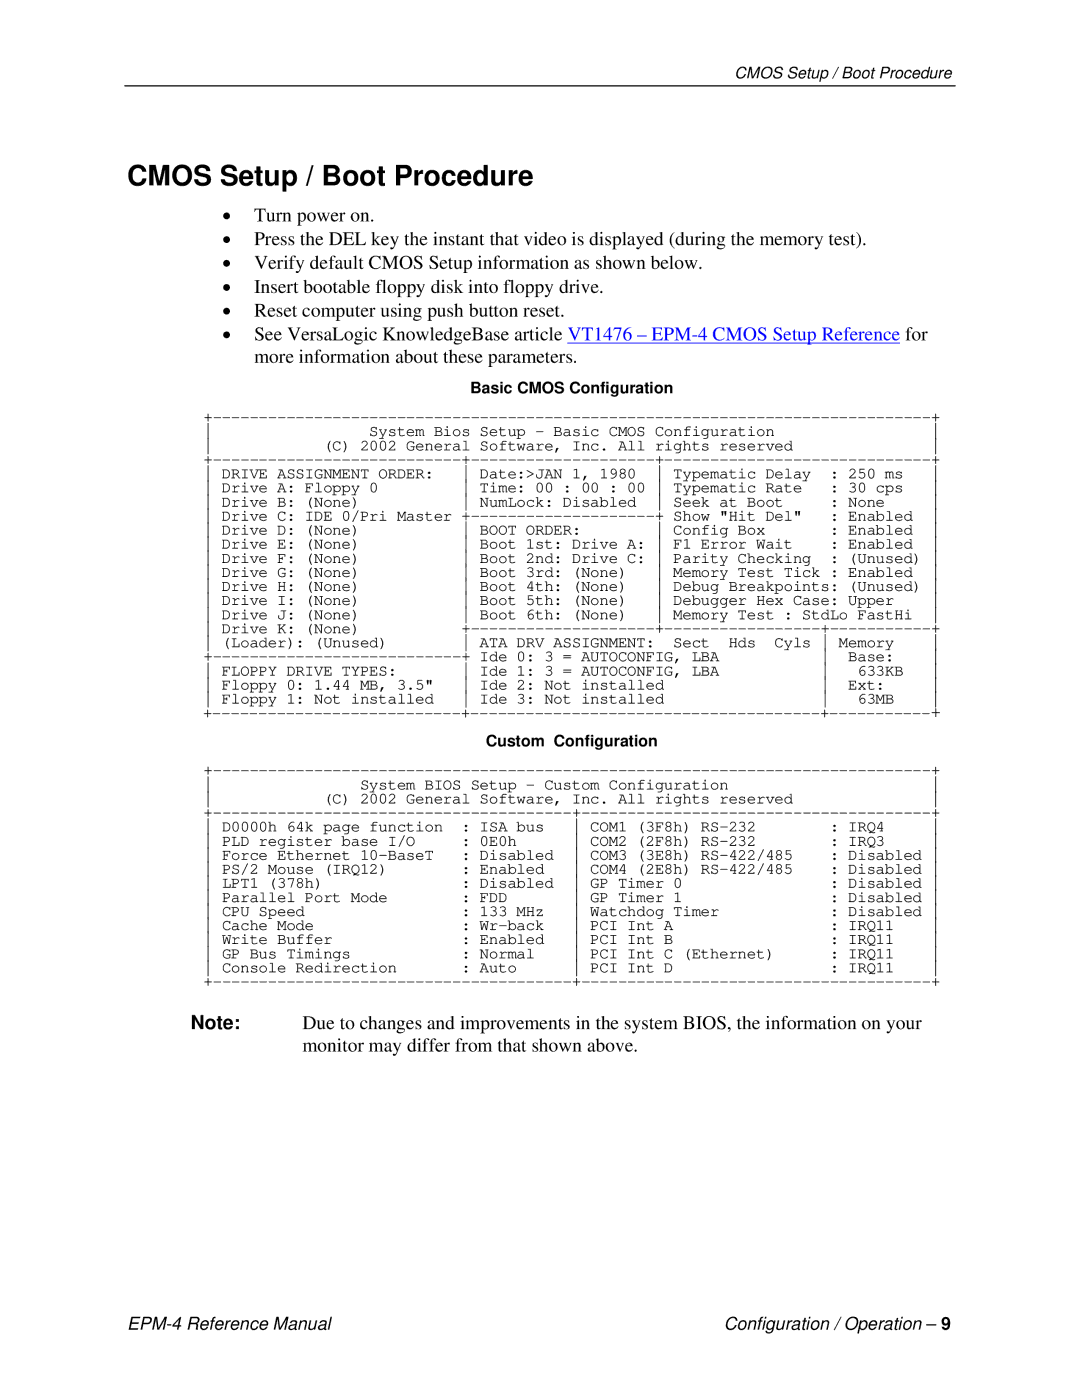
Verify default CMOS Setup information as shown below.

Insert bootable floppy disk into floppy drive.

Reset computer using push button reset.

See VersaLogic KnowledgeBase article VT1476 – EPM-4 CMOS Setup Reference for more information about these parameters.


Basic CMOS Configuration


+------------------------------------------------------------------------------

System Bios

Setup - Basic CMOS Configuration


+


(C) 2002 General

Software, Inc. All rights reserved


+---------------------------

+--------------------

Date:>JAN 1, 1980

+-----------------------------

:

250 ms

+

DRIVE ASSIGNMENT ORDER:

Typematic Delay

Drive A: Floppy 0

Time: 00 : 00 : 00 Typematic Rate

:

30 cps

Drive B: (None)

NumLock: Disabled

Seek at Boot

: None

Drive C: IDE 0/Pri Master +--------------------

BOOT ORDER:

+ Show "Hit Del"

: Enabled

Drive D: (None)

Config Box

: Enabled

Drive E: (None)

Boot 1st: Drive A: F1 Error Wait

: Enabled

Drive F: (None)

Boot 2nd: Drive C: Parity Checking

: (Unused)

Drive G: (None)

Boot 3rd: (None)

Memory Test Tick : Enabled

Drive H: (None)

Boot 4th: (None)

Debug Breakpoints: (Unused)

Drive I: (None)

Boot 5th: (None)

Debugger Hex Case: Upper

Drive J: (None)

Boot 6th: (None)

Memory Test : StdLo FastHi

Drive K: (None)

+--------------------


+-----------------

+-----------

+

(Loader): (Unused)

ATA DRV ASSIGNMENT: Sect Hds Cyls Memory

+---------------------------

+

Ide 0: 3 = AUTOCONFIG, LBA

Base:

FLOPPY DRIVE TYPES:

Ide 1: 3 = AUTOCONFIG, LBA

633KB

Floppy 0: 1.44 MB, 3.5"

Ide 2: Not installed

Ext:

Floppy 1: Not installed

Ide 3: Not installed

63MB

+---------------------------

+--------------------------------------


+-----------

+


Custom Configuration


+------------------------------------------------------------------------------

System BIOS Setup - Custom Configuration


+


(C) 2002 General Software, Inc. All rights reserved


+---------------------------------------

:

ISA bus

+--------------------------------------

: IRQ4

+

D0000h 64k page function

COM1 (3F8h) RS-232

PLD register base I/O

:

0E0h

COM2 (2F8h) RS-232

: IRQ3

Force Ethernet 10-BaseT

:

Disabled

COM3 (3E8h) RS-422/485

: Disabled

PS/2 Mouse (IRQ12)

:

Enabled

COM4 (2E8h) RS-422/485

: Disabled

LPT1 (378h)

:

Disabled

GP Timer 0

: Disabled

Parallel Port Mode

:

FDD

GP Timer 1

: Disabled

CPU Speed


:

133 MHz

Watchdog Timer

: Disabled

Cache Mode


:

Wr-back

PCI Int A

: IRQ11

Write Buffer

:

Enabled

PCI Int B

: IRQ11

GP Bus Timings

:

Normal

PCI Int C (Ethernet)

: IRQ11

Console Redirection

:

Auto

PCI Int D

: IRQ11

+---------------------------------------


+--------------------------------------


+

Note: Due to changes and improvements in the system BIOS, the information on your monitor may differ from that shown above.

EPM-4 Reference Manual

Configuration / Operation 9

Page 17
Image 17
Lynx EPM-4 manual Cmos Setup / Boot Procedure, Basic Cmos Configuration

EPM-4 specifications

The Lynx EPM-4 is a cutting-edge electronic monitoring device designed for a wide range of applications including transportation, logistics, and outdoor activities. With its sleek design and robust capabilities, the EPM-4 provides users with advanced tracking and monitoring features that enhance efficiency and safety.

One of the standout features of the Lynx EPM-4 is its high-precision GPS tracking technology. This allows for real-time location monitoring, ensuring that users can keep tabs on their assets or personnel at all times. The GPS functionality is complemented by cellular connectivity, enabling seamless communication and data transmission even in remote areas. Whether used in urban settings or off-the-grid locations, the EPM-4 maintains reliability and performance.

Another key characteristic of the Lynx EPM-4 is its user-friendly interface. The device is equipped with a bright LED display that provides instant access to essential information, including speed, distance traveled, and battery status. Its intuitive navigation system ensures that even users with minimal technical expertise can operate the device effectively.

Durability is a fundamental aspect of the Lynx EPM-4 design. Constructed to withstand harsh environmental conditions, it features IP67-rated water and dust resistance. This ensures that the device can perform flawlessly in diverse weather conditions, making it suitable for outdoor enthusiasts and professionals alike.

The EPM-4 also incorporates advanced battery technology, allowing for extended usage time on a single charge. This is particularly advantageous for long-haul trips or field operations where charging facilities may be unavailable. Additionally, the device supports various power management modes that optimize battery life based on usage patterns.

Connectivity options are another highlight of the Lynx EPM-4. It supports Bluetooth and Wi-Fi, enabling quick data transfer to smartphones, tablets, or computers for further analysis. Users can easily share information with team members or stakeholders, enhancing collaboration and decision-making processes.

Lastly, the Lynx EPM-4 features customizable settings, allowing users to tailor the device’s functionality to meet their specific needs. Whether it’s setting geofences, receiving alerts for unusual activity, or customizing data logging intervals, the EPM-4 ensures a personalized experience that maximizes utility.

In conclusion, the Lynx EPM-4 stands out as a premier electronic monitoring solution, combining GPS precision, robust durability, extended battery life, and versatile connectivity. With its advanced features and user-friendly design, it serves a vital role in managing logistics, ensuring safety, and enhancing operational efficiency across various industries.