RECORDING

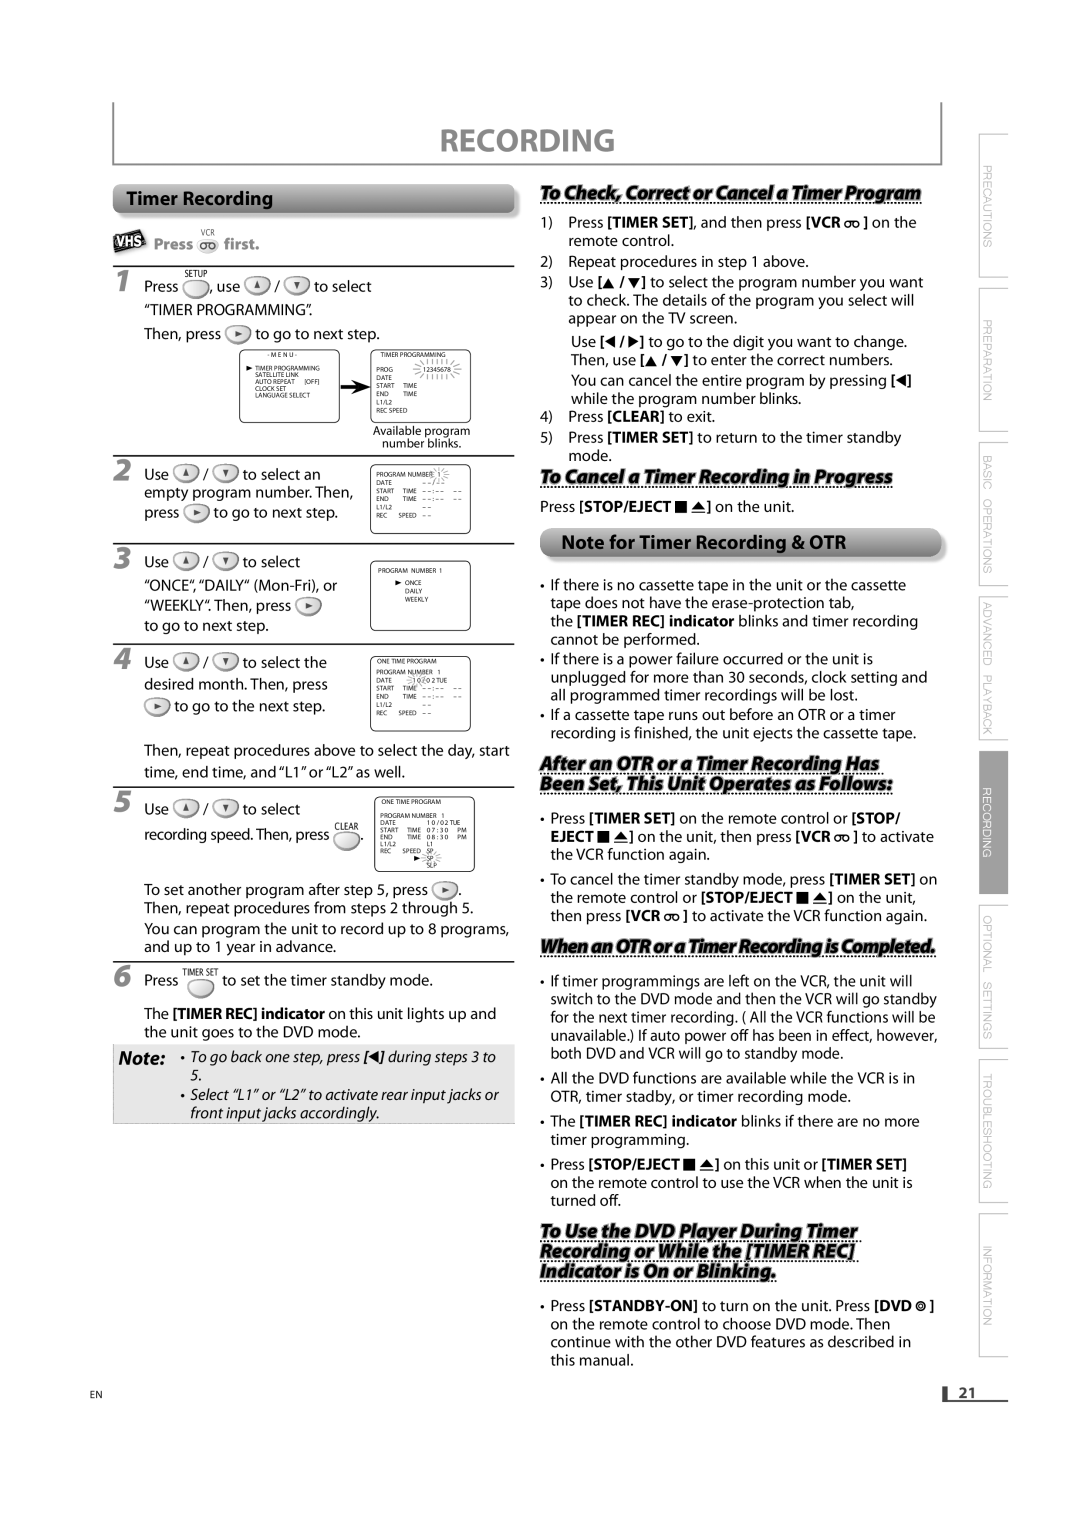
Timer Recording

VHSVHS

Press

VCR


first.


1

SETUP

/

to select

Press

, use


“TIMER PROGRAMMING”.


Then, press

to go to next step.

- M E N U -

TIMER PROGRAMMING

B TIMER PROGRAMMING

PROG


12345678


SATELLITE LINK


DATE


AUTO REPEAT [OFF]

START

TIME

CLOCK SET

END

TIME

LANGUAGE SELECT

L1/L2

REC SPEED

Available program

number blinks.

2 Use

/

to select an

DATE


– / – –


empty program number. Then,

PROGRAM NUMBER 1


END

TIME

– : – –

– –


START

TIME

– : – –

– –

press


to go to next step.

L1/L2


– –


REC

SPEED

– –


3 Use

/

to select

PROGRAM NUMBER 1


“ONCE“, “DAILY“ (Mon-Fri), or


DAILY


B ONCE


“WEEKLY“. Then, press


WEEKLY


to go to next step.


4 Use

/

to select the

PROGRAM NUMBER 1


ONE TIME PROGRAM


desired month. Then, press

DATE

1 0 / 0 2 TUE


START

TIME

– : – –

– –

to go to the next step.

END

TIME

– : – –

– –

REC

SPEED

– –


L1/L2


– –


Then, repeat procedures above to select the day, start time, end time, and “L1” or “L2” as well.

5 Use

/

to select


ONE TIME PROGRAM


PROGRAM NUMBER 1


recording speed. Then, press

CLEAR

DATE


1 0

/ 0 2 TUE

START

TIME

0 7

: 3 0

PM

.

END

TIME

0 8

: 3 0

PM


L1/L2


L1


REC

SPEED

SP


B SP


SLP


To set another program after step 5, press . Then, repeat procedures from steps 2 through 5.

You can program the unit to record up to 8 programs, and up to 1 year in advance.

6 Press TIMER SET to set the timer standby mode.

The [TIMER REC] indicator on this unit lights up and the unit goes to the DVD mode.

Note: • To go back one step, press [s] during steps 3 to

5.

• Select “L1” or “L2” to activate rear input jacks or front input jacks accordingly.

To Check, Correct or Cancel a Timer Program

1)Press [TIMER SET], and then press [VCR ] on the remote control.

2)Repeat procedures in step 1 above.

3)Use [K / L] to select the program number you want to check. The details of the program you select will appear on the TV screen.

Use [s / B] to go to the digit you want to change. Then, use [K / L] to enter the correct numbers. You can cancel the entire program by pressing [s] while the program number blinks.

4)Press [CLEAR] to exit.

5)Press [TIMER SET] to return to the timer standby mode.

To Cancel a Timer Recording in Progress

Press [STOP/EJECT C A] on the unit.

Note for Timer Recording & OTR

If there is no cassette tape in the unit or the cassette tape does not have the erase-protection tab,

the [TIMER REC] indicator blinks and timer recording cannot be performed.

If there is a power failure occurred or the unit is unplugged for more than 30 seconds, clock setting and all programmed timer recordings will be lost.

If a cassette tape runs out before an OTR or a timer recording is finished, the unit ejects the cassette tape.

After an OTR or a Timer Recording Has Been Set, This Unit Operates as Follows:

Press [TIMER SET] on the remote control or [STOP/ EJECT C A] on the unit, then press [VCR ] to activate the VCR function again.

To cancel the timer standby mode, press [TIMER SET] on the remote control or [STOP/EJECT C A] on the unit, then press [VCR ] to activate the VCR function again.

WhenanOTRoraTimerRecordingisCompleted.

If timer programmings are left on the VCR, the unit will switch to the DVD mode and then the VCR will go standby for the next timer recording. ( All the VCR functions will be unavailable.) If auto power off has been in effect, however, both DVD and VCR will go to standby mode.

All the DVD functions are available while the VCR is in OTR, timer stadby, or timer recording mode.

The [TIMER REC] indicator blinks if there are no more timer programming.

Press [STOP/EJECT CA] on this unit or [TIMER SET] on the remote control to use the VCR when the unit is turned off.

PRECAUTIONS PREPARATION BASIC OPERATIONS ADVANCED PLAYBACK RECORDING OPTIONAL SETTINGS TROUBLESHOOTING

EN

To Use the DVD Player During Timer Recording or While the [TIMER REC] Indicator is On or Blinking.

Press [STANDBY-ON]to turn on the unit. Press [DVD ] on the remote control to choose DVD mode. Then continue with the other DVD features as described in this manual.

INFORMATION

21

Page 21
Image 21
Magnavox DV220MW9 Timer Recording, To Check, Correct or Cancel a Timer Program, WhenanOTRoraTimerRecordingisCompleted

DV220MW9 specifications

The Magnavox DV220MW9 is a versatile DVD player that combines quality performance with an array of features, making it an excellent choice for both casual viewers and dedicated movie enthusiasts. One of the standout aspects of this device is its compatibility with various disc formats, including DVD, DVD-R/RW, CD, and CD-R/RW formats. This feature enables users to enjoy a wide range of media, from store-bought DVDs to personal recordings.

Equipped with progressive scan technology, the DV220MW9 enhances the viewing experience by delivering high-quality video output. This technology scans images progressively, providing a smoother and clearer picture quality that is especially noticeable when watching movies or high-action sequences. Additionally, the player supports standard definition video playback, ensuring compatibility with a variety of television sets.

The Magnavox DV220MW9 also boasts user-friendly features that enhance accessibility and convenience. The remote control is intuitive, allowing users to navigate through menus and settings effortlessly. The device includes a one-touch play function, simplifying the process of starting a movie. Furthermore, it incorporates a resume playback feature, enabling users to continue watching from where they left off, which is particularly useful for viewers who may not have time to finish a movie in one sitting.

In terms of connectivity, the DV220MW9 provides both composite and S-Video outputs, ensuring compatibility with a wide range of televisions and display devices. This versatility allows users to connect the player to older televisions as well as modern high-definition models, making it a flexible addition to any entertainment setup.

The design of the Magnavox DV220MW9 is sleek and compact, allowing it to fit seamlessly into any media center without taking up too much space. The device’s simple and elegant appearance makes it a stylish addition to home entertainment systems.

Overall, the Magnavox DV220MW9 stands out due to its reliable performance, diverse format compatibility, and user-friendly features. Whether for everyday viewing or for special movie nights, this DVD player caters to a wide audience, making it a valuable tool for enjoying a variety of media formats.