VCR Functions

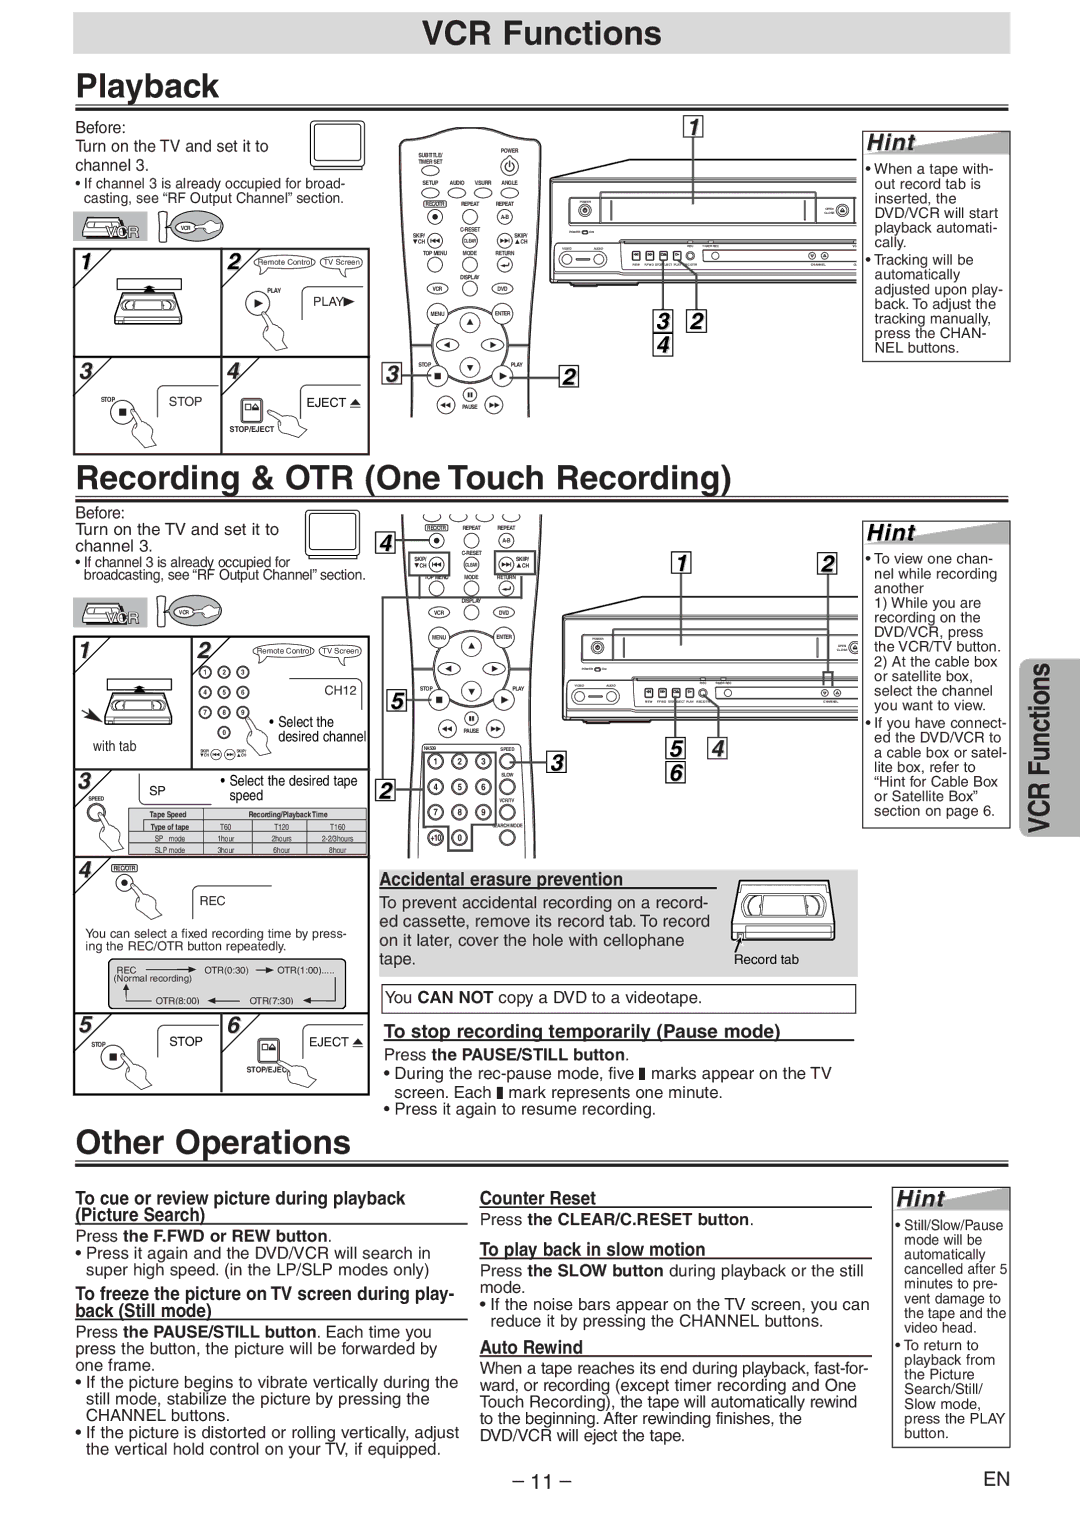
Playback

Before:

Turn on the TV and set it to channel 3.

If channel 3 is already occupied for broad- casting, see “RF Output Channel” section.

VCR

VCR


1


2

Remote Control

TV Screen


PLAY


PLAYB

3


4


STOP

STOP


EJECT A


STOP/EJECT


3

SUBTITLE/


POWER


TIMER SET


SETUP

AUDIO V.SURR

ANGLE

REC/OTR

REPEAT

REPEAT


A-B

SKIP/

C-RESET

SKIIP/

CLEAR

CH

CH

TOP MENU

MODE

RETURN


DISPLAY


VCR


DVD

MENU


ENTER

STOP


PLAY


PAUSE


1

POWER

POWER ON

REC

TIMER REC

VIDEOAUDIO

REW F.FWD STOP/EJECT PLAY REC/OTR

3 2

4

2

OPEN

CLOSE

VC

CHANNELOU

Hint

When a tape with- out record tab is inserted, the DVD/VCR will start playback automati- cally.

Tracking will be automatically adjusted upon play- back. To adjust the tracking manually, press the CHAN- NEL buttons.

Recording & OTR (One Touch Recording)

Before:

Turn on the TV and set it to channel 3.

• If channel 3 is already occupied for broadcasting, see “RF Output Channel” section.

VCR

VCR


1

2


Remote Control

TV Screen


1

2

3


4

5

6

CH12


7

8

9


• Select the


0

desired channel

with tab


SKIP/


SKIIP/


CH


CH


3

SP

• Select the desired tape

SPEED

speed


Tape Speed


Recording/Playback Time


Type of tape

T60

T120

T160


SP mode

1hour

2hours

2-2/3hours


SLP mode

3hour

6hour

8hour

4

REC/OTR


REC/OTR

REPEAT

REPEAT

4


A-B

C-RESET


SKIP/

CLEAR

SKIIP/

CH

CH

TOP MENU

MODE

RETURN


DISPLAY


VCR


DVD


MENU


ENTER

5

STOP


PLAY


PAUSE


NA509


SPEED


1

2

3

2


SLOW

4

5

6


VCR/TV


7

8

9

SEARCH MODE

+10 0


1


POWER


POWER

ON


VIDEO

AUDIO

REC

TIMER REC


REW F.FWD STOP/EJECT PLAY

REC/OTR


3

5


4

6


2

OPEN

CLOSE

CHANNEL

Hint

To view one chan- nel while recording another

1)While you are recording on the DVD/VCR, press the VCR/TV button.

2)At the cable box or satellite box, select the channel you want to view.

If you have connect- ed the DVD/VCR to a cable box or satel- lite box, refer to “Hint for Cable Box or Satellite Box” section on page 6.

VCR Functions

REC

You can select a fixed recording time by press- ing the REC/OTR button repeatedly.

REC

OTR(0:30)


OTR(1:00)

(Normal recording)


OTR(8:00)

OTR(7:30)

5

STOP

6

STOP

EJECT A


STOP/EJEC

Accidental erasure prevention

To prevent accidental recording on a record- ed cassette, remove its record tab. To record on it later, cover the hole with cellophane

tape.

Record tab

You CAN NOT copy a DVD to a videotape.

To stop recording temporarily (Pause mode)

Press the PAUSE/STILL button.

During the rec-pause mode, five C marks appear on the TV screen. Each C mark represents one minute.

Press it again to resume recording.

Other Operations

To cue or review picture during playback (Picture Search)

Press the F.FWD or REW button.

Press it again and the DVD/VCR will search in super high speed. (in the LP/SLP modes only)

To freeze the picture on TV screen during play- back (Still mode)

Press the PAUSE/STILL button. Each time you press the button, the picture will be forwarded by one frame.

If the picture begins to vibrate vertically during the still mode, stabilize the picture by pressing the CHANNEL buttons.

If the picture is distorted or rolling vertically, adjust the vertical hold control on your TV, if equipped.

Counter Reset

Press the CLEAR/C.RESET button.

To play back in slow motion

Press the SLOW button during playback or the still mode.

If the noise bars appear on the TV screen, you can reduce it by pressing the CHANNEL buttons.

Auto Rewind

When a tape reaches its end during playback, fast-for- ward, or recording (except timer recording and One Touch Recording), the tape will automatically rewind to the beginning. After rewinding finishes, the DVD/VCR will eject the tape.

Hint

Still/Slow/Pause mode will be automatically cancelled after 5 minutes to pre- vent damage to the tape and the video head.

To return to playback from the Picture Search/Still/ Slow mode, press the PLAY button.

– 11 –

EN

Page 11
Image 11
Magnavox MSD804 owner manual VCR Functions Playback, Recording & OTR One Touch Recording, Other Operations

MSD804 specifications

The Magnavox MSD804 is a powerful and versatile system that epitomizes the innovations in home entertainment technology during its time. Launched in the early 1990s, this device brought together a combination of features that not only enhanced audio and visual quality but also provided a user-friendly experience that appealed to a broad spectrum of consumers.

One of the most notable features of the MSD804 is its integrated CD player, allowing users to enjoy their favorite music and audio content with unparalleled sound clarity. The system utilized advanced digital-to-analog conversion technology, which significantly reduced distortion and noise, ensuring that audio playback remained true to the original recording. This focus on audio fidelity made the MSD804 particularly popular among audiophiles and casual listeners alike.

In addition to its audio capabilities, the MSD804 boasted a high-quality video output, which was a significant advancement for home entertainment systems of its era. With support for various video formats, users could effortlessly connect their video components, including VCRs and laser disc players. The system incorporated features such as automatic tracking and dynamic color control, enhancing the viewing experience and making it adaptable to various types of content.

A highlight of the MSD804 is its user-friendly interface, designed with convenience in mind. The system came equipped with an intuitive remote control that allowed users to easily navigate through their audio and video selections. This feature provided an added level of comfort, letting users manage their entertainment systems from a distance without the need to get up constantly.

Moreover, the MSD804 featured multiple connectivity options, including RCA, S-Video, and stereo outputs, giving users the flexibility to connect to a wide range of devices. This adaptability ensured that the system could seamlessly fit into various home entertainment setups, whether standalone or as part of a more complex audio-visual configuration.

Overall, the Magnavox MSD804 exemplifies a significant point in the evolution of home entertainment systems, bringing together high-quality audio and video technology in a practical and accessible package. Its combination of advanced features, user-friendly interface, and connectivity options made it a standout choice for consumers seeking an enhanced home viewing experience. The MSD804 remains a nostalgic reminder of a time when home entertainment was becoming more integrated and sophisticated.