NAMES FUNCTIONS

ENGLISH

ADVANCED OPERATIONS –AUDIO CD–


AND

CONNECTIONS

BASIC

OPERATIONS

BASIC

CONNECTIONS

ADVANCED

EDITING (RECORDING A DISC ON A TAPE)

When recording from a compact disc to a tape, use this function to match the tape length to the playing time of the tracks to be recorded and to create 4- second intervals between the tracks.

7Simple edit

This operation fits tracks into a specified tape length while keeping the tracks in their original order.

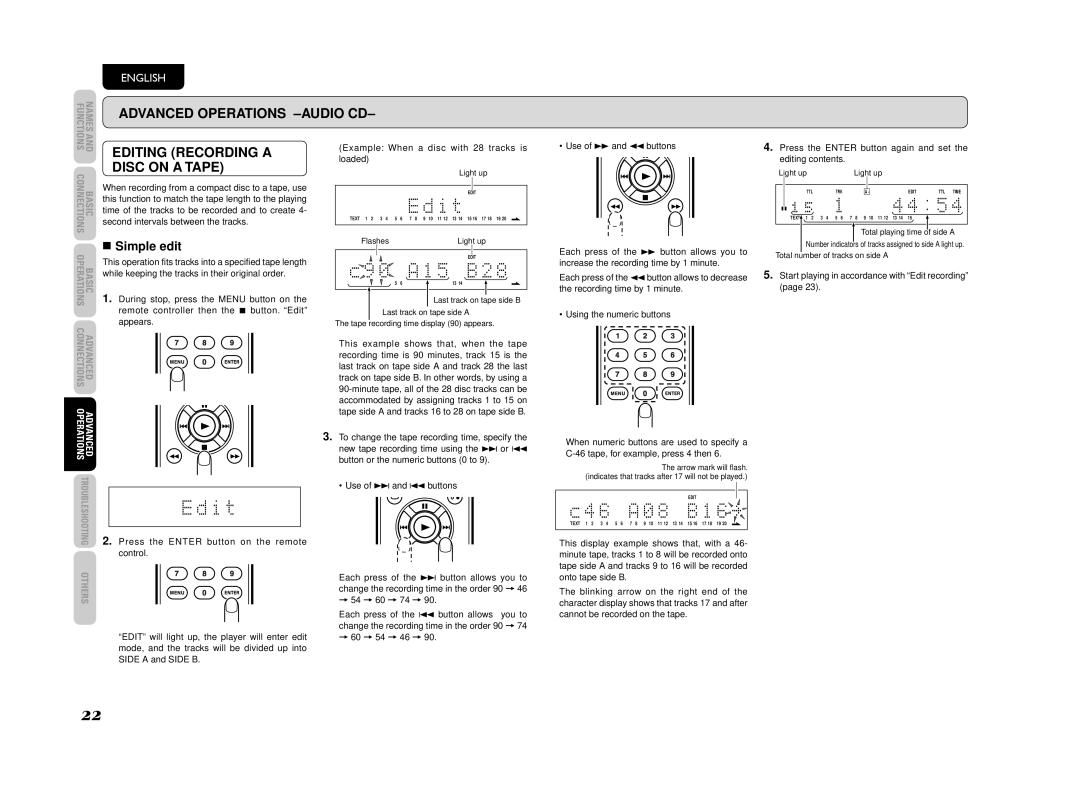
1.During stop, press the MENU button on the remote controller then the 7 button. “Edit” appears.

(Example: When a disc with 28 tracks is loaded)


Light up


EDIT


TEXT

1

2

3

4

5

6

7

8

9

10

11 12

13 14

15 16

17 18

19 20


Flashes


Light up


5


5


5

5


EDIT


5

5

5


5


5

6


13 14


Last track on tape side B

Last track on tape side A

The tape recording time display (90) appears.

This example shows that, when the tape recording time is 90 minutes, track 15 is the last track on tape side A and track 28 the last track on tape side B. In other words, by using a 90-minute tape, all of the 28 disc tracks can be accommodated by assigning tracks 1 to 15 on tape side A and tracks 16 to 28 on tape side B.

• Use of ¡ and 1 buttons

Each press of the ¡ button allows you to increase the recording time by 1 minute.

Each press of the 1 button allows to decrease the recording time by 1 minute.

• Using the numeric buttons

4.Press the ENTER button again and set the editing contents.

Light up

Light up


TTL


TRK


A –


EDIT

TTL

TIME

TEXT

1

2

3

4

5

6

7

8

9

10

11 12

13 14

15


Total playing time of side A Number indicators of tracks assigned to side A light up.

Total number of tracks on side A

5.Start playing in accordance with “Edit recording” (page 23).

ADVANCED OPERATIONS

TROUBLESHOOTING

OTHERS

2.Press the ENTER button on the remote control.

“EDIT” will light up, the player will enter edit mode, and the tracks will be divided up into SIDE A and SIDE B.

3.To change the tape recording time, specify the new tape recording time using the ¢ or 4 button or the numeric buttons (0 to 9).

• Use of ¢ and 4 buttons

Each press of the ¢ button allows you to change the recording time in the order 90 = 46

=54 = 60 = 74 = 90.

Each press of the 4 button allows you to change the recording time in the order 90 = 74

=60 = 54 = 46 = 90.

When numeric buttons are used to specify a C-46 tape, for example, press 4 then 6.

The arrow mark will flash. (indicates that tracks after 17 will not be played.)


EDIT


5


5


5


5


5


5

TEXT

1

2

3

4

5

6

7

8

9

10

11 12

13 14

15 16

17 18

19 20


This display example shows that, with a 46- minute tape, tracks 1 to 8 will be recorded onto tape side A and tracks 9 to 16 will be recorded onto tape side B.

The blinking arrow on the right end of the character display shows that tracks 17 and after cannot be recorded on the tape.

22

Page 25
Image 25
Marantz CD5003 manual Editing Recording a Disc on a Tape, Simple edit

CD5003 specifications

The Marantz CD5003 is a remarkable CD player that exemplifies high-quality audio engineering, designed to deliver exceptional sound reproduction for music enthusiasts. Launched as part of Marantz's renowned line of audio components, the CD5003 combines sophisticated technology with user-friendly features, making it an excellent choice for both casual listeners and audiophiles.

One of the standout features of the CD5003 is its high-performance DAC (Digital-to-Analog Converter). Equipped with the advanced CS4398 chip, this DAC ensures precise signal processing and translates digital audio into analog sound with remarkable accuracy. The player supports a wide range of CD formats including CD-R and CD-RW, allowing users to enjoy diverse music collections without compromise.

In addition to its robust DAC, the CD5003 boasts a meticulously designed, low-jitter clock system that significantly diminishes timing errors. This is critical for maintaining audio clarity and ensuring that sound reproduction remains faithful to the original recording. This technological sophistication produces a nuanced and dynamic audio experience, capturing every detail in the music.

The CD5003 features a sleek, compact design that seamlessly fits into any home audio setup. Its front panel is thoughtfully laid out, with a clear display and intuitive controls that facilitate easy navigation through tracks and settings. The player also includes a headphone output with a dedicated volume control, allowing for private listening sessions without needing additional equipment.

Further enhancing its versatility, the Marantz CD5003 includes a variety of connectivity options. It comes with both optical and coaxial digital outputs, enabling users to connect the player to a wide array of audio systems, including external DACs and home theater setups. This flexibility ensures that the player can integrate smoothly into any existing audio configuration.

Lastly, the Marantz CD5003 employs a finely-tuned transport mechanism which minimizes vibration and resonance, critical factors in achieving superior audio fidelity. By isolating the digital disc from environmental disturbances, this design greatly improves playback accuracy and reliability.

In conclusion, the Marantz CD5003 stands out as a premium CD player that embodies the brand's commitment to quality sound. With its advanced technologies, user-friendly features, and elegant design, it is sure to satisfy those who seek an enriching listening experience. Whether you are rediscovering your CD collection or exploring new music, the CD5003 promises to elevate your audio enjoyment.