ASSEMBLY INSTRUCTIONS

RECIPES

3

Drain Clip

4

5

Storage for

Valve Spout

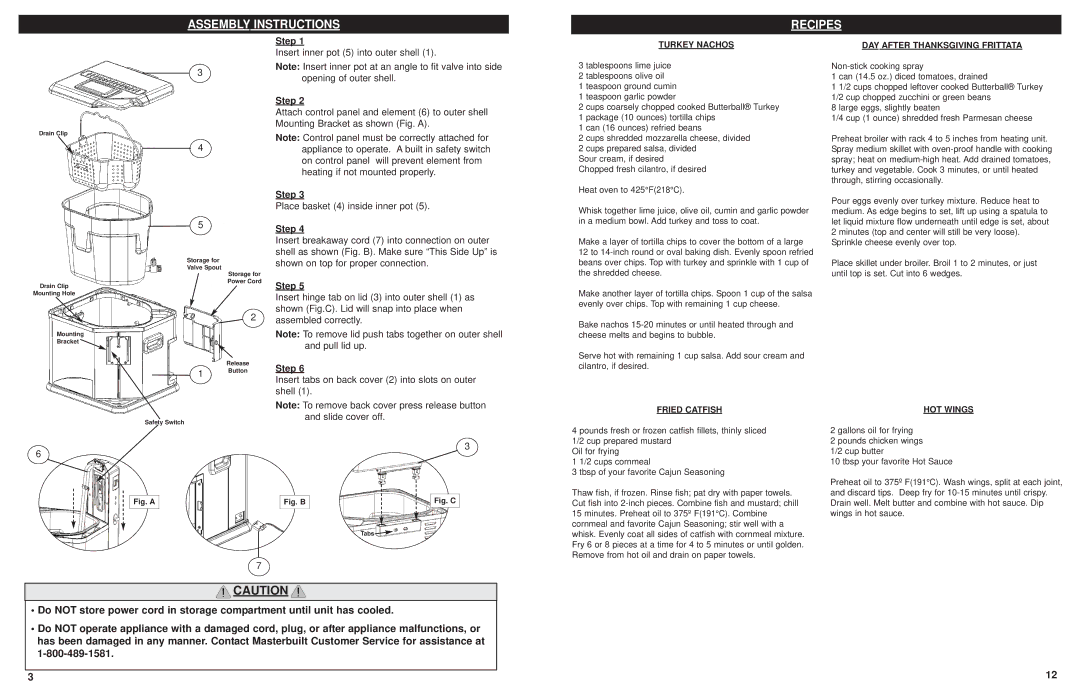
Step 1

Insert inner pot (5) into outer shell (1).

Note: Insert inner pot at an angle to fit valve into side opening of outer shell.

Step 2

Attach control panel and element (6) to outer shell Mounting Bracket as shown (Fig. A).

Note: Control panel must be correctly attached for appliance to operate. A built in safety switch on control panel will prevent element from heating if not mounted properly.

Step 3

Place basket (4) inside inner pot (5).

Step 4

Insert breakaway cord (7) into connection on outer shell as shown (Fig. B). Make sure “This Side Up” is shown on top for proper connection.

TURKEY NACHOS

3 tablespoons lime juice

2 tablespoons olive oil

1 teaspoon ground cumin

1 teaspoon garlic powder

2 cups coarsely chopped cooked Butterball® Turkey

1 package (10 ounces) tortilla chips

1 can (16 ounces) refried beans

2 cups shredded mozzarella cheese, divided

2 cups prepared salsa, divided Sour cream, if desired Chopped fresh cilantro, if desired

Heat oven to 425°F(218°C).

Whisk together lime juice, olive oil, cumin and garlic powder in a medium bowl. Add turkey and toss to coat.

Make a layer of tortilla chips to cover the bottom of a large

12 to 14-inch round or oval baking dish. Evenly spoon refried beans over chips. Top with turkey and sprinkle with 1 cup of

DAY AFTER THANKSGIVING FRITTATA

Non-stick cooking spray

1 can (14.5 oz.) diced tomatoes, drained

1 1/2 cups chopped leftover cooked Butterball® Turkey 1/2 cup chopped zucchini or green beans

8 large eggs, slightly beaten

1/4 cup (1 ounce) shredded fresh Parmesan cheese

Preheat broiler with rack 4 to 5 inches from heating unit. Spray medium skillet with oven-proof handle with cooking spray; heat on medium-high heat. Add drained tomatoes, turkey and vegetable. Cook 3 minutes, or until heated through, stirring occasionally.

Pour eggs evenly over turkey mixture. Reduce heat to medium. As edge begins to set, lift up using a spatula to let liquid mixture flow underneath until edge is set, about 2 minutes (top and center will still be very loose). Sprinkle cheese evenly over top.

Place skillet under broiler. Broil 1 to 2 minutes, or just

Drain Clip

Storage for Power Cord

Step 5

the shredded cheese.

until top is set. Cut into 6 wedges.

Mounting Hole

2

Mounting

Bracket

Release

1 Button

Insert hinge tab on lid (3) into outer shell (1) as shown (Fig.C). Lid will snap into place when assembled correctly.

Note: To remove lid push tabs together on outer shell and pull lid up.

Step 6

Insert tabs on back cover (2) into slots on outer shell (1).

Make another layer of tortilla chips. Spoon 1 cup of the salsa evenly over chips. Top with remaining 1 cup cheese.

Bake nachos 15-20 minutes or until heated through and cheese melts and begins to bubble.

Serve hot with remaining 1 cup salsa. Add sour cream and cilantro, if desired.

Safety Switch

6

Fig. A

Note: To remove back cover press release button and slide cover off.

3

Fig. B

Fig. C


Tabs

FRIED CATFISH

4 pounds fresh or frozen catfish fillets, thinly sliced 1/2 cup prepared mustard

Oil for frying

1 1/2 cups cornmeal

3 tbsp of your favorite Cajun Seasoning

Thaw fish, if frozen. Rinse fish; pat dry with paper towels. Cut fish into 2-inch pieces. Combine fish and mustard; chill

15minutes. Preheat oil to 375º F(191°C). Combine cornmeal and favorite Cajun Seasoning; stir well with a whisk. Evenly coat all sides of catfish with cornmeal mixture. Fry 6 or 8 pieces at a time for 4 to 5 minutes or until golden. Remove from hot oil and drain on paper towels.

HOT WINGS

2 gallons oil for frying

2 pounds chicken wings 1/2 cup butter

10 tbsp your favorite Hot Sauce

Preheat oil to 375º F(191°C). Wash wings, split at each joint, and discard tips. Deep fry for 10-15 minutes until crispy. Drain well. Melt butter and combine with hot sauce. Dip wings in hot sauce.

7

CAUTION

Do NOT store power cord in storage compartment until unit has cooled.

Do NOT operate appliance with a damaged cord, plug, or after appliance malfunctions, or has been damaged in any manner. Contact Masterbuilt Customer Service for assistance at 1-800-489-1581.

3

12

Page 4
Image 4
Masterbuilt 20010109, 20010611 operation manual Assembly Instructions Recipes, Step

20010611, 20010109 specifications

The Masterbuilt 20010109 and 20010611 are two notable models within the Masterbuilt line of electric smokers, designed to enhance the outdoor cooking experience for both novices and experienced chefs alike. These versatile electric smokers are ideal for anyone looking to achieve that signature smoky flavor without the hassle of traditional wood or charcoal methods.

One of the main features of the Masterbuilt 20010109, also known as the Masterbuilt Electric Smokehouse, is its spacious cooking capacity. This model typically offers up to 30 inches of smoking space, allowing users to cook multiple racks of ribs, briskets, and other meats simultaneously. The adjustable cooking racks provide flexibility for different types of food, making it perfect for family gatherings or parties.

The user-friendly design of the Masterbuilt 20010109 includes a simple digital control panel for setting and monitoring the cooking temperature and time, making it easier to achieve perfectly smoked results. The built-in thermostat ensures consistent temperature throughout the cooking process, which is vital for controlling smoke flavor and tenderness.

On the other hand, the Masterbuilt 20010611 further expands on these features with its Bluetooth technology. With this model, users can connect their smartphones or tablets to monitor and control the smoking process from a distance, providing a level of convenience previously unseen in traditional smokers. The integrated temperature probe allows cooks to check internal meat temperatures without opening the door, which helps maintain the cooking environment.

Both models utilize a patented wood chip loading system, allowing users to add wood chips without opening the main chamber. This feature not only preserves heat but also delivers consistent smoke flavor throughout the cooking process. The integrated water pan also helps regulate humidity levels, ensuring moist and tender outcomes for meats.

The construction of both models emphasizes durability, featuring a sturdy smoking chamber designed to withstand the elements. The exterior is made from high-quality materials, offering longevity and performance for years to come. Easy cleanup is another feature offered by Masterbuilt; the removable drip pan and ashtray simplify the post-cooking maintenance.

In summary, the Masterbuilt 20010109 and 20010611 electric smokers offer a seamless smoking experience with generous capacity, digital controls, and innovative technologies like Bluetooth connectivity. Their design, durability, and ease of use make them suitable choices for anyone looking to elevate their outdoor cooking game.