Manuals
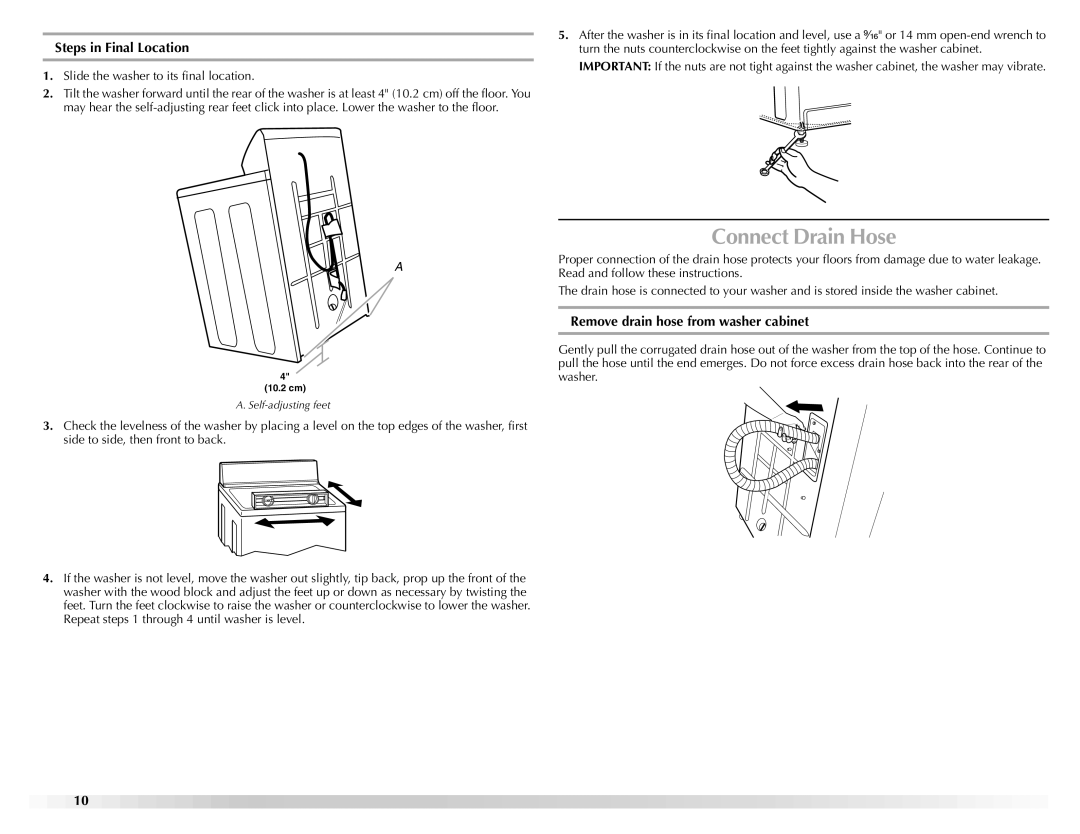
/
Maytag
/
Laundry Appliance
/
Washer
Maytag
W10117890A
manual
Connect Drain Hose, Steps in Final Location
Models:
W10117890A
1
10
20
20
Download
20 pages
21.8 Kb
7
8
9
10
11
12
13
14
Troubleshooting
Install
Cleaning Your Washer
Weight
If you need replacement parts
Safety
Looped power cord
Page 10
Image 10
Page 9
Page 11
Page 10
Image 10
Page 9
Page 11
Contents
AUTOMATIC WASHER
W10117890A
USE & CARE GUIDE
INSTALLATION REQUIREMENTS
TABLE OF CONTENTS
WASHER SAFETY
INSTALLATION INSTRUCTIONS
Your safety and the safety of others are very important
WASHER SAFETY
DANGER
IMPORTANT SAFETY INSTRUCTIONS
SAVE THESE INSTRUCTIONS
Tools and Parts
INSTALLATION REQUIREMENTS
Tools needed for connecting the drain hose and water inlet hoses
Location Requirements
Laundry tub drain system view C
Recessed area or closet installation
Drain System
Standpipe drain system - wall or floor views A & B
Electrical Shock Hazard Plug into a grounded 3 prong outlet
Electrical Requirements
GROUNDING INSTRUCTIONS
Do not remove ground prong Do not use an adapter
Excessive Weight Hazard
INSTALLATION INSTRUCTIONS
Straight power cord
Use two or more people to move and install washer
Install the Front Leveling Feet
Looped power cord
Level the Washer
Steps in Final Location
Connect Drain Hose
Remove drain hose from washer cabinet
Laundry tub drain or standpipe drain
Connecting the drain hose form to the corrugated drain hose
Connect the Inlet Hoses
To keep drain water from going back into the washer
Check for leaks
Clear the water lines
Connect the inlet hoses to the washer
A. Cold water inlet valve B. Hot water inlet valve
Complete Installation
Secure the Drain Hose
Fire Hazard
WASHER USE
Starting Your Washer
No washer can completely remove oil
Suggested Fabrics
Temperature Guide
Wash Temp
Warm
Water Inlet Hoses
Cleaning Your Washer
WASHER CARE
Moving and Storage
Washer Operation
TROUBLESHOOTING
Washer and Components
Agitator operation
Washer continues to fill or drain cycle seems stuck
Washer Results
Washer won’t drain or spin
Wash/Rinse temperature not what I selected
Load is wrinkled
ASSISTANCE OR SERVICE
If you need replacement parts
Load is tangled or twisted
All rights reserved
2007
3/07
Printed in U.S.A
Top
Page
Image
Contents