Adjust the Doors

Door Closing

Your refrigerator has two front adjustable rollers – one on the right and one on the left. If your refrigerator seems unsteady or you want the doors to close easier, adjust the refrigerator's tilt using the instructions below.

IMPORTANT: To comply with American Disabilities Act (ADA) guidelines, fully retract the rollers into the cabinet to lower the refrigerator.

1.Remove the base grille. See the Base Grille graphic in “Refrigerator Doors.” The two leveling screws are part of the front roller assemblies which are at the base of the refrigerator on either side.

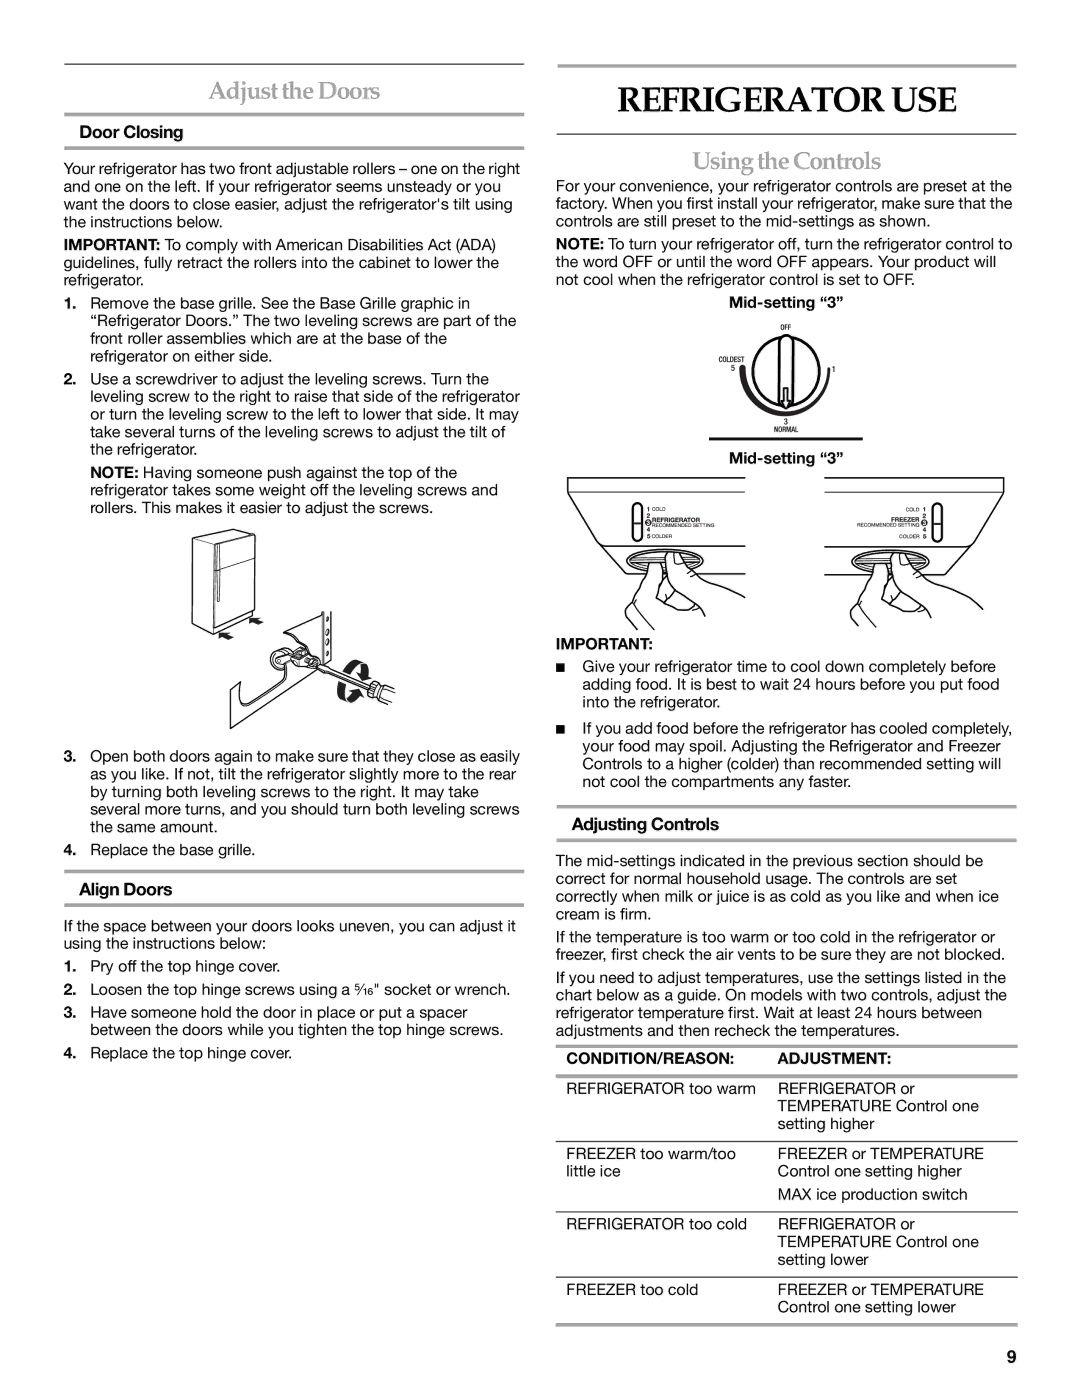
2.Use a screwdriver to adjust the leveling screws. Turn the leveling screw to the right to raise that side of the refrigerator or turn the leveling screw to the left to lower that side. It may take several turns of the leveling screws to adjust the tilt of the refrigerator.

NOTE: Having someone push against the top of the refrigerator takes some weight off the leveling screws and rollers. This makes it easier to adjust the screws.

3.Open both doors again to make sure that they close as easily as you like. If not, tilt the refrigerator slightly more to the rear by turning both leveling screws to the right. It may take several more turns, and you should turn both leveling screws the same amount.

4.Replace the base grille.

Align Doors

If the space between your doors looks uneven, you can adjust it using the instructions below:

1.Pry off the top hinge cover.

2.Loosen the top hinge screws using a ⁵⁄₁₆" socket or wrench.

3.Have someone hold the door in place or put a spacer between the doors while you tighten the top hinge screws.

4.Replace the top hinge cover.

REFRIGERATOR USE

Using the Controls

For your convenience, your refrigerator controls are preset at the factory. When you first install your refrigerator, make sure that the controls are still preset to the mid-settings as shown.

NOTE: To turn your refrigerator off, turn the refrigerator control to the word OFF or until the word OFF appears. Your product will not cool when the refrigerator control is set to OFF.

Mid-setting “3”

Mid-setting “3”

IMPORTANT:

Give your refrigerator time to cool down completely before adding food. It is best to wait 24 hours before you put food into the refrigerator.

If you add food before the refrigerator has cooled completely, your food may spoil. Adjusting the Refrigerator and Freezer Controls to a higher (colder) than recommended setting will not cool the compartments any faster.

Adjusting Controls

The mid-settings indicated in the previous section should be correct for normal household usage. The controls are set correctly when milk or juice is as cold as you like and when ice cream is firm.

If the temperature is too warm or too cold in the refrigerator or freezer, first check the air vents to be sure they are not blocked.

If you need to adjust temperatures, use the settings listed in the chart below as a guide. On models with two controls, adjust the refrigerator temperature first. Wait at least 24 hours between adjustments and then recheck the temperatures.

CONDITION/REASON:

ADJUSTMENT:


REFRIGERATOR too warm

REFRIGERATOR or


TEMPERATURE Control one


setting higher


FREEZER too warm/too

FREEZER or TEMPERATURE

little ice

Control one setting higher


MAX ice production switch


REFRIGERATOR too cold

REFRIGERATOR or


TEMPERATURE Control one


setting lower


FREEZER too cold

FREEZER or TEMPERATURE


Control one setting lower


9

Page 9
Image 9
Maytag W10249207A, W10249206A installation instructions Refrigerator USE, Adjust the Doors, Using the Controls

W10249207A, W10249206A specifications

Maytag, a trusted name in home appliances, offers a range of high-quality products designed for durability and performance. Among their notable offerings are the Maytag W10249206A and W10249207A, two essential components designed to enhance the functionality of Maytag washers and dryers.

The Maytag W10249206A is a reliable lid lock assembly designed for use with select front-load washing machines. This component is critical for ensuring safe operation, as it prevents the lid from being opened during the wash cycle. The robust construction of the lid lock assembly ensures long-lasting performance, aligning with Maytag’s reputation for durability. Its installation is straightforward, allowing users to replace old or malfunctioning parts with ease, ensuring their washing machines remain operational and effective.

On the other hand, the Maytag W10249207A is a high-performance door lock switch designed for front-load washers. This essential component ensures that the door remains securely locked during operation, providing peace of mind while the machine is running. The W10249207A is engineered with precision, ensuring a tight seal to prevent leaks and maintain efficient washing cycles. Its compatibility with various Maytag washer models makes it a versatile choice for users looking to maintain or repair their appliances.

Both components are equipped with advanced technologies that reflect Maytag’s commitment to innovation. The materials used in their construction are selected for their strength and resistance to wear. This attention to detail extends to the design, which incorporates user-friendly features for easy handling and installation. These parts not only enhance the performance of Maytag machines but also contribute to their energy efficiency, ultimately leading to cost savings for users.

In summary, the Maytag W10249206A and W10249207A represent two vital components in the reliable operation of Maytag washing machines. With their durable construction, ease of installation, and commitment to safety, these products align perfectly with the brand's longstanding dedication to quality and performance. By investing in these components, consumers ensure that their Maytag appliances continue to deliver the exceptional washing results they expect.