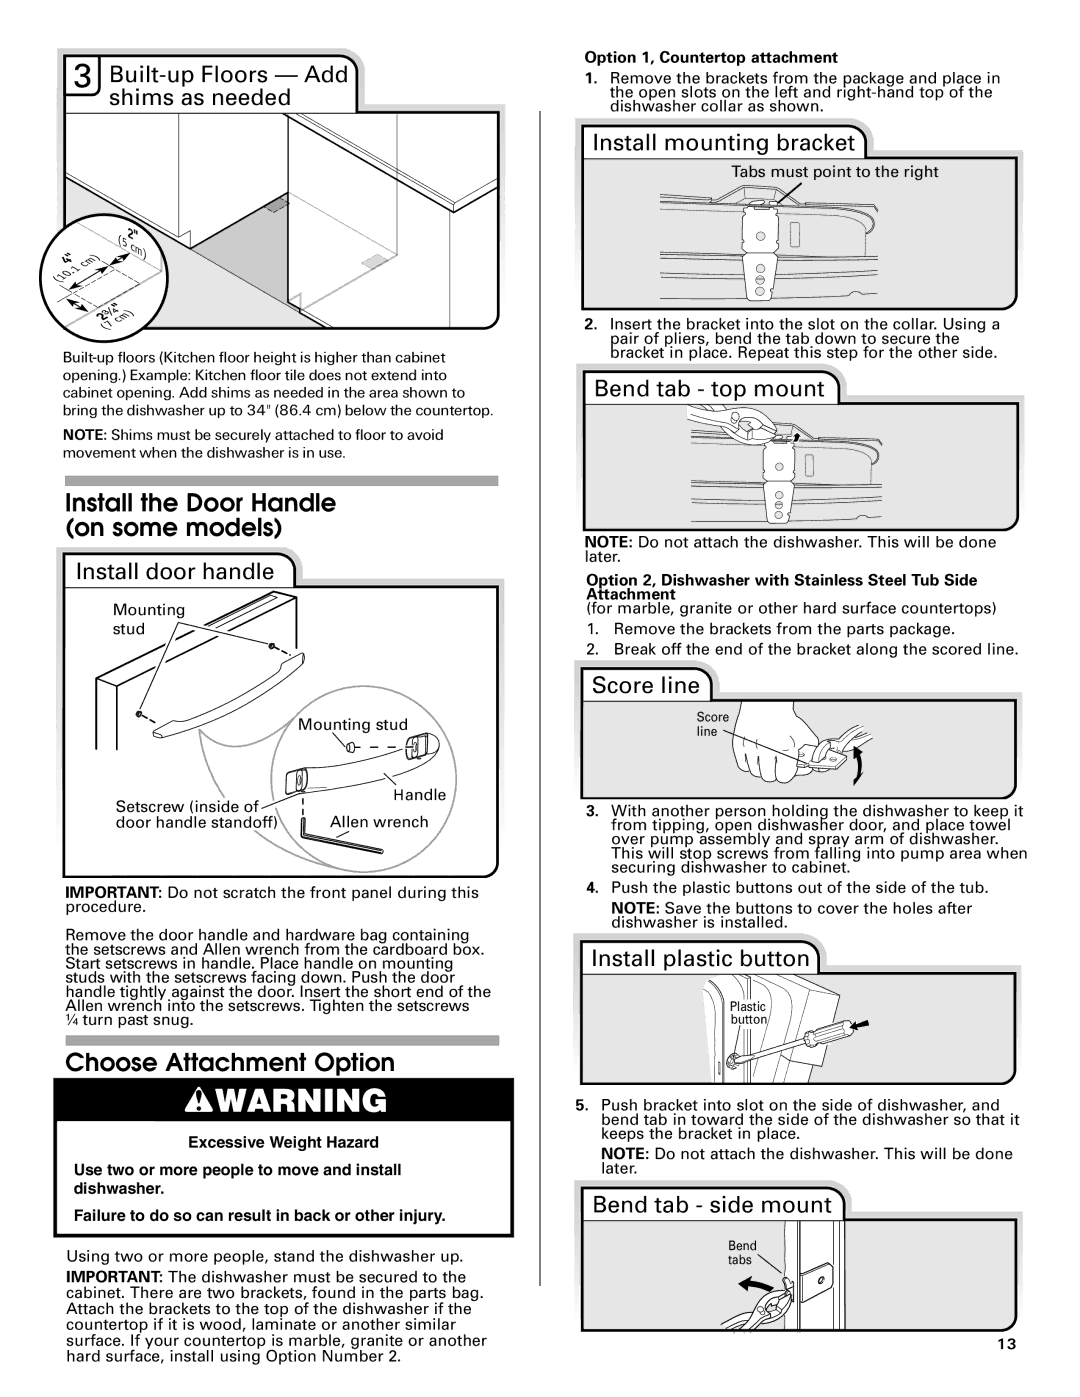
3 Built-up Floors — Add shims as needed


2


(5

"


cm)

"

)


4 cm


.1


(10


)


cm


(7


Built-up floors (Kitchen floor height is higher than cabinet opening.) Example: Kitchen floor tile does not extend into cabinet opening. Add shims as needed in the area shown to bring the dishwasher up to 34" (86.4 cm) below the countertop.

NOTE: Shims must be securely attached to floor to avoid movement when the dishwasher is in use.

Install the Door Handle (on some models)

Install door handle

Mounting stud

Mounting stud

Handle

Setscrew (inside of

door handle standoff)

Allen wrench

IMPORTANT: Do not scratch the front panel during this procedure.

Remove the door handle and hardware bag containing the setscrews and Allen wrench from the cardboard box. Start setscrews in handle. Place handle on mounting studs with the setscrews facing down. Push the door handle tightly against the door. Insert the short end of the Allen wrench into the setscrews. Tighten the setscrews ¹⁄₄ turn past snug.

Choose Attachment Option

Excessive Weight Hazard

Use two or more people to move and install dishwasher.

Failure to do so can result in back or other injury.

Using two or more people, stand the dishwasher up.

IMPORTANT: The dishwasher must be secured to the cabinet. There are two brackets, found in the parts bag. Attach the brackets to the top of the dishwasher if the countertop if it is wood, laminate or another similar surface. If your countertop is marble, granite or another hard surface, install using Option Number 2.

Option 1, Countertop attachment

1.Remove the brackets from the package and place in the open slots on the left and right-hand top of the dishwasher collar as shown.

Install mounting bracket

Tabs must point to the right

2.Insert the bracket into the slot on the collar. Using a pair of pliers, bend the tab down to secure the bracket in place. Repeat this step for the other side.

Bend tab - top mount

NOTE: Do not attach the dishwasher. This will be done later.

Option 2, Dishwasher with Stainless Steel Tub Side Attachment

(for marble, granite or other hard surface countertops)

1.Remove the brackets from the parts package.

2.Break off the end of the bracket along the scored line.

Score line

Score line

3.With another person holding the dishwasher to keep it from tipping, open dishwasher door, and place towel over pump assembly and spray arm of dishwasher. This will stop screws from falling into pump area when securing dishwasher to cabinet.

4.Push the plastic buttons out of the side of the tub.

NOTE: Save the buttons to cover the holes after dishwasher is installed.

Install plastic button

Plastic button

5.Push bracket into slot on the side of dishwasher, and bend tab in toward the side of the dishwasher so that it keeps the bracket in place.

NOTE: Do not attach the dishwasher. This will be done later.

Bend tab - side mount

Bend tabs

13

Page 13
Image 13
Maytag MDB6709AWW, W10290309A installation instructions Install the Door Handle on some models, Choose Attachment Option

MDB6709AWW, W10290309A specifications

The Maytag W10290309A, commonly known as a replacement part for the MDB6709AWW dishwasher series, showcases a blend of reliability and efficiency in home appliances. This specific part is essential for maintaining the performance of the MDB6709AWW model, which is designed with the user in mind, offering innovative technologies and features that streamline dishwashing tasks.

One of the standout features of the MDB6709AWW is its robust construction, which is reflective of Maytag's dedication to durability. Built with high-quality materials, it is designed to handle the rigors of daily use while maintaining its efficiency. This model operates with a powerful motor, ensuring that dishes are not only clean but also sanitized. The performance is enhanced by the Precision Dry option, which ensures that your dishes come out bone-dry, eliminating the need for towel drying.

The MDB6709AWW also includes the power of the Soil Sensor technology. This feature automatically adjusts the wash cycle based on the level of soil detected on the dishes, ensuring optimal water usage and energy efficiency. This smart technology not only saves on utility bills but also contributes to environmental sustainability.

Another characteristic that sets the MDB6709AWW apart is the dedicated rinse aid dispenser. This dispenser effectively helps in preventing spots and film build-up on dishes, ensuring a spotless finish after every wash. The beauty of this feature is that it minimizes the need for manual rinsing before loading, saving precious time.

The ADA-compliant design of the Maytag MDB6709AWW ensures that it is accessible to all users, making it a great choice for families and individuals alike. The intuitive control system allows for easy operation, with clearly labeled options for various wash cycles, temperatures, and settings.

Moreover, the quiet operation of this dishwasher is a noteworthy aspect, making it suitable for open-concept living spaces. With sound dampening technology, this unit operates at minimal noise levels, allowing you to carry on with your daily activities without disruption.

In summary, the Maytag W10290309A and the MDB6709AWW dishwasher embody a combination of advanced technologies, user-focused design, and reliable performance. With features like the Precision Dry, Soil Sensor technology, and a durable build, it's easy to see why this model is trusted in households. Whether you are washing a few items or a full load after a family dinner, this dishwasher promises to deliver outstanding results with every cycle.