F

4- OPERATING INSTRUCTIONS - INSTRUCTIONS D’UTILISATION INSTRUCCIONES DE OPERACION

G

Fig. 3-2D

H

Fig. 3-2E

B

B

A

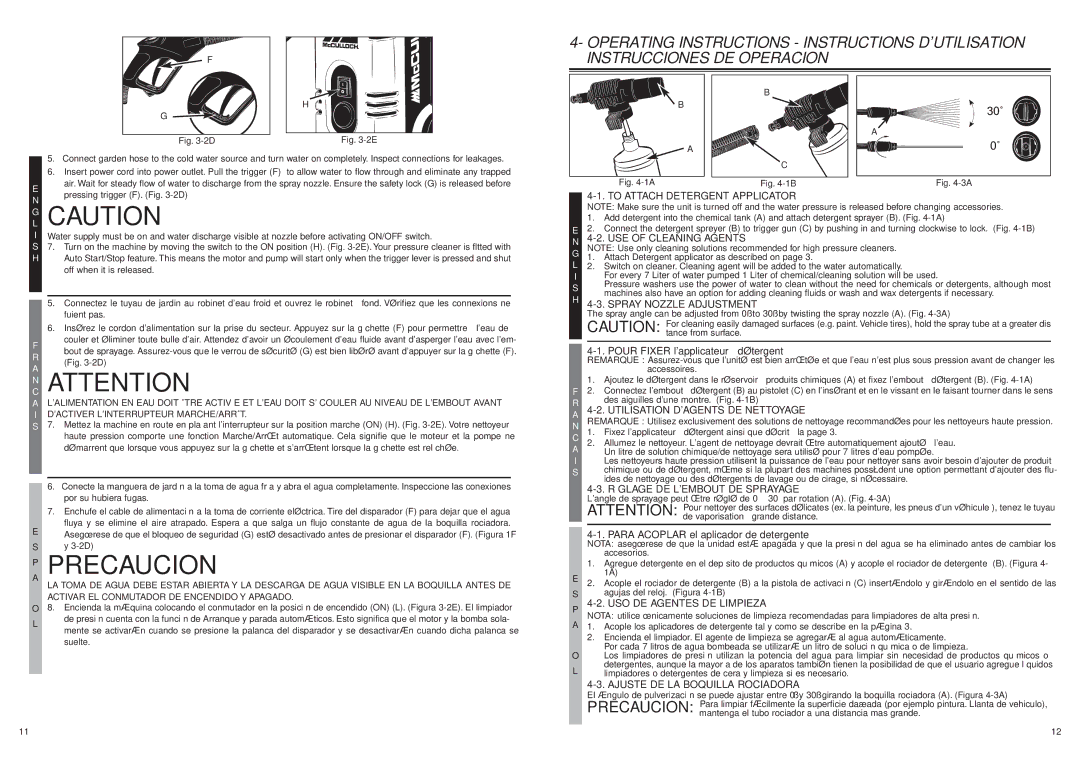
5. Connect garden hose to the cold water source and turn water on completely. Inspect connections for leakages.

6. Insert power cord into power outlet. Pull the trigger (F) to allow water to flow through and eliminate any trapped

A

C

E

air. Wait for steady flow of water to discharge from the spray nozzle. Ensure the safety lock (G) is released before

Fig. 4-1A

Fig. 4-1B

Fig. 4-3A

pressing trigger (F). (Fig. 3-2D)

4-1. TO ATTACH DETERGENT APPLICATOR

N

GL CAUTION

IWater supply must be on and water discharge visible at nozzle before activating ON/OFF switch.

S7. Turn on the machine by moving the switch to the ON position (H). (Fig. 3-2E). Your pressure cleaner is fltted with

HAuto Start/Stop feature. This means the motor and pump will start only when the trigger lever is pressed and shut off when it is released.

5.Connectez le tuyau de jardin au robinet d'eau froid et ouvrez le robinet à fond. Vérifiez que les connexions ne fuient pas.

6.Insérez le cordon d'alimentation sur la prise du secteur. Appuyez sur la gâchette (F) pour permettre à l'eau de

NOTE: Make sure the unit is turned off and the water pressure is released before changing accessories.


1.

Add detergent into the chemical tank (A) and attach detergent sprayer (B). (Fig. 4-1A)

E

2.

Connect the detergent spreyer (B) to trigger gun (C) by pushing in and turning clockwise to lock. (Fig. 4-1B)

N

4-2. USE OF CLEANING AGENTS

G

NOTE: Use only cleaning solutions recommended for high pressure cleaners.

1.

Attach Detergent applicator as described on page 3.

L2. Switch on cleaner. Cleaning agent will be added to the water automatically.

I

For every 7 Liter of water pumped 1 Liter of chemical/cleaning solution will be used.

S

Pressure washers use the power of water to clean without the need for chemicals or detergents, although most

machines also have an option for adding cleaning fluids or wash and wax detergents if necessary.

H

4-3. SPRAY NOZZLE ADJUSTMENT


The spray angle can be adjusted from 0˚ to 30˚ by twisting the spray nozzle (A). (Fig. 4-3A)


For cleaning easily damaged surfaces (e.g. paint. Vehicle tires), hold the spray tube at a greater dis


CAUTION: tance from surface.

F

couler et éliminer toute bulle d'air. Attendez d'avoir un écoulement d'eau fluide avant d'asperger l'eau avec l'em- bout de sprayage. Assurez-vous que le verrou de sécurité (G) est bien libéré avant d'appuyer sur la gâchette (F).

4-1. POUR FIXER l'applicateur à détergent

R A

(Fig. 3-2D)

REMARQUE : Assurez-vous que l'unité est bien arrêtée et que l'eau n'est plus sous pression avant de changer les

accessoires.

NC ATTENTION

AL'ALIMENTATION EN EAU DOIT ÊTRE ACTIVÉE ET L'EAU DOIT S'ÉCOULER AU NIVEAU DE L'EMBOUT AVANT I D'ACTIVER L'INTERRUPTEUR MARCHE/ARRÊT.

S7. Mettez la machine en route en plaçant l'interrupteur sur la position marche (ON) (H). (Fig. 3-2E). Votre nettoyeur haute pression comporte une fonction Marche/Arrêt automatique. Cela signifie que le moteur et la pompe ne démarrent que lorsque vous appuyez sur la gâchette et s'arrêtent lorsque la gâchette est relâchée.

6.Conecte la manguera de jardín a la toma de agua fría y abra el agua completamente. Inspeccione las conexiones por su hubiera fugas.

7.Enchufe el cable de alimentación a la toma de corriente eléctrica. Tire del disparador (F) para dejar que el agua

fluya y se elimine el aire atrapado. Espera a que salga un flujo constante de agua de la boquilla rociadora.

EAsegúrese de que el bloqueo de seguridad (G) esté desactivado antes de presionar el disparador (F). (Figura 1F

Sy 3-2D)

AP PRECAUCION

LA TOMA DE AGUA DEBE ESTAR ABIERTA Y LA DESCARGA DE AGUA VISIBLE EN LA BOQUILLA ANTES DE

ÑACTIVAR EL CONMUTADOR DE ENCENDIDO Y APAGADO.

O8. Encienda la máquina colocando el conmutador en la posición de encendido (ON) (L). (Figura 3-2E). El limpiador

Lde presión cuenta con la función de Arranque y parada automáticos. Esto significa que el motor y la bomba sola- mente se activarán cuando se presione la palanca del disparador y se desactivarán cuando dicha palanca se suelte.

11

1. Ajoutez le détergent dans le réservoir à produits chimiques (A) et fixez l'embout à détergent (B). (Fig. 4-1A)

F2. Connectez l'embout à détergent (B) au pistolet (C) en l'insérant et en le vissant en le faisant tourner dans le sens

R


des aiguilles d'une montre. (Fig. 4-1B)

4-2. UTILISATION D'AGENTS DE NETTOYAGE

A

REMARQUE : Utilisez exclusivement des solutions de nettoyage recommandées pour les nettoyeurs haute pression.

N

C

1.

Fixez l'applicateur à détergent ainsi que décrit à la page 3.

2.

Allumez le nettoyeur. L'agent de nettoyage devrait être automatiquement ajouté à l'eau.

A

Un litre de solution chimique/de nettoyage sera utilisé pour 7 litres d'eau pompée.

ILes nettoyeurs haute pression utilisent la puissance de l'eau pour nettoyer sans avoir besoin d'ajouter de produit

Schimique ou de détergent, même si la plupart des machines possèdent une option permettant d'ajouter des flu- ides de nettoyage ou des détergents de lavage ou de cirage, si nécessaire.

4-3. RÉGLAGE DE L'EMBOUT DE SPRAYAGE

L'angle de sprayage peut être réglé de 0° à 30° par rotation (A). (Fig. 4-3A)

ATTENTION: Pour nettoyer des surfaces délicates (ex. la peinture, les pneus d'un véhicule ), tenez le tuyau de vaporisation à grande distance.

4-1. PARA ACOPLAR el aplicador de detergente

NOTA: asegúrese de que la unidad está apagada y que la presión del agua se ha eliminado antes de cambiar los accesorios.

1.Agregue detergente en el depósito de productos químicos (A) y acople el rociador de detergente (B). (Figura 4- 1A)

E2. Acople el rociador de detergente (B) a la pistola de activación (C) insertándolo y girándolo en el sentido de las

Sagujas del reloj. (Figura 4-1B)

P

4-2. USO DE AGENTES DE LIMPIEZA


NOTA: utilice únicamente soluciones de limpieza recomendadas para limpiadores de alta presión.

A1. Acople los aplicadores de detergente tal y como se describe en la página 3.

Ñ2. Encienda el limpiador. El agente de limpieza se agregará al agua automáticamente.

Por cada 7 litros de agua bombeada se utilizará un litro de solución química o de limpieza.

O

Los limpiadores de presión utilizan la potencia del agua para limpiar sin necesidad de productos químicos o

L

detergentes, aunque la mayoría de los aparatos también tienen la posibilidad de que el usuario agregue líquidos

limpiadores o detergentes de cera y limpieza si es necesario.

4-3. AJUSTE DE LA BOQUILLA ROCIADORA

El ángulo de pulverización se puede ajustar entre 0˚ y 30˚ girando la boquilla rociadora (A). (Figura 4-3A)

PRECAUCION: Para limpiar fácilmente la superficie dañada (por ejemplo pintura. Llanta de vehiculo), mantenga el tubo rociador a una distancia mas grande.

12

Page 7
Image 7
McCulloch 966000201, 7096180A25 user manual GL Caution, NC Attention, AP Precaucion

966000201, 7096180A25 specifications

The McCulloch 966000201,7096180A25 is a powerful and versatile chainsaw that caters to both homeowners and professional users seeking reliable performance for various cutting tasks. Designed with a focus on ease of use and efficiency, this model exemplifies the core values of the McCulloch brand—durability and functionality.

One of the standout features of the McCulloch 966000201,7096180A25 is its robust engine. Powered by a high-performance 50cc two-stroke engine, it delivers impressive power and torque, allowing users to tackle everything from small branches to larger tree limbs with ease. The engine is designed to maintain optimal performance while reducing fuel consumption and emissions, aligning with modern environmental standards.

This chainsaw comes equipped with a 14-inch cutting bar, offering a balanced combination of maneuverability and cutting capacity. The Oregon chain is specifically designed for efficiency and smooth cuts, minimizing kickback while providing fast and precise cutting results. The tool-free chain tensioning system enhances user convenience, enabling quick adjustments without the need for additional tools.

Another noteworthy characteristic is the chainsaw's lightweight construction, which promotes ease of handling during extended use. Weighing in at just over 11 pounds, this model allows users to operate the chainsaw without excessive fatigue, making it suitable for both professional tasks and home landscaping projects.

The McCulloch 966000201,7096180A25 also features an ergonomic design that focuses on user comfort. The soft-grip handle provides an excellent grip, leading to better control and stability during operation. Additionally, the anti-vibration technology incorporated into this chainsaw reduces harmful vibrations, further enhancing user comfort and minimizing strain on the hands and arms.

Safety is another key aspect of this chainsaw's design. Equipped with a chain brake that engages in the event of kickback, the McCulloch 966000201,7096180A25 helps protect users from potential accidents. The transparent fuel tank allows for easy monitoring of fuel levels, ensuring users can refuel as needed without interruptions.

In summary, the McCulloch 966000201,7096180A25 stands out as a top choice for those seeking a reliable chainsaw that combines power, efficiency, and user-friendly features. With its focus on comfort, safety, and high-performance cutting capabilities, it is an excellent investment for both novice and experienced users alike. Whether for home maintenance or professional landscaping, this chainsaw is designed to meet a variety of cutting needs effectively.