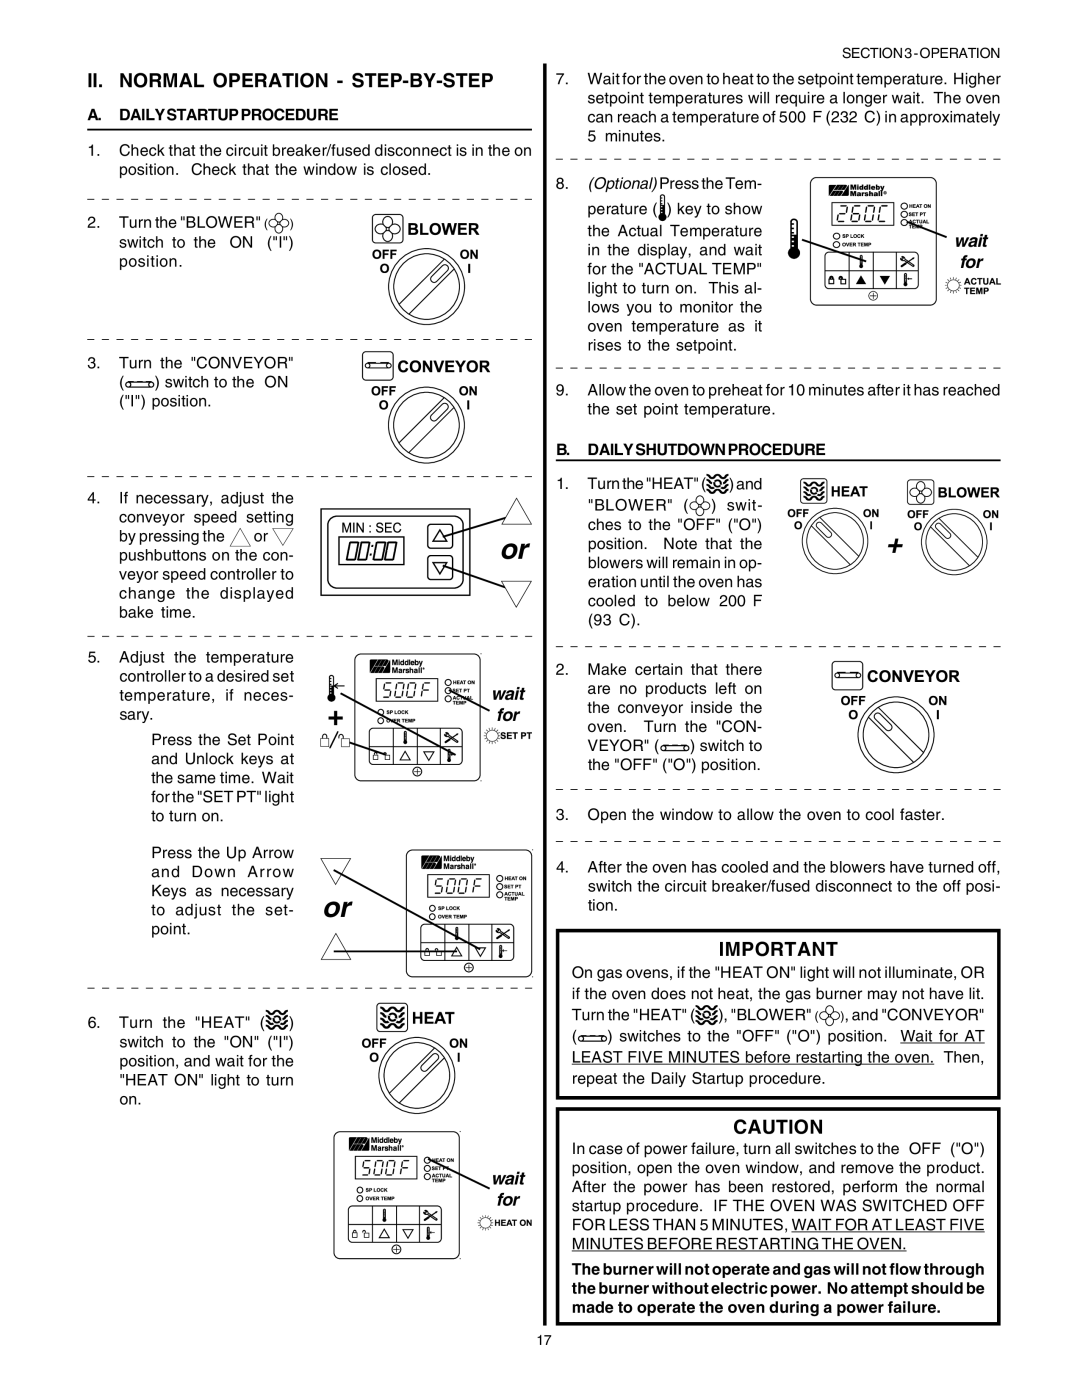
II. NORMAL OPERATION - STEP-BY-STEP

A.DAILYSTARTUPPROCEDURE

1.Check that the circuit breaker/fused disconnect is in the on position. Check that the window is closed.

SECTION 3 - OPERATION

7.Wait for the oven to heat to the setpoint temperature. Higher setpoint temperatures will require a longer wait. The oven can reach a temperature of 500°F (232°C) in approximately 5 minutes.

8. (Optional) Press the Tem-

2.Turn the "BLOWER" () switch to the “ON” ("I") position.

3.Turn the "CONVEYOR"

() switch to the “ON” ("I") position.

4.If necessary, adjust the conveyor speed setting

by pressing the or pushbuttons on the con- veyor speed controller to change the displayed bake time.

5.Adjust the temperature controller to a desired set temperature, if neces- sary.

Press the Set Point and Unlock keys at the same time. Wait for the "SET PT" light to turn on.

Press the Up Arrow and Down Arrow Keys as necessary to adjust the set- point.

or

wait

+ for

or

perature () key to show

the Actual Temperature

wait

in the display, and wait

for

for the "ACTUAL TEMP"


light to turn on. This al-


lows you to monitor the


oven temperature as it


rises to the setpoint.


9.Allow the oven to preheat for 10 minutes after it has reached the set point temperature.

B.DAILYSHUTDOWNPROCEDURE

1. Turn the "HEAT" (

) and


"BLOWER" (

) swit-


ches to the "OFF" ("O")

+

position. Note that the

blowers will remain in op-


eration until the oven has cooled to below 200°F (93°C).

2.Make certain that there are no products left on the conveyor inside the oven. Turn the "CON-

VEYOR" () switch to the "OFF" ("O") position.

3.Open the window to allow the oven to cool faster.

4.After the oven has cooled and the blowers have turned off, switch the circuit breaker/fused disconnect to the off posi- tion.

IMPORTANT

6. Turn the "HEAT" () switch to the "ON" ("I") position, and wait for the "HEAT ON" light to turn on.

wait for

On gas ovens, if the "HEAT ON" light will not illuminate, OR if the oven does not heat, the gas burner may not have lit. Turn the "HEAT" ( ), "BLOWER" (), and "CONVEYOR"

() switches to the "OFF" ("O") position. Wait for AT LEAST FIVE MINUTES before restarting the oven. Then, repeat the Daily Startup procedure.

CAUTION

In case of power failure, turn all switches to the “OFF” ("O") position, open the oven window, and remove the product. After the power has been restored, perform the normal startup procedure. IF THE OVEN WAS SWITCHED OFF FOR LESS THAN 5 MINUTES, WAIT FOR AT LEAST FIVE MINUTES BEFORE RESTARTING THE OVEN.

The burner will not operate and gas will not flow through the burner without electric power. No attempt should be made to operate the oven during a power failure.

17

Page 17
Image 17
Middleby Marshall PS53GS Gas manual II. Normal Operation STEP-BY-STEP, Dailystartupprocedure, Dailyshutdownprocedure

PS53GS Gas specifications

The Middleby Marshall PS53GS Gas is a state-of-the-art conveyor oven designed to meet the needs of high-volume pizzerias and restaurants that require consistent performance and excellent food quality. With its innovative design and advanced technologies, the PS53GS delivers efficient cooking, enhances productivity, and maximizes flavor, making it an essential addition to any commercial kitchen.

One of the standout features of the PS53GS is its dual air impingement technology. This system optimizes airflow within the cooking chamber, allowing for even heat distribution and faster cooking times. As a result, pizzas and other baked goods achieve a perfectly cooked crust, ensuring that every dish served is of the highest quality. The oven’s high-performance burners provide precise temperature control, allowing chefs to set the desired cooking temperature for a wide range of menu items, from classic pizzas to baked pasta and bread.

The PS53GS is engineered for durability, built with stainless steel construction that not only gives it a sleek appearance but also ensures long-lasting performance. The oven's insulation retains heat efficiently, reducing energy consumption and operating costs. Additionally, the removable conveyor belt is designed for easy cleaning, making maintenance a breeze in a busy kitchen environment.

One of the commonly recognized characteristics of the PS53GS is its user-friendly control panel. Featuring intuitive digital controls, operators can easily adjust cooking times, temperatures, and conveyor speed to achieve the perfect results for various menu items. The customizable settings facilitate quick adjustments, enabling restaurants to cater to changing customer preferences and peak service times without sacrificing quality.

For enhanced operational efficiency, the PS53GS is available in various configurations to suit different kitchen layouts. The compact design allows it to fit into limited spaces while still providing ample cooking capacity. This versatility makes it an excellent choice for small establishments as well as larger operations looking to optimize their kitchen workflow.

In conclusion, the Middleby Marshall PS53GS Gas conveyor oven is a top-tier solution for any commercial kitchen focused on delivering exceptional food quality and efficiency. Through its advanced cooking technologies, durable construction, and user-friendly features, it stands out as an industry leader that can help businesses thrive in a competitive market. Whether for pizzas, pastries, or a variety of baked goods, the PS53GS is a reliable partner in culinary excellence.