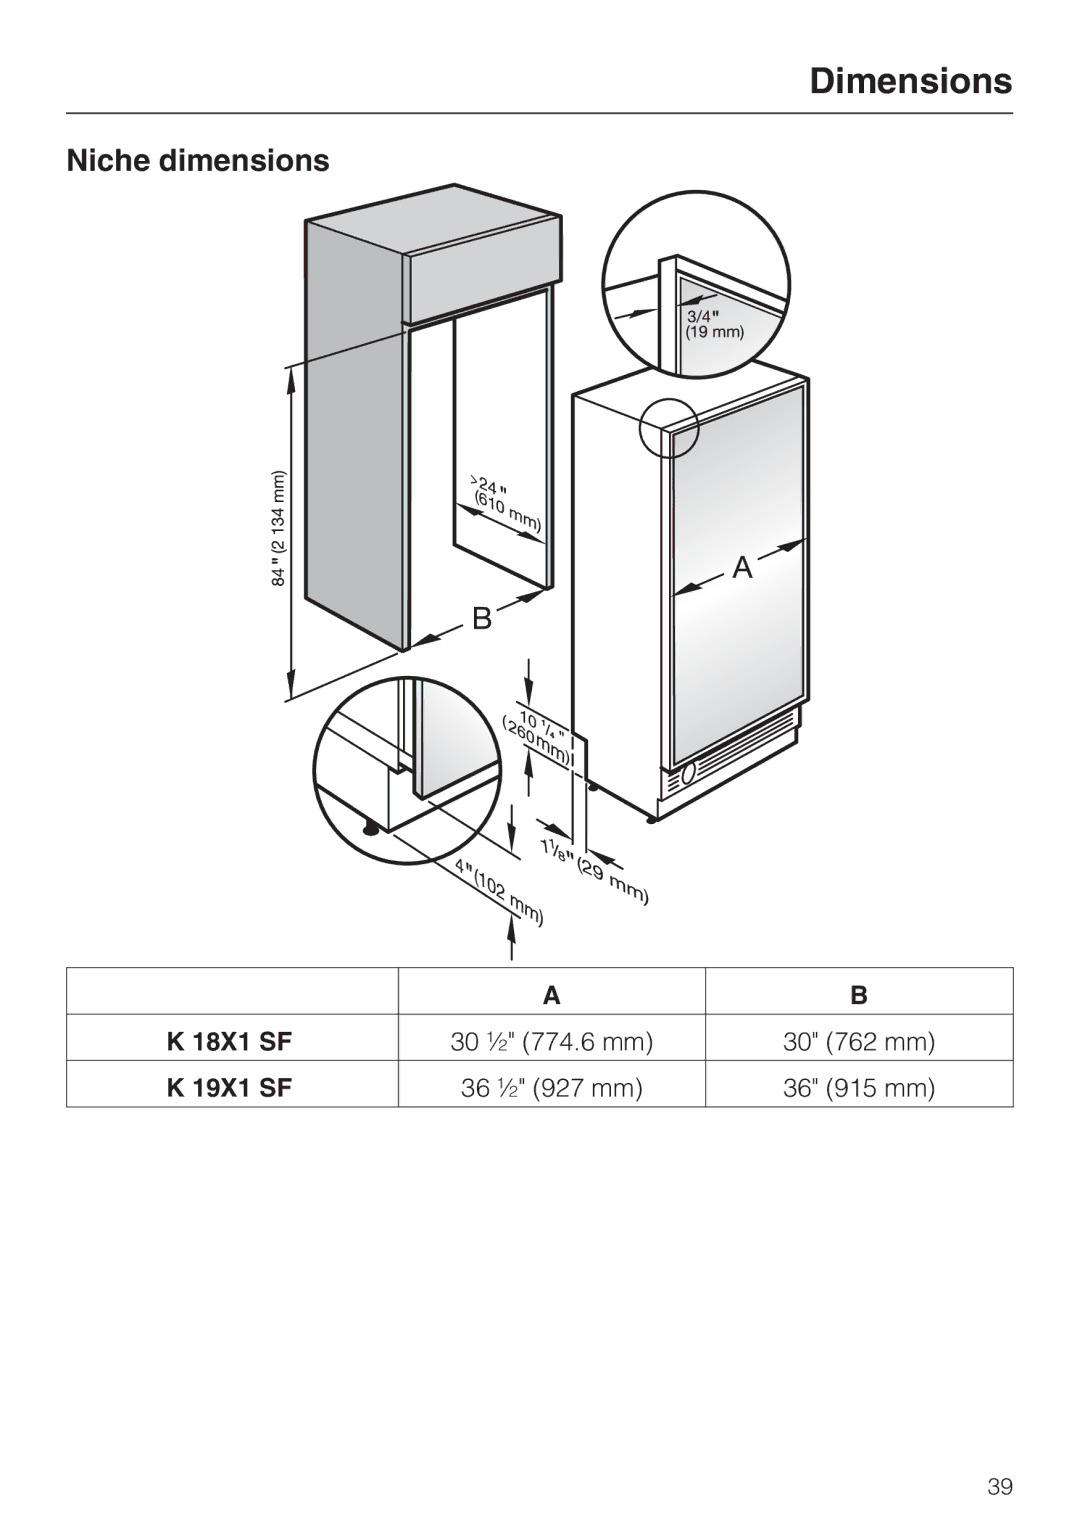
Manuals
/
Miele
/
Kitchen Appliance
/
Refrigerator
Miele
K1811SF, K1801SF, K1901SF, K1911SF installation instructions Dimensions, Niche dimensions
Models:
K1811SF
K1911SF
K1901SF
K1801SF
1
39
56
56
Download
56 pages
32.11 Kb
36
37
38
39
40
41
42
43
<
>
Install
FAQ
Dimension
Issue
Possible fault
Alarm
a Hinged door shelf b Shelves height adjustable
Settings
Cleaning and care
Temperature unit Fahrenheit/Celsius
Page 39
Image 39
Dimensions
Niche dimensions
A
B
K 18X1 SF
30 ½" (774.6 mm)
30" (762 mm)
K 19X1 SF
36 ½" (927 mm)
36" (915 mm)
39
Page 38
Page 40
Page 39
Image 39
Page 38
Page 40
Contents
en - US, CA
Operating and Installation Instructions
Refrigerator K 1801 SF K 1811 SF K 1901 SF
K 1911 SF
Contents
Installation . . . . . . . . . . . . . . . . . . . . . . . . . . . . . . . . . . . . . . . . . . . . . . . . . . . . . . 35 Installation site . . . . . . . . . . . . . . . . . . . . . . . . . . . . . . . . . . . . . . . . . . . . . . . . . . . . 35 Installation options . . . . . . . . . . . . . . . . . . . . . . . . . . . . . . . . . . . . . . . . . . . . . . . . . 37 Side panels . . . . . . . . . . . . . . . . . . . . . . . . . . . . . . . . . . . . . . . . . . . . . . . . . . . . . . 38 Adjusting the door opening angle optional accessory . . . . . . . . . . . . . . . . . . . . 38 Dimensions. . . . . . . . . . . . . . . . . . . . . . . . . . . . . . . . . . . . . . . . . . . . . . . . . . . . . . 39 Installing the appliance . . . . . . . . . . . . . . . . . . . . . . . . . . . . . . . . . . . . . . . . . . . . 41 Before you begin . . . . . . . . . . . . . . . . . . . . . . . . . . . . . . . . . . . . . . . . . . . . . . . . . . 41 RemoteVision module installation . . . . . . . . . . . . . . . . . . . . . . . . . . . . . . . . . . . . . 43 Preparing the installation niche . . . . . . . . . . . . . . . . . . . . . . . . . . . . . . . . . . . . . . . 44 Sliding the appliance into the installation space . . . . . . . . . . . . . . . . . . . . . . . . . . 47 Aligning the appliance . . . . . . . . . . . . . . . . . . . . . . . . . . . . . . . . . . . . . . . . . . . . . . 48 Attaching the appliance to the installation niche . . . . . . . . . . . . . . . . . . . . . . . . . . 49 Electrical connection . . . . . . . . . . . . . . . . . . . . . . . . . . . . . . . . . . . . . . . . . . . . . . 52 RemoteVision optional accessory
Contents
Electrical Safety
IMPORTANT SAFETY INSTRUCTIONS
Installation
SAVE THESE INSTRUCTIONS
Disposal of your old appliance
IMPORTANT SAFETY INSTRUCTIONS
e Control panel f Main switch g Humidity filters
Guide to the refrigerator
a Hinged door shelf b Shelves height adjustable
c Door shelves height adjustable d Deli drawer
Guide to the refrigerator
Control panel
Before using for the first time
Before use
Turning the appliance On/Off
Using the settings
Settings
Custom settings
Turning the button sound On/Off
Settings
Settings
Turning off for longer periods of time
Alarm
Temperature alarm
Door alarm
Setting the temperature in the refrigerator
Setting the temperature
Temperature unit Fahrenheit/Celsius
Setting the temperature
Humidity
Storage temperatures
Using the SmartFresh drawers
SmartFresh drawers
SmartFresh drawers
Foods that are best stored under dry conditions
Foods that are best stored under moist conditions
Different storage zones
Using the refrigerator efficiently
SuperCool
Switching on SuperCool
Switching off SuperCool
Refrigerator and SmartFresh drawers
Automatic defrost
Adjusting the interior fittings
Moving the shelves
Deli drawer
Adjusting the interior fittings
SmartFresh drawer
Removing a door shelf
Adjusting the door shelves
Removing the storage shelf from above the drawer
Adjusting the interior fittings
Appliance door
Cleaning and care
Before cleaning
Cleaning the interior and accessories
Remove the SmartFresh drawer
Humidity filters
Cleaning and care
Aluminum frames
Cleaning and care
After cleaning
Ventilation slits
Door seals
Changing the light bulb
Cleaning and care
Upper lighting
Side lighting
Cleaning and care
Frequently asked questions
Issue
Frequently asked questions
Solution
Frequently asked questions
Issue
Possible fault
MieleCare
After sales service
installation or use
Installation instructions
Caring for the environment
Disposal of packing materials
Disposal of an old appliance
Installation site
Installation
Ventilation
Installation niche
Base
Furniture/fixtures
Side-by-side
Installation options
Installation
Single column
from 5/8 16 mm to 6 5/16 160 mm
Side panels
Installation
Installation with partition using the Merging Kit
Niche dimensions
Dimensions
K 18X1 SF
Power supply
Door dimensions open min
Dimensions
Before you begin
Installing the appliance
Check the installation niche
Before installation
Installing the appliance
RemoteVision module installation
Preparing the installation niche
Mounting Accessories
Installing the appliance
Anti-tipbrackets
Installing the appliance
Securing an alternative anti-tipdevice
Installing the appliance
Sliding the appliance into the installation space
Installing the appliance
Unscrew the plinth
Installing the appliance
Aligning the appliance
installation niche
Attaching the appliance to the
Installing the appliance
Attaching the toe-kickcover
Installing the appliance
Attach the plinth to the appliance
Installing the appliance
Mounting the air separator
Electrical connection
RemoteVision optional accessory
Accessing the RemoteVision control panel
Description of function
MasterCool control panel options for RemoteVision
RemoteVision optional accessory
Status indicators
Alteration rights reserved
M.-Nr.07 682
K 1801 SF, K 1811 SF, K 1901 SF, K 1911 SF