|
|
|
|
| SPECIFICATIONS | ||
|
|
|
|
|
| ||
Cat. No. | Volts DC |
| Max. Bit | For use with Hammer Collar Sizes | |||
| Diameter |
| Diameter / Circumference | ||||
| 12 |
| 5/8" | S = Ø 43 mm - 46 mm | |||
|
|
|
|
| M = Ø 48 mm – 55 mm | ||
|
|
|
|
| L = Ø 56 mm - 59 mm | ||
|
|
|
|
|
|
|
|
|
|
|
|
| SYMBOLOGY | ||
|
|
|
|
|
|
|
|
|
| Volts |
|
|
| Underwriters Laboratories, Inc. | |
|
|
|
|
| United States and Canada | ||
|
|
|
|
|
|
| |
|
|
|
|
|
|
| |
|
| Direct Current |
|
|
| ||
|
|
|
|
|
|
|
|
|
|
|
|
|
|
|
|
|
|
|
|
| ASSEMBLY | ||
Attaching the HAMMERVAC™ to a Rotary Hammer/Hammer Drill
The HAMMERVAC™ is provided with three clamp- ing collar assemblies and one side handle grip. Choose the correct clamping collar assembly for the tool being used (see Specifications). The side handle grip should be unscrewed from one as- sembly to be used on another.
1.Turn OFF, remove the battery pack from the HAMMERVAC™, and disconnect power from the tool.
2.Remove the tool side handle.
3.Partially screw side handle grip onto clamping collar assembly
4. Slide the HAMMER- | 3 | 1 |
VAC™ side handle | ||
clamping collar as- |
|
|
sembly over the |
|
|
chuck and onto the |
|
|
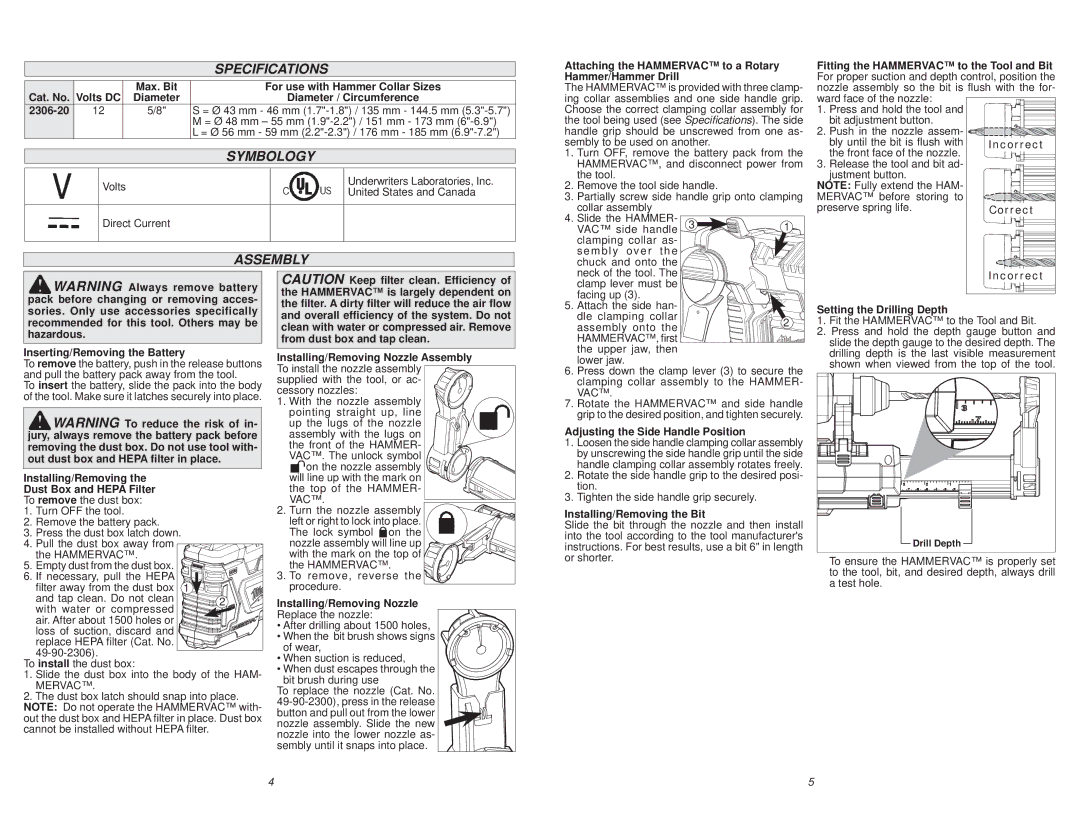
Fitting the HAMMERVAC™ to the Tool and Bit For proper suction and depth control, position the nozzle assembly so the bit is flush with the for- ward face of the nozzle: ![]() 1. Press and hold the tool and
1. Press and hold the tool and ![]()
![]()
![]()
![]()
![]()
![]()
![]()
bit adjustment button.
2. Push in the nozzle assem- ![]()
![]()
![]()
![]()
![]()
![]()
![]()
![]()
![]()
![]()
![]()
![]()
![]()
![]()
![]()
![]()
![]()
![]()
![]()
![]()
![]()
![]()
bly until the bit is flush with the front face of the nozzle.
3. Release the tool and bit ad- justment button.
NOTE: Fully extend the HAM- MERVAC™ before storing to preserve spring life.
WARNING Always remove battery pack before changing or removing acces- sories. Only use accessories specifically recommended for this tool. Others may be hazardous.
Inserting/Removing the Battery
To remove the battery, push in the release buttons and pull the battery pack away from the tool.
To insert the battery, slide the pack into the body of the tool. Make sure it latches securely into place.
WARNING To reduce the risk of in- jury, always remove the battery pack before removing the dust box. Do not use tool with- out dust box and HEPA filter in place.
Installing/Removing the
Dust Box and HEPA Filter
To remove the dust box:
1.Turn OFF the tool.
2.Remove the battery pack.
3.Press the dust box latch down.
4.Pull the dust box away from ![]()
the HAMMERVAC™.
5.Empty dust from the dust box. ![]()
![]()
![]()
![]()
![]()
![]()
![]()
![]()
![]()
![]()
6.If necessary, pull the HEPA ![]()
![]()
![]()
![]()
![]()
![]()
![]()
![]()
![]()
![]() filter away from the dust box
filter away from the dust box ![]() 1
1![]()
![]()
![]()
![]()
![]()
![]()
![]()
![]()
![]()
![]()
![]()
and tap clean. Do not clean | 2 | |
with water or compressed | ||
| ||
air. After about 1500 holes or |
| |
loss of suction, discard and |
| |
replace HEPA filter (Cat. No. |
| |
| ||
To install the dust box: |
|
1.Slide the dust box into the body of the HAM- MERVAC™.
2.The dust box latch should snap into place. NOTE: Do not operate the HAMMERVAC™ with- out the dust box and HEPA filter in place. Dust box cannot be installed without HEPA filter.
CAUTION Keep filter clean. Efficiency of the HAMMERVAC™ is largely dependent on the filter. A dirty filter will reduce the air flow and overall efficiency of the system. Do not clean with water or compressed air. Remove from dust box and tap clean.
Installing/Removing Nozzle Assembly | |
To install the nozzle assembly | |
supplied with the tool, or ac- | |
cessory nozzles: |
|
1. With the nozzle assembly | |
pointing straight | up, line |
up the lugs of the nozzle | |
assembly with the lugs on | |
the front of the HAMMER- | |
VAC™. The unlock symbol | |
on the nozzle assembly | |
will line up with the mark on | |
the top of the HAMMER- | |
VAC™. |
|
2. Turn the nozzle assembly | |
left or right to lock into place. | |
The lock symbol | on the |
nozzle assembly will line up | |
with the mark on the top of | |
the HAMMERVAC™. | |
3.To remove, reverse the ![]()
![]()
![]()
![]()
![]()
![]()
![]()
![]()
![]()
![]()
procedure.![]()
Installing/Removing Nozzle
Replace the nozzle:
• After drilling about 1500 holes,
• When the bit brush shows signs ![]()
![]()
![]()
![]()
![]()
![]()
![]()
![]()
![]() of wear,
of wear,![]()
![]()
![]()
![]()
![]()
![]()
![]()
• When suction is reduced,
• When dust escapes through the bit brush during use To replace the nozzle (Cat. No.
sembly until it snaps into place.
neck of the tool. The |
|
clamp lever must be |
|
facing up (3). |
|
5. Attach the side han- |
|
dle clamping collar | 2 |
assembly onto the | |
HAMMERVAC™, first |
|
the upper jaw, then |
|
lower jaw. |
|
6.Press down the clamp lever (3) to secure the clamping collar assembly to the HAMMER- VAC™.
7.Rotate the HAMMERVAC™ and side handle grip to the desired position, and tighten securely.
Adjusting the Side Handle Position
1.Loosen the side handle clamping collar assembly by unscrewing the side handle grip until the side handle clamping collar assembly rotates freely.
2.Rotate the side handle grip to the desired posi- tion.
3.Tighten the side handle grip securely.
Installing/Removing the Bit
Slide the bit through the nozzle and then install into the tool according to the tool manufacturer's instructions. For best results, use a bit 6" in length or shorter.
Setting the Drilling Depth
1.Fit the HAMMERVAC™ to the Tool and Bit.
2.Press and hold the depth gauge button and slide the depth gauge to the desired depth. The drilling depth is the last visible measurement shown when viewed from the top of the tool.
Drill Depth |
To ensure the HAMMERVAC™ is properly set to the tool, bit, and desired depth, always drill a test hole.
4 | 5 |