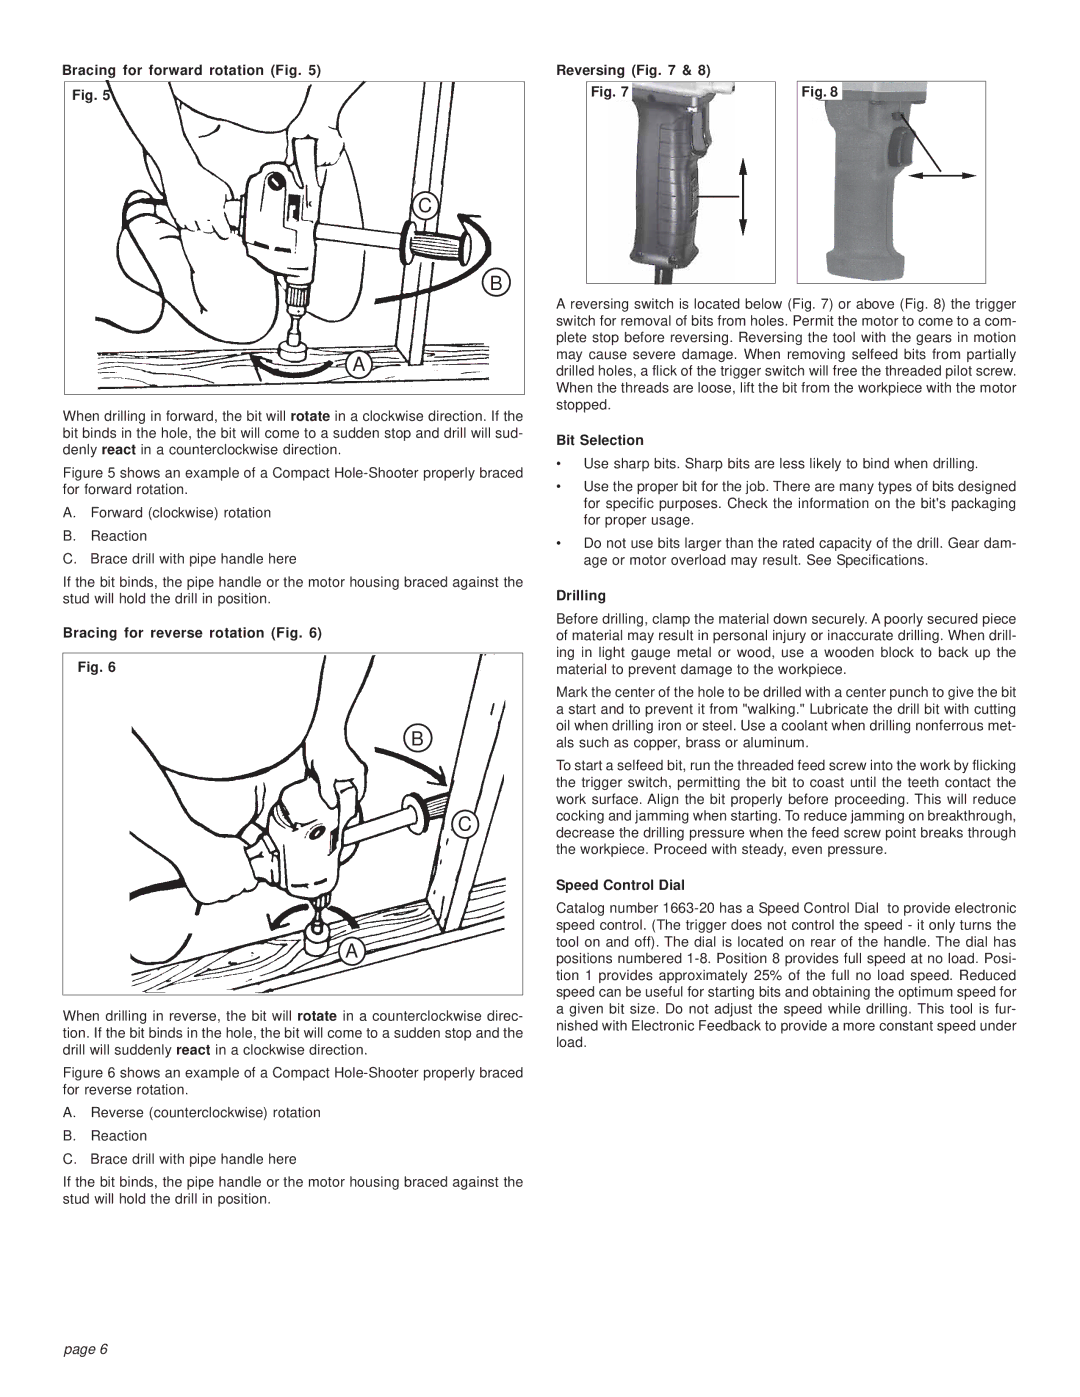
Bracing for forward rotation (Fig. 5)
Fig. 5
C
B
A
When drilling in forward, the bit will rotate in a clockwise direction. If the bit binds in the hole, the bit will come to a sudden stop and drill will sud- denly react in a counterclockwise direction.
Figure 5 shows an example of a Compact Hole-Shooter properly braced for forward rotation.
A.Forward (clockwise) rotation
B.Reaction
C.Brace drill with pipe handle here
If the bit binds, the pipe handle or the motor housing braced against the stud will hold the drill in position.
Bracing for reverse rotation (Fig. 6)
Fig. 6
B
C
A
When drilling in reverse, the bit will rotate in a counterclockwise direc- tion. If the bit binds in the hole, the bit will come to a sudden stop and the drill will suddenly react in a clockwise direction.
Figure 6 shows an example of a Compact Hole-Shooter properly braced for reverse rotation.
A.Reverse (counterclockwise) rotation
B.Reaction
C.Brace drill with pipe handle here
If the bit binds, the pipe handle or the motor housing braced against the stud will hold the drill in position.
Reversing (Fig. 7 & 8) |
|
Fig. 7 | Fig. 8 |
A reversing switch is located below (Fig. 7) or above (Fig. 8) the trigger switch for removal of bits from holes. Permit the motor to come to a com- plete stop before reversing. Reversing the tool with the gears in motion may cause severe damage. When removing selfeed bits from partially drilled holes, a flick of the trigger switch will free the threaded pilot screw. When the threads are loose, lift the bit from the workpiece with the motor stopped.
Bit Selection
•Use sharp bits. Sharp bits are less likely to bind when drilling.
•Use the proper bit for the job. There are many types of bits designed for specific purposes. Check the information on the bit's packaging for proper usage.
•Do not use bits larger than the rated capacity of the drill. Gear dam- age or motor overload may result. See Specifications.
Drilling
Before drilling, clamp the material down securely. A poorly secured piece of material may result in personal injury or inaccurate drilling. When drill- ing in light gauge metal or wood, use a wooden block to back up the material to prevent damage to the workpiece.
Mark the center of the hole to be drilled with a center punch to give the bit a start and to prevent it from "walking." Lubricate the drill bit with cutting oil when drilling iron or steel. Use a coolant when drilling nonferrous met- als such as copper, brass or aluminum.
To start a selfeed bit, run the threaded feed screw into the work by flicking the trigger switch, permitting the bit to coast until the teeth contact the work surface. Align the bit properly before proceeding. This will reduce cocking and jamming when starting. To reduce jamming on breakthrough, decrease the drilling pressure when the feed screw point breaks through the workpiece. Proceed with steady, even pressure.
Speed Control Dial
Catalog number
page 6
