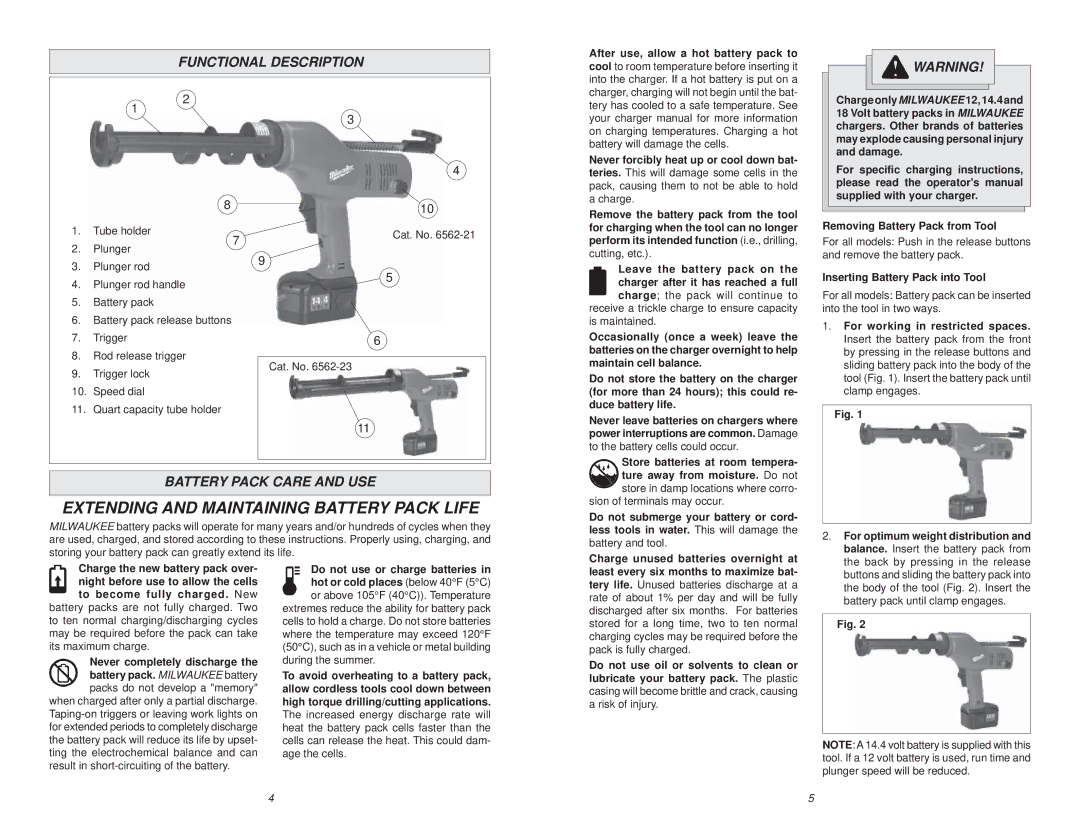
FUNCTIONAL DESCRIPTION
After use, allow a hot battery pack to cool to room temperature before inserting it into the charger. If a hot battery is put on a charger, charging will not begin until the bat-
![]() WARNING!
WARNING!
1
2
8
3
4
10
tery has cooled to a safe temperature. See your charger manual for more information on charging temperatures. Charging a hot battery will damage the cells.
Never forcibly heat up or cool down bat- teries. This will damage some cells in the pack, causing them to not be able to hold a charge.
Remove the battery pack from the tool
ChargeonlyMILWAUKEE12,14.4and 18 Volt battery packs in MILWAUKEE chargers. Other brands of batteries may explode causing personal injury and damage.
For specific charging instructions, please read the operator's manual supplied with your charger.
1. Tube holder
Cat. No.
for charging when the tool can no longer
Removing Battery Pack from Tool
2. Plunger
7
perform its intended function (i.e., drilling,
cutting, etc.).
For all models: Push in the release buttons and remove the battery pack.
3. Plunger rod
4. Plunger rod handle
5. Battery pack
6. Battery pack release buttons
7. Trigger
8. Rod release trigger
9. Trigger lock
10. Speed dial
11. Quart capacity tube holder
9
5
6
Cat. No.
11
Leave the battery pack on the charger after it has reached a full charge; the pack will continue to receive a trickle charge to ensure capacity
is maintained.
Occasionally (once a week) leave the batteries on the charger overnight to help maintain cell balance.
Do not store the battery on the charger (for more than 24 hours); this could re- duce battery life.
Never leave batteries on chargers where power interruptions are common. Damage to the battery cells could occur.
Inserting Battery Pack into Tool
For all models: Battery pack can be inserted into the tool in two ways.
1.For working in restricted spaces. Insert the battery pack from the front by pressing in the release buttons and sliding battery pack into the body of the tool (Fig. 1). Insert the battery pack until clamp engages.
Fig. 1
BATTERY PACK CARE AND USE
EXTENDING AND MAINTAINING BATTERY PACK LIFE
MILWAUKEE battery packs will operate for many years and/or hundreds of cycles when they are used, charged, and stored according to these instructions. Properly using, charging, and storing your battery pack can greatly extend its life.
Store batteries at room tempera- ture away from moisture. Do not store in damp locations where corro-
sion of terminals may occur.
Do not submerge your battery or cord- less tools in water. This will damage the battery and tool.
Charge unused batteries overnight at
2. For optimum weight distribution and |
balance. Insert the battery pack from |
the back by pressing in the release |
Charge the new battery pack over- night before use to allow the cells to become fully charged. New
battery packs are not fully charged. Two to ten normal charging/discharging cycles may be required before the pack can take its maximum charge.
Never completely discharge the battery pack. MILWAUKEE battery packs do not develop a "memory"
when charged after only a partial discharge.
Do not use or charge batteries in hot or cold places (below 40°F (5°C) or above 105°F (40°C)). Temperature
extremes reduce the ability for battery pack cells to hold a charge. Do not store batteries where the temperature may exceed 120°F (50°C), such as in a vehicle or metal building during the summer.
To avoid overheating to a battery pack, allow cordless tools cool down between high torque drilling/cutting applications. The increased energy discharge rate will heat the battery pack cells faster than the cells can release the heat. This could dam- age the cells.
least every six months to maximize bat- tery life. Unused batteries discharge at a rate of about 1% per day and will be fully discharged after six months. For batteries stored for a long time, two to ten normal charging cycles may be required before the pack is fully charged.
Do not use oil or solvents to clean or lubricate your battery pack. The plastic casing will become brittle and crack, causing a risk of injury.
buttons and sliding the battery pack into |
the body of the tool (Fig. 2). Insert the |
battery pack until clamp engages. |
Fig. 2
NOTE: A 14.4 volt battery is supplied with this tool. If a 12 volt battery is used, run time and plunger speed will be reduced.
4 | 5 |
