owners

manual

TERMINOLOGY AND CONTROLS

FRONT PANEL

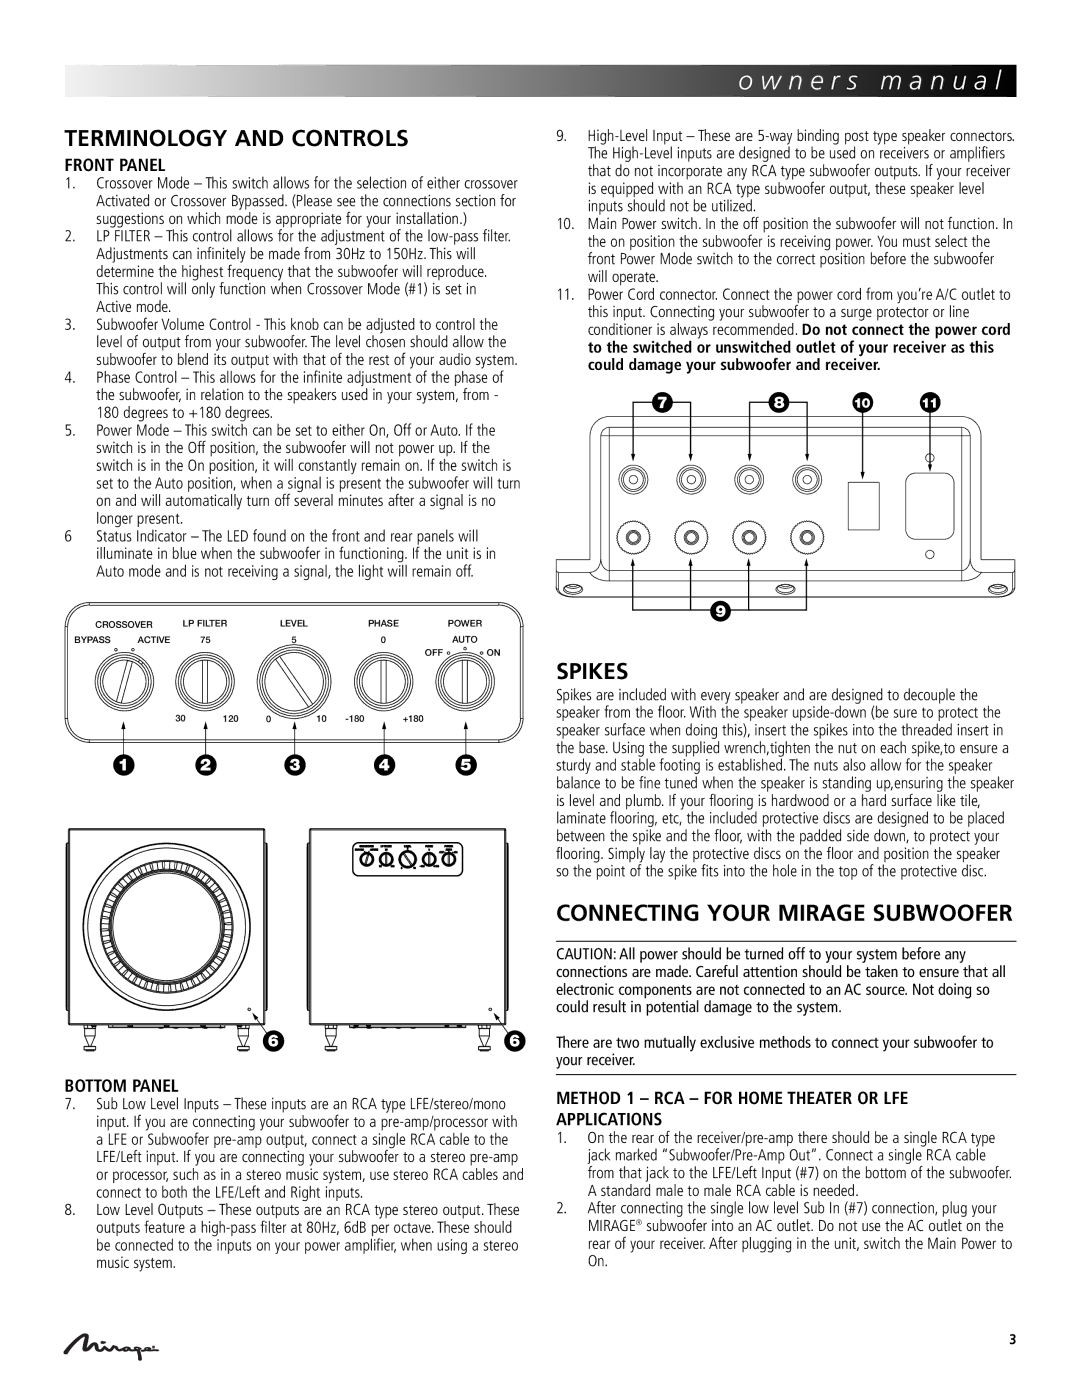
1.Crossover Mode – This switch allows for the selection of either crossover Activated or Crossover Bypassed. (Please see the connections section for suggestions on which mode is appropriate for your installation.)

2.LP FILTER – This control allows for the adjustment of the low-pass filter. Adjustments can infinitely be made from 30Hz to 150Hz. This will determine the highest frequency that the subwoofer will reproduce. This control will only function when Crossover Mode (#1) is set in Active mode.

3.Subwoofer Volume Control - This knob can be adjusted to control the level of output from your subwoofer. The level chosen should allow the subwoofer to blend its output with that of the rest of your audio system.

4.Phase Control – This allows for the infinite adjustment of the phase of the subwoofer, in relation to the speakers used in your system, from - 180 degrees to +180 degrees.

5.Power Mode – This switch can be set to either On, Off or Auto. If the switch is in the Off position, the subwoofer will not power up. If the switch is in the On position, it will constantly remain on. If the switch is

set to the Auto position, when a signal is present the subwoofer will turn on and will automatically turn off several minutes after a signal is no longer present.

6Status Indicator – The LED found on the front and rear panels will illuminate in blue when the subwoofer in functioning. If the unit is in Auto mode and is not receiving a signal, the light will remain off.

CROSSOVER

LP FILTER

LEVEL

PHASE


POWER

BYPASS

ACTIVE


75

5

0


AUTO


OFF

ON


30

120

0

10 -180

+180


1


2

3

4


5

66

9.High-Level Input – These are 5-way binding post type speaker connectors. The High-Level inputs are designed to be used on receivers or amplifiers that do not incorporate any RCA type subwoofer outputs. If your receiver is equipped with an RCA type subwoofer output, these speaker level inputs should not be utilized.

10.Main Power switch. In the off position the subwoofer will not function. In the on position the subwoofer is receiving power. You must select the front Power Mode switch to the correct position before the subwoofer will operate.

11.Power Cord connector. Connect the power cord from you’re A/C outlet to this input. Connecting your subwoofer to a surge protector or line conditioner is always recommended. Do not connect the power cord to the switched or unswitched outlet of your receiver as this could damage your subwoofer and receiver.

7


8


10

11


9

SPIKES

Spikes are included with every speaker and are designed to decouple the speaker from the floor. With the speaker upside-down (be sure to protect the speaker surface when doing this), insert the spikes into the threaded insert in the base. Using the supplied wrench,tighten the nut on each spike,to ensure a sturdy and stable footing is established. The nuts also allow for the speaker balance to be fine tuned when the speaker is standing up,ensuring the speaker is level and plumb. If your flooring is hardwood or a hard surface like tile, laminate flooring, etc, the included protective discs are designed to be placed between the spike and the floor, with the padded side down, to protect your flooring. Simply lay the protective discs on the floor and position the speaker so the point of the spike fits into the hole in the top of the protective disc.

CONNECTING YOUR MIRAGE SUBWOOFER

CAUTION: All power should be turned off to your system before any connections are made. Careful attention should be taken to ensure that all electronic components are not connected to an AC source. Not doing so could result in potential damage to the system.

There are two mutually exclusive methods to connect your subwoofer to your receiver.

BOTTOM PANEL

7.Sub Low Level Inputs – These inputs are an RCA type LFE/stereo/mono input. If you are connecting your subwoofer to a pre-amp/processor with a LFE or Subwoofer pre-amp output, connect a single RCA cable to the LFE/Left input. If you are connecting your subwoofer to a stereo pre-amp or processor, such as in a stereo music system, use stereo RCA cables and connect to both the LFE/Left and Right inputs.

8.Low Level Outputs – These outputs are an RCA type stereo output. These outputs feature a high-pass filter at 80Hz, 6dB per octave. These should be connected to the inputs on your power amplifier, when using a stereo music system.

METHOD 1 – RCA – FOR HOME THEATER OR LFE APPLICATIONS

1.On the rear of the receiver/pre-amp there should be a single RCA type jack marked “Subwoofer/Pre-Amp Out”. Connect a single RCA cable from that jack to the LFE/Left Input (#7) on the bottom of the subwoofer. A standard male to male RCA cable is needed.

2.After connecting the single low level Sub In (#7) connection, plug your MIRAGE® subwoofer into an AC outlet. Do not use the AC outlet on the rear of your receiver. After plugging in the unit, switch the Main Power to On.

3

Page 3
Image 3
Mirage Loudspeakers OMD-S8, OMD-S10, OMD-S12 owner manual Terminology and Controls, Spikes, Connecting Your Mirage Subwoofer

OMD-S8, OMD-S10, OMD-S12 specifications

Mirage Loudspeakers has long been recognized for their innovative audio technology and commitment to delivering exceptional sound quality. Among their impressive lineup, the OMD series, which includes the OMD-S12, OMD-S10, and OMD-S8, stands out for its advanced features and rich audio performance, making them popular choices for home theater enthusiasts and audiophiles alike.

The OMD-S12 is a powerful floorstanding speaker designed to deliver a dynamic range and deep bass performance. One of its standout features is the patented "Omnidirectional Design," which allows the speaker to disperse sound in an all-encompassing manner, creating a more immersive listening experience. The OMD-S12 utilizes dual 6.5-inch aluminum woofers for impactful bass response, combined with a 1-inch silk dome tweeter that reproduces high frequencies with precision. This combination ensures that both music and movie soundtracks are rendered with clarity and depth, making it a versatile choice for various audio environments.

Next in the lineup, the OMD-S10 offers a more compact option without compromising on sound quality. This bookshelf speaker features a 5.5-inch aluminum woofer and the same 1-inch silk dome tweeter found in the OMD-S12. The OMD-S10 also incorporates the innovative Omnidirectional Design, which allows it to perform exceptionally well in smaller spaces while still delivering a wide soundstage. Its sleek and elegant design makes it an attractive addition to any room, and its ability to blend seamlessly with décor is a testament to Mirage's focus on both aesthetics and performance.

Lastly, the OMD-S8 is designed as an even smaller bookshelf speaker, perfect for those who desire high-quality sound in limited spaces. It features a 4-inch aluminum woofer and a 1-inch silk dome tweeter, working together to produce a balanced audio signature. The OMD-S8 retains the hallmark Omnidirectional Design, offering that signature open sound that Mirage loudspeakers are known for. This speaker is ideal for setting up a multi-channel audio system in conjunction with the larger models, ensuring consistency across a range of applications.

In terms of build quality, all models in the OMD series feature robust cabinet construction that minimizes vibrations and resonance, allowing for clean sound reproduction. With their emphasis on advanced technologies and meticulous engineering, the Mirage OMD-S12, OMD-S10, and OMD-S8 speakers are designed to elevate the listening experience, whether for music, movies, or gaming. Their harmonious blend of performance, aesthetics, and innovative design showcases Mirage's commitment to audio excellence.