625. NetCommand IR Control (265 Series)

NetCommand Setup

Initial NetCommand Setup

To perform this procedure, you need:

The remote controls for both the TV and the device you want to control.

An IR emitter cable available from Mitsubishi.

Note: To set up an A/V receiver, see “Setting Up A/V Receiver Control,” page 68.

1.Connect and position the IR emitters for the devices you wish to control. See “IR Emitters” on the previous page.

2.Set the TV’s remote control to TV mode and power on the TV.

NetCommand and Device-Specific Keys

Device-specific keys are those which have no equivalent on the TV’s remote control. Use any of these methods to set up NetCommand control for these keys.

TOOLS Menu. In some cases, the TV will, by default, assign a key to the TOOLS menu. See the table below.

Examples of Default NetCommand

Assignments in the TOOLS Menu

Cable Box, Sat-

3

MENU

ellite Receiver


9

ON DEMAND


DVD, DVR,

3

SETUP

Blu-ray


6

TOP MENU


9

ANGLE

VCR

3

MENU


6

INPUT

A/V Receiver

3

MENU


6

SURROUND


NetCommand’s default setup assigns some device-specific keys to the TOOLS menu when “learned.” These key functions are accessible only with the TOOLS key.

F Keys. There are four F keys, F1 through F4, which you can assign to any function on the device’s remote control. For a cable box, “learn” the F keys as the A, B, C, D keys.

Arbitrary Key Assignment. You can assign a device key arbitrarily to any “unlearned” key on the TV’s remote control. Make a note of the key name and function for later reference.

3.Switch the TV to the desired input to control. Press INPUT, highlight the input icon, and press ENTER.

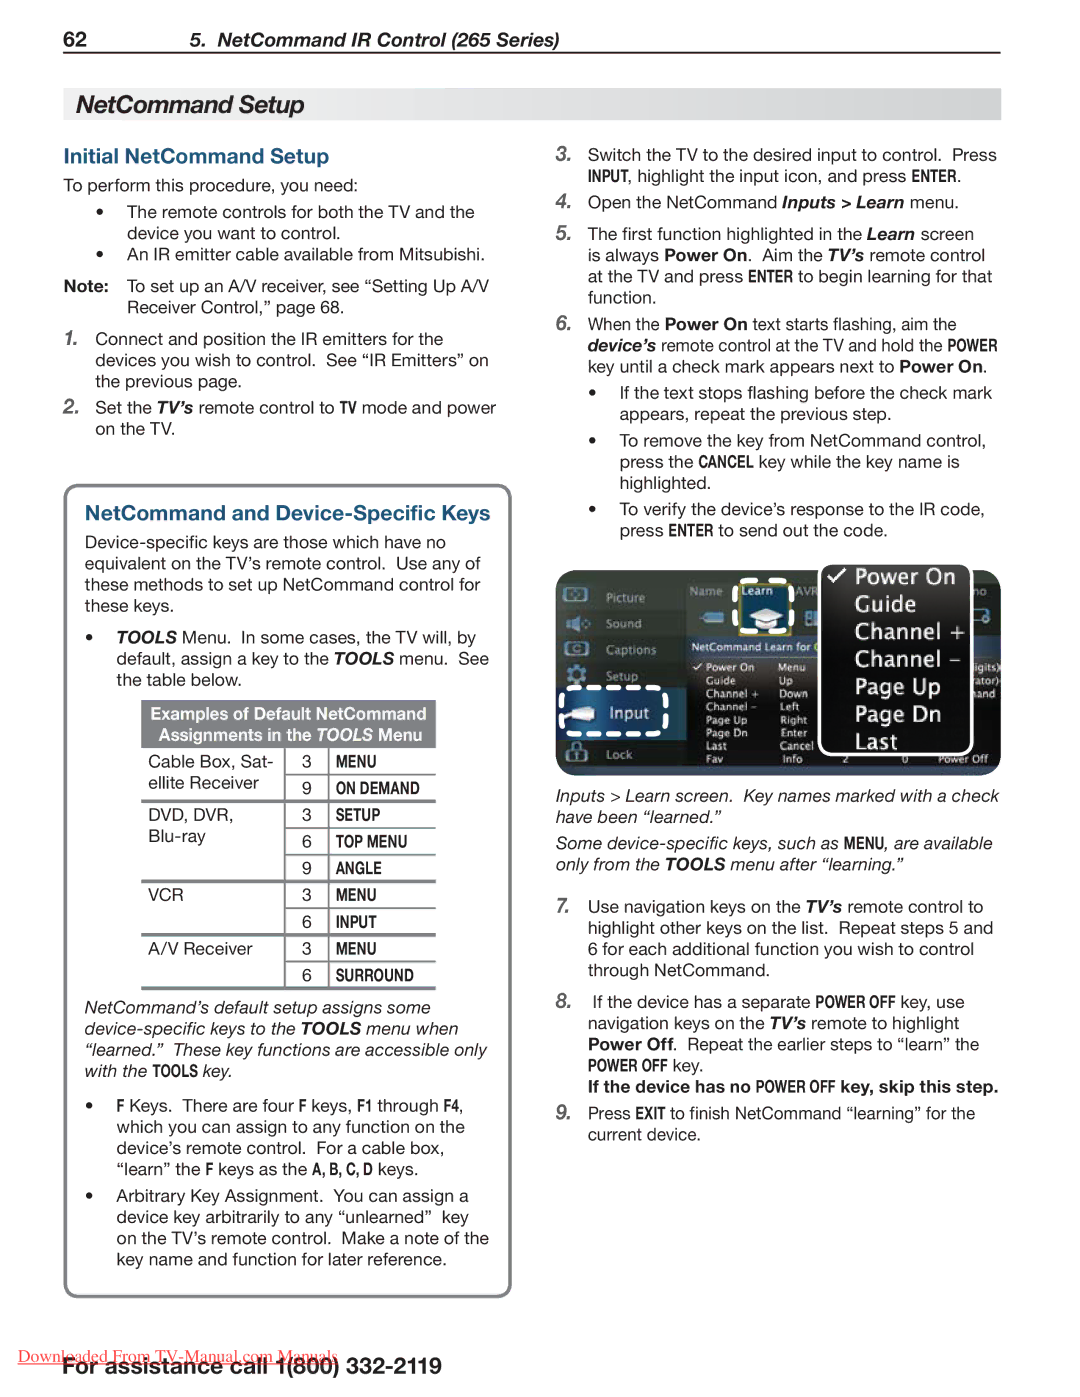
4.Open the NetCommand Inputs > Learn menu.

5.The first function highlighted in the Learn screen is always Power On. Aim the TV’s remote control at the TV and press ENTER to begin learning for that function.

6.When the Power On text starts flashing, aim the device’s remote control at the TV and hold the POWER key until a check mark appears next to Power On.

If the text stops flashing before the check mark appears, repeat the previous step.

To remove the key from NetCommand control, press the CANCEL key while the key name is highlighted.

To verify the device’s response to the IR code, press ENTER to send out the code.

Inputs > Learn screen. Key names marked with a check have been “learned.”

Some device-specific keys, such as MENU, are available only from the TOOLS menu after “learning.”

7.Use navigation keys on the TV’s remote control to highlight other keys on the list. Repeat steps 5 and 6 for each additional function you wish to control through NetCommand.

8.If the device has a separate POWER OFF key, use navigation keys on the TV’s remote to highlight Power Off. Repeat the earlier steps to “learn” the POWER OFF key.

If the device has no POWER OFF key, skip this step.

9.Press EXIT to finish NetCommand “learning” for the current device.

DownloadedFor assistanceFrom TV-Manualcall.com1(800)Manuals 332-2119

Page 62
Image 62
Mitsubishi Electronics 154 Series, 265 Series, 164 Series Initial NetCommand Setup, NetCommand and Device-Specific Keys

154 Series, 164 Series, 265 Series specifications

Mitsubishi Electronics has established itself as a leader in the HVAC industry, offering a diverse range of products that cater to various needs. Among its notable offerings are the 265 Series, 164 Series, and 154 Series air conditioning units, each embodying advanced technology and user-friendly features.

The Mitsubishi 265 Series stands out for its energy efficiency and environmentally friendly operation. This series employs advanced inverter technology, which adjusts the compressor speed according to the cooling or heating demand, resulting in substantial energy savings. Additionally, the 265 Series is designed with quiet operation in mind, minimizing noise levels for residential and commercial settings. Its compact design allows for easy installation, and it is compatible with a range of indoor units, making it versatile for different applications.

In contrast, the 164 Series focuses on providing effective climate control in larger spaces. This series is equipped with multi-zone capability, allowing a single outdoor unit to connect with multiple indoor units. This flexibility makes it ideal for commercial buildings or residences with varying temperature needs in different areas. The 164 Series also features advanced filtration systems that improve indoor air quality by capturing dust, allergens, and other particles, ensuring a healthier environment.

The 154 Series, on the other hand, is engineered for simplicity and reliability. It is a more basic model designed for users who seek dependable performance without overwhelming features. The 154 Series offers straightforward controls and is easy to operate, making it suitable for both residential and light commercial applications. Despite its simplicity, it still boasts a commendable SEER rating, ensuring energy efficiency while providing comfortable temperature settings.

Across all three series, Mitsubishi Electronics incorporates a range of smart technologies. With compatibility for Wi-Fi control, users can manage their HVAC systems remotely, adjusting temperatures and settings from their smartphones or tablets. This feature enhances convenience and energy management, particularly in modern smart homes.

In summary, the Mitsubishi 265, 164, and 154 Series air conditioning units each offer unique advantages tailored to different consumer needs. From extreme energy efficiency and advanced filtration in the 265 Series to the multi-zone capabilities of the 164 Series, and the reliability of the 154 Series, Mitsubishi Electronics continues to push the boundaries of HVAC technology, ensuring superior comfort and performance in any environment.