Installation

Layout of the projector

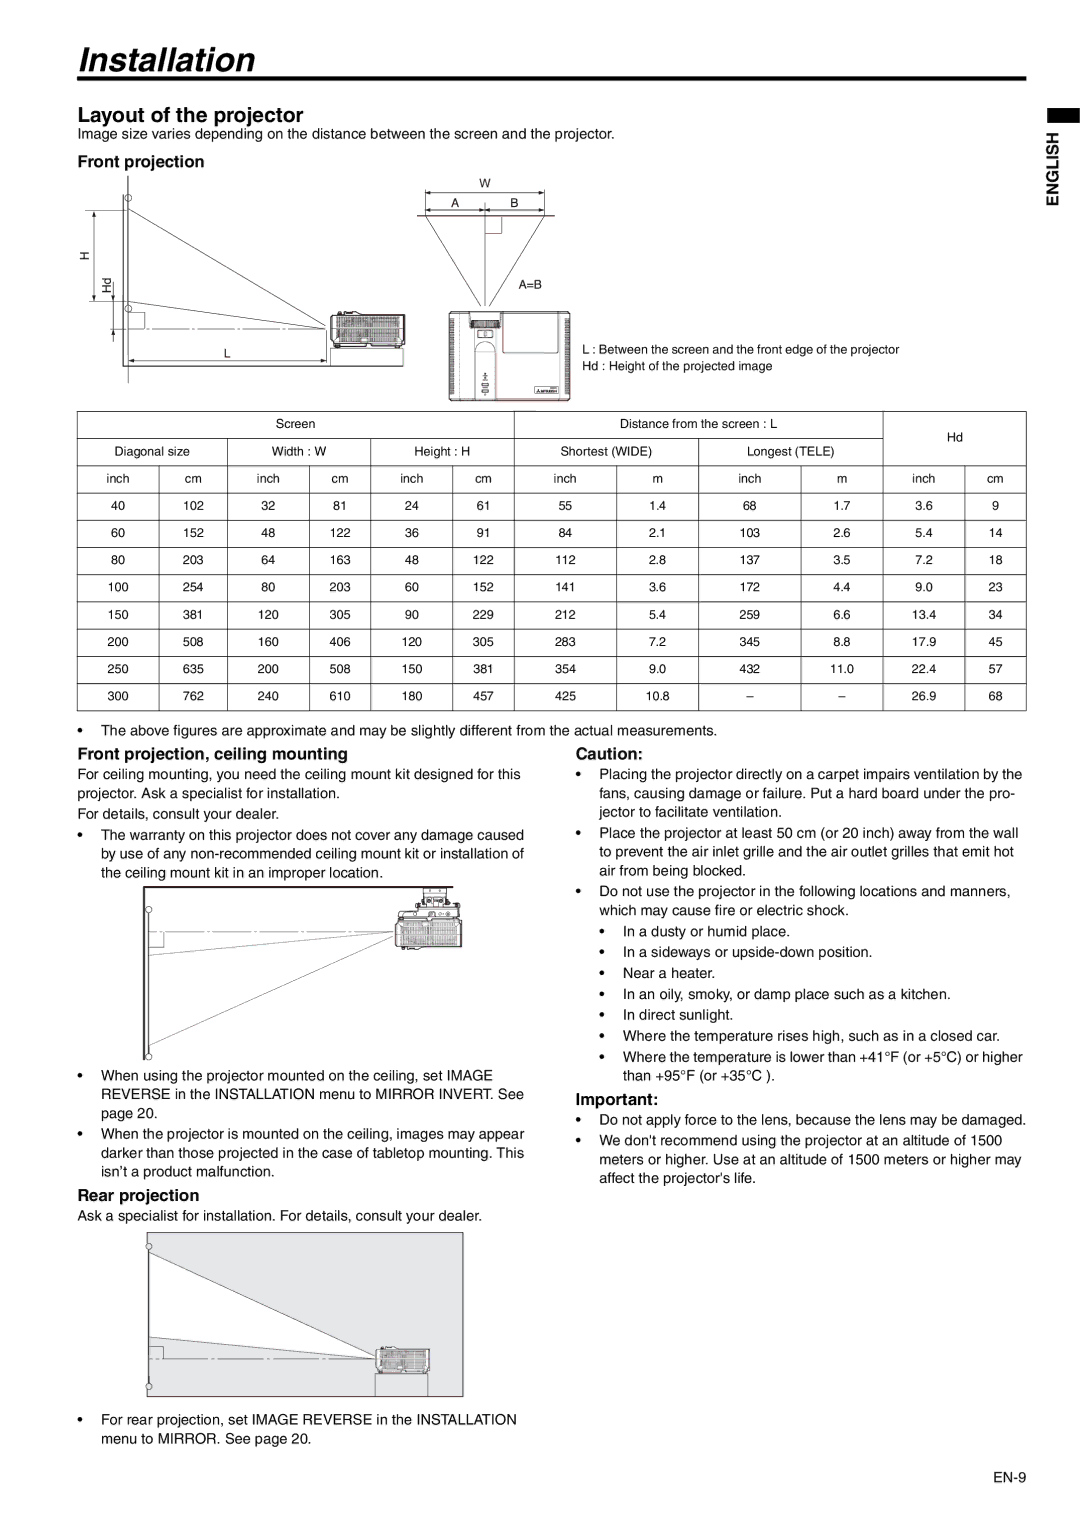
Image size varies depending on the distance between the screen and the projector.

Front projection

W

L : Between the screen and the front edge of the projector

Hd : Height of the projected image

ENGLISH


Screen


Distance from the screen : L


Hd


Diagonal size

Width : W


Height : H


Shortest (WIDE)

Longest (TELE)


inch

cm

inch


cm

inch


cm

inch

m

inch

m

inch


cm


40

102

32


81

24


61

55

1.4

68

1.7

3.6


9


60

152

48


122

36


91

84

2.1

103

2.6

5.4


14


80

203

64


163

48


122

112

2.8

137

3.5

7.2


18


100

254

80


203

60


152

141

3.6

172

4.4

9.0


23


150

381

120


305

90


229

212

5.4

259

6.6

13.4


34


200

508

160


406

120


305

283

7.2

345

8.8

17.9


45


250

635

200


508

150


381

354

9.0

432

11.0

22.4


57


300

762

240


610

180


457

425

10.8

26.9


68


The above figures are approximate and may be slightly different from the actual measurements.

Front projection, ceiling mounting

For ceiling mounting, you need the ceiling mount kit designed for this projector. Ask a specialist for installation.

For details, consult your dealer.

The warranty on this projector does not cover any damage caused by use of any non-recommended ceiling mount kit or installation of the ceiling mount kit in an improper location.

When using the projector mounted on the ceiling, set IMAGE REVERSE in the INSTALLATION menu to MIRROR INVERT. See page 20.

When the projector is mounted on the ceiling, images may appear darker than those projected in the case of tabletop mounting. This isn’t a product malfunction.

Rear projection

Ask a specialist for installation. For details, consult your dealer.

Caution:

Placing the projector directly on a carpet impairs ventilation by the fans, causing damage or failure. Put a hard board under the pro- jector to facilitate ventilation.

Place the projector at least 50 cm (or 20 inch) away from the wall to prevent the air inlet grille and the air outlet grilles that emit hot air from being blocked.

Do not use the projector in the following locations and manners, which may cause fire or electric shock.

In a dusty or humid place.

In a sideways or upside-down position.

Near a heater.

In an oily, smoky, or damp place such as a kitchen.

In direct sunlight.

Where the temperature rises high, such as in a closed car.

Where the temperature is lower than +41°F (or +5°C) or higher than +95°F (or +35°C ).

Important:

Do not apply force to the lens, because the lens may be damaged.

We don't recommend using the projector at an altitude of 1500 meters or higher. Use at an altitude of 1500 meters or higher may affect the projector's life.

For rear projection, set IMAGE REVERSE in the INSTALLATION menu to MIRROR. See page 20.

EN-9

Page 9
Image 9
Mitsubishi Electronics XD221U user manual Installation, Layout of the projector, Front projection, ceiling mounting

XD221U specifications

The Mitsubishi Electronics XD221U is a remarkable projector that offers an impressive combination of high-quality imaging, advanced technologies, and user-friendly features, making it a popular choice for various settings, including business presentations, educational environments, and home entertainment.

One of the standout features of the XD221U is its brightness capability. With a high lumen output, this projector delivers clear and vibrant images even in well-lit rooms. This makes it particularly suitable for classrooms and conference rooms where ambient light can be a challenge. The projector utilizes 3LCD technology, which ensures rich color reproduction and sharp details. The 3LCD system enables the XD221U to produce both vivid colors and deep blacks, improving overall image quality.

The resolution of the XD221U is XGA (1024 x 768), making it ideal for displaying standard office documents, presentations, and videos. The aspect ratio of 4:3 is well-suited for traditional content formats and provides a good viewing experience. Additionally, the projector supports various input options, including VGA, HDMI, and RCA, making it versatile and compatible with most modern devices such as laptops, tablets, and DVD players.

Portability is another key characteristic of the XD221U. Designed with mobility in mind, it is lightweight and compact, making it easy to transport from one location to another. This portability ensures that users can set up presentations or screenings quickly, enhancing productivity in professional environments.

Mitsubishi Electronics has also integrated several helpful features into the XD221U to enhance user experience. The projector includes an automatic vertical keystone correction feature, which helps to adjust the image automatically when the projector is not perfectly aligned with the screen. This allows for a more straightforward setup and consistent image quality, regardless of projector placement.

Another notable attribute is the long lamp life, which reduces the need for frequent replacements and lowers total cost of ownership. Users can expect a substantial hours of usage before needing to change the lamp, contributing to its appeal for businesses and schools.

In summary, the Mitsubishi Electronics XD221U is a versatile projector that excels in delivering bright, high-quality images and offers a range of features designed for comfort and convenience. Its advanced 3LCD technology, XGA resolution, and ease of use make it a strong candidate for anyone in need of a reliable and effective projection solution.