Installation

Layout of the projector

Image size varies depending on the distance between the screen and the projector.

Front projection

H

Hd

L

W

A B

A=B

L : Between the screen and the front edge of the projector

Hd : Height of the projected image

ENGLISH


Screen


Distance from the screen : L


Hd


Diagonal size

Width : W


Height : H


Shortest (WIDE)

Longest (TELE)


inch

cm

inch


cm

inch


cm

inch

m

inch

m

inch


cm


40

102

32


81

24


61

50

1.3

61

1.5

3.5


8.8


60

152

48


122

36


91

76

1.9

91

2.3

5.2


13.3


80

203

64


163

48


122

101

2.6

121

3.1

7.0


17.7


100

254

80


203

60


152

126

3.2

151

3.8

8.7


22.1


150

381

120


305

90


229

189

4.8

227

5.8

13.1


33.2


200

508

160


406

120


305

252

6.4

302

7.7

17.4


44.2


250

635

200


508

150


381

315

8

378

9.6

21.8


55.3


300

762

240


610

180


457

378

9.6

26.1


66.3


The above figures are approximate and may be slightly different from the actual measurements.

Front projection, ceiling mounting

For ceiling mounting, you need the ceiling mount kit designed for this projector. Ask a specialist for installation.

For details, consult your dealer.

The warranty on this projector does not cover any damage caused by use of any non-recommended ceiling mount kit or installation of the ceiling mount kit in an improper location.

When using the projector mounted on the ceiling, set IMAGE REVERSE in the INSTALLATION menu to MIRROR INVERT. See page 16.

When the projector is mounted on the ceiling, images may appear darker than those projected in the case of tabletop mounting. This isn’t a product malfunction.

Rear projection

Ask a specialist for installation. For details, consult your dealer.

Caution:

Placing the projector directly on a carpet impairs ventilation by the fans, causing damage or failure. Put a hard board under the pro- jector to facilitate ventilation.

Place the projector at least 50 cm (or 20 inch) away from the wall to prevent the air inlet grille and the air outlet grilles that emit hot air from being blocked.

Do not use the projector in the following locations and manners, which may cause fire or electric shock.

In a dusty or humid place.

In a sideways or upside-down position.

Near a heater.

In an oily, smoky, or damp place such as a kitchen.

In direct sunlight.

Where the temperature rises high, such as in a closed car.

Where the temperature is lower than +41ºF (or +5ºC) or higher than +95ºF (or +35ºC ).

Important:

Do not apply force to the lens, because the lens may be damaged.

We don't recommend using the projector at an altitude of 1500 meters or higher. Use at an altitude of 1500 meters or higher may affect the projector's life.

For rear projection, set IMAGE REVERSE in the INSTALLATION menu to MIRROR. See page 16.

EN-9

Page 9
Image 9
Mitsubishi Electronics XD470U/XD470U-G user manual Installation, Layout of the projector, Front projection, Rear projection

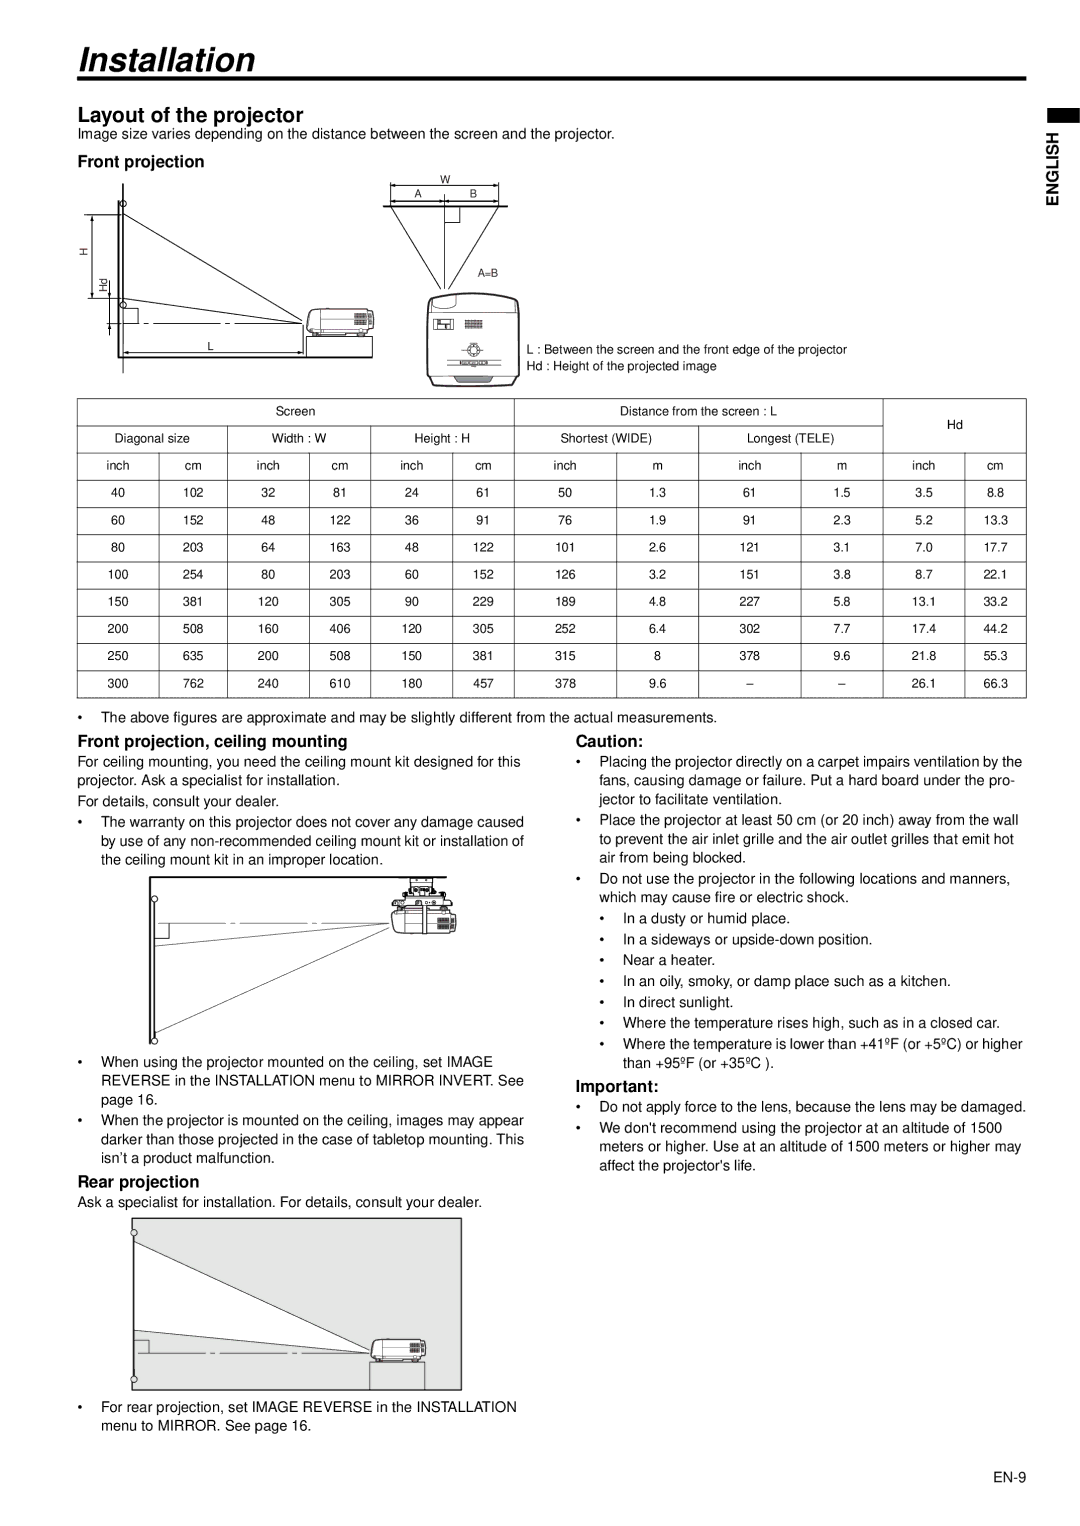
XD470U/XD470U-G specifications

The Mitsubishi Electronics XD470U/XD470U-G are advanced digital projectors designed for business and educational environments, providing high-quality images and a range of features that enhance presentations and learning experiences. Notable for their versatility, these projectors can accommodate various applications, making them an ideal choice for conference rooms, classrooms, and auditoriums.

At the heart of the XD470U/XD470U-G is a powerful imaging system that delivers stunningly bright and vivid visuals. With a brightness rating of 4500 ANSI lumens, these projectors ensure clarity even in well-lit rooms. They feature a native resolution of XGA (1024 x 768), which is compatible with a wide range of content types, from text to intricate graphics, ensuring that every detail is clearly visible.

One of the standout technologies in the XD470U/XD470U-G is its advanced Color Management technology which produces exceptional color accuracy. This technology helps in achieving vibrant colors that maintain their integrity across various viewing conditions. Coupled with a contrast ratio of 2000:1, the projectors offer deep blacks and bright whites, enhancing the overall quality of the visual experience.

The XD470U/XD470U-G projectors are equipped with a variety of input options, including HDMI, VGA, and USB, making connectivity seamless and adaptable to different devices. Additionally, the inclusion of RS-232 control allows for easy integration with existing AV systems, providing flexibility for users who require advanced management options.

Portability is another key feature, with a compact design and lightweight build enabling easy transportation between locations. This makes the XD470U/XD470U-G ideal for mobile professionals who often conduct presentations in different venues.

The projectors also boast an extended lamp life of up to 6000 hours in eco mode, significantly reducing maintenance and replacement costs. Furthermore, they come with eco-friendly features that contribute to lower energy consumption, aligning with sustainability goals while delivering robust performance.

In conclusion, the Mitsubishi Electronics XD470U/XD470U-G projectors are built to meet the demands of modern business and education settings. With their impressive brightness, advanced color technology, versatile connectivity options, and focus on energy efficiency, they remain a valuable asset for effective presentations and engaging learning environments.