Mitsubishi Electronics XL6U Adjustment of the image from the computer, Simple adjustment method

Models: XL6U

1 32
Download 32 pages 17.53 Kb
Page 19
Image 19

Adjustment of the image from the computer

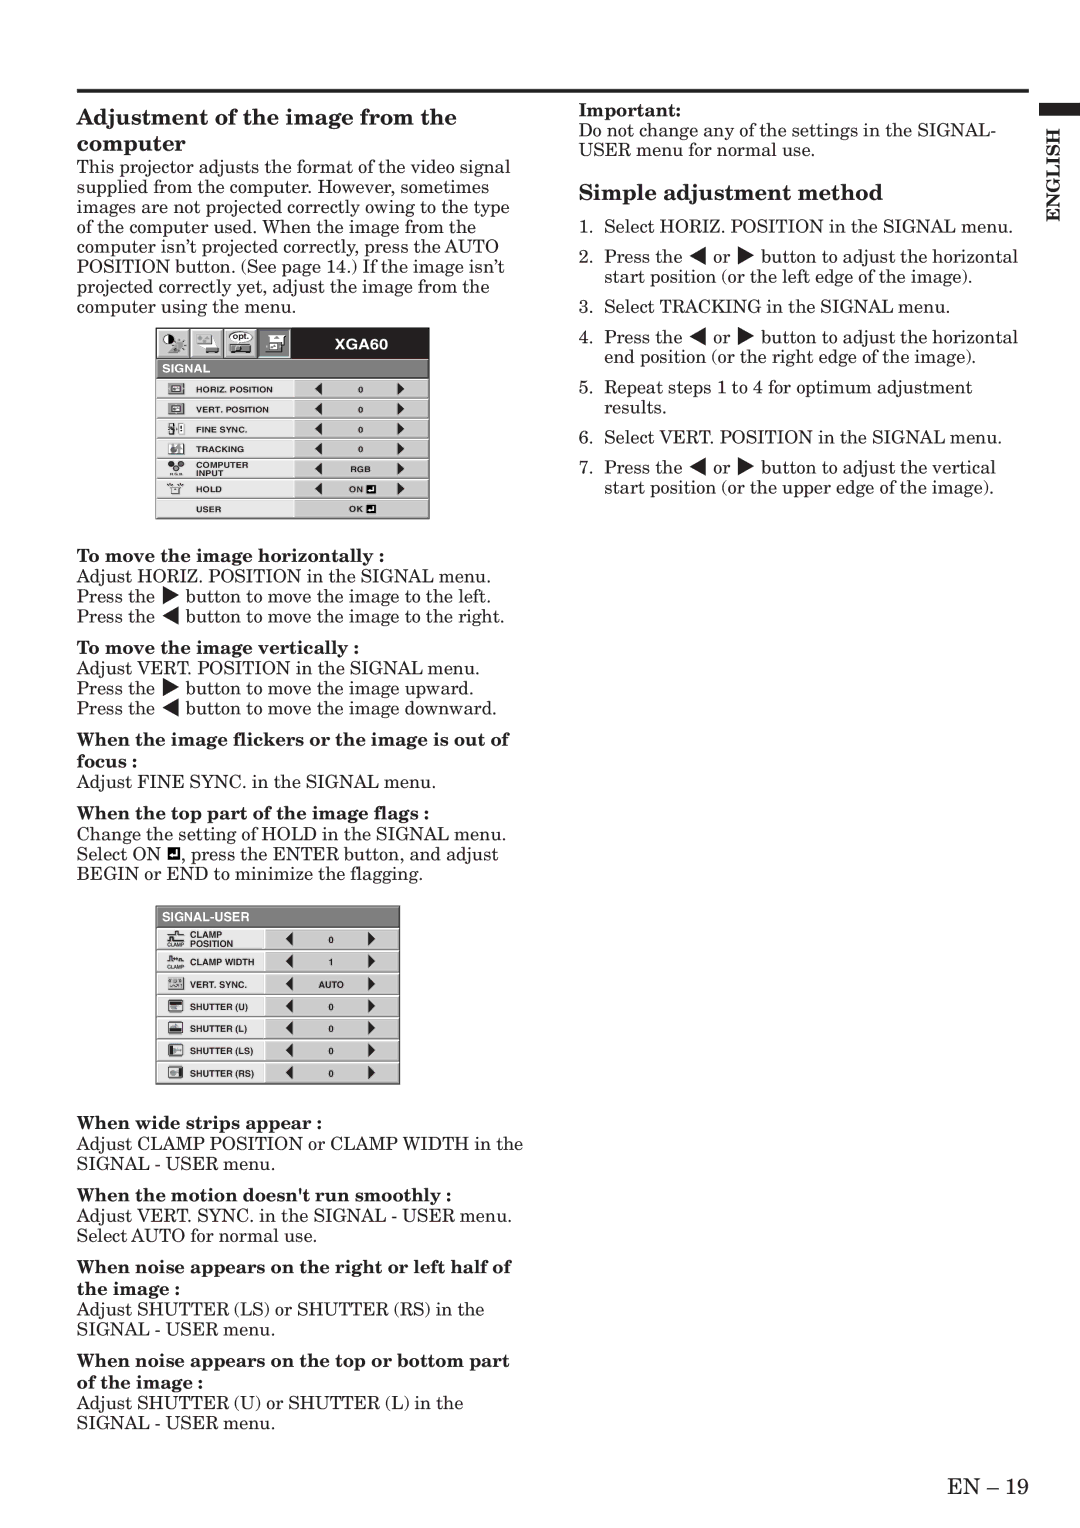
This projector adjusts the format of the video signal supplied from the computer. However, sometimes images are not projected correctly owing to the type of the computer used. When the image from the computer isn’t projected correctly, press the AUTO POSITION button. (See page 14.) If the image isn’t projected correctly yet, adjust the image from the computer using the menu.

Important:

Do not change any of the settings in the SIGNAL- USER menu for normal use.

Simple adjustment method

1.

Select HORIZ. POSITION in the SIGNAL menu.

2.

Press the $ or % button to adjust the horizontal


start position (or the left edge of the image).

3.

Select TRACKING in the SIGNAL menu.

ENGLISH

opt.

SIGNAL

XGA60

4. Press the $ or % button to adjust the horizontal

end position (or the right edge of the image).


HORIZ. POSITION


0


VERT. POSITION


0


FINE SYNC.


0


TRACKING


0


COMPUTER

RGB


RRGGBB INPUT


HOLD


ON


USER


OK


To move the image horizontally :

Adjust HORIZ. POSITION in the SIGNAL menu. Press the % button to move the image to the left. Press the $ button to move the image to the right.

To move the image vertically :

Adjust VERT. POSITION in the SIGNAL menu. Press the % button to move the image upward. Press the $ button to move the image downward.

When the image flickers or the image is out of focus :

Adjust FINE SYNC. in the SIGNAL menu.

When the top part of the image flags :

Change the setting of HOLD in the SIGNAL menu. Select ON , press the ENTER button, and adjust BEGIN or END to minimize the flagging.

SIGNAL-USER


CLAMP


0


POSITION


CLAMP WIDTH


1


?

VERT. SYNC.


AUTO


SHUTTER (U)


0


SHUTTER (L)


0


SHUTTER (LS)


0


SHUTTER (RS)


0


When wide strips appear :

Adjust CLAMP POSITION or CLAMP WIDTH in the SIGNAL - USER menu.

When the motion doesn't run smoothly :

Adjust VERT. SYNC. in the SIGNAL - USER menu. Select AUTO for normal use.

When noise appears on the right or left half of the image :

Adjust SHUTTER (LS) or SHUTTER (RS) in the SIGNAL - USER menu.

When noise appears on the top or bottom part of the image :

Adjust SHUTTER (U) or SHUTTER (L) in the SIGNAL - USER menu.

5.

Repeat steps 1 to 4 for optimum adjustment


results.

6.

Select VERT. POSITION in the SIGNAL menu.

7.

Press the $ or % button to adjust the vertical


start position (or the upper edge of the image).

EN – 19

Page 19
Image 19
Mitsubishi Electronics XL6U user manual Adjustment of the image from the computer, Simple adjustment method

XL6U specifications

Mitsubishi Electronics has made significant strides in the field of home entertainment with its cutting-edge XL6U projector. This high-performance projector stands out for its versatility and advanced features, catering to both business and personal use. One of the defining qualities of the XL6U is its impressive brightness, producing up to 6000 ANSI lumens. This powerful output ensures clear and vibrant images even in well-lit environments, making it an excellent choice for conference rooms, classrooms, or home theaters.

The XL6U utilizes DLP (Digital Light Processing) technology, which is known for its exceptional color accuracy and sharpness. With a native resolution of 1920x1080, the projector delivers stunning Full HD visuals, bringing every detail to life. This makes it particularly well-suited for displaying high-definition video content, from presentations to film screenings.

Moreover, the XL6U supports both 2D and 3D projection capabilities. This feature enhances user experience by allowing viewers to enjoy immersive 3D films, making it an ideal option for gaming and cinematic experiences. The projector also supports the latest HDMI standards, ensuring compatibility with a variety of media devices such as Blu-ray players, gaming consoles, and streaming devices.

In terms of connectivity, the XL6U offers a broad range of options, including USB, VGA, and HDMI ports. This variety allows for easy integration with existing systems, simplifying setup and usage. Additionally, the projector's built-in speakers produce clear audio, although users have the option to connect external audio systems for improved sound quality.

The XL6U is designed with longevity in mind. Its high-performance lamp provides up to 7500 hours of usage in eco mode, reducing maintenance costs and extending the life of the projector. This durability is complemented by a user-friendly operation interface, enabling both novice and experienced users to navigate its features with ease.

Overall, the Mitsubishi Electronics XL6U is a robust projector combining high brightness, excellent image quality, and versatility in connectivity. It caters to a wide range of applications, from business presentations to home entertainment, making it a smart investment for those seeking a reliable and high-performing projection solution. With its array of advanced technologies and features, the XL6U exemplifies Mitsubishi’s commitment to innovation and quality in the electronics market.