Installation Instructions

Fill the recess under the valve and spout escutcheons with plumber's putty (not included). Place spout with es- cutcheon and adapter in place down through the center hole. Put washer over spout shank. Screw on mounting nut and make hand-tight. Turn mounting nuts on valve bodies all the way down, for basin clearance, and drop on mounting washers.

With the valve bodies and supply tubing assembled under the sink, slide the bodies up through the holes. Screw top mounting nuts down until top of valve bodies are 3/8" to 7/16" from top of deck. (See illustration). Place a

3/8" bead of plumber's putty (not supplied) around the underside of handle escutcheons. Screw the escutch- eons onto valve bodies and hand-tighten them until they bottom out. Screw the mounting nuts and washers up against the bottom of the basin and hand-tighten. Hold the valve bodies from turning by using another wrench on valve body flats. Install supply tubing to spout "T". Hold back spout tee with wrench when tightening sup- ply tube.

Test the lift rod to make sure it operates freely. NOTE: If lift rod binds against spout union tee, carefully bend spout tube slightly outward to clear lift rod.

MOUNTING

NUT

SPOUT

SHANK

MOUNTING

WASHER

Install handle knob onto stem extension. Install handle screw and tighten. Snap on handle inserts. Repeat with the other knob. Make final tightening of all mounting nuts from below with a basin wrench.

Install waste assembly, see Lavatory Lift Rod and Waste Assembly then connect valve bodies to water supply lines, do not turn on water at this time. Faucet flushing is required, see Flushing Instructions.


TOP OF VALVE BODY


NOTE: to properly install handle


DECK


3/8" (10mm)


escutcheon and handle, valve bodies

to 7/16" (11mm)


must be above deck at dimensions shown.


MOUNTING NUT

*SPOUT TUBE (SEE NOTE 5, WASTE ASSEMBLY INSTALLATION)

KNOB

INSERT

HANDLE SCREW

HANDLE

KNOB

STEM

IF HANDLE ROTATION IS REVERSED: TURN OFF WATER SUPPLIES AND OPEN HANDLES TO ALLEVI- ATE PRESSURE. Remove handle, cartridge nut and upper handle adapter. Lift lower handle adapter and turn 180°, then reset on top of cartridge stem. Reinstall all components, making sure the cartridge nuts from both sides are secure before turning water on, CAUTION: BE SURE NOT TO CROSS THREAD CARTRIDGE

NUTS DURING INSTALLATION.

Disassembly

CAUTION: Turn OFF BOTH water supplies, then open knobs to relieve pressure.

1.Remove handle knob insert and handle screw then lift off the handle knob.

2.Loosen the cartridge nut with an adjustable wrench and remove it and the stem guide as a unit together with the stem extension.

3.Set aside the cartridge nut and stem guide and with the stem extension installed, reassemble handle knob, han- dle screw and tighten.

4.Grasp the handle knob and pull the cartridge STRAIGHT UP and out of the valve body.

Reassembly

GUIDE

CARTRIDGE

NUT

STEM

EXTENSION

CARTRIDGE

ESCUTCHEON

CAUTION: Failure to follow these instructions can cause a faulty installation or damage the new cartridge.

1.Assemble the handle knob and the stem extension to teh new cartridge with the handle screw. Turn stem to the ON position, waterway holes in cartridge are lined up.

2.Insert the cartridge straight into the valve body.

3.Now press down firmly while rotating handle knob counterclockwise. This will align the "KEY" on the cartridge with the "NOTCH" in the valve body. When the key enters the notch you will feel it drop in and the cartridge will be in place. To be certain, rotate the handle clockwise and then counterclockwise with gentle force. You should feel the handle knob stop in both directions. If so, the cartridge is in place. Do not turn the water on yet.

4.Remove handle screw and handle knob. Install cartridge nut with stem guide over the stem extension, start by hand DO NOT CROSS THREAD. Firmly tighten cartridge nut and stem guide using an adjustable wrench.

5.Replace handle parts. Turn on water supplies.

Flushing Instructions

STEM

KEY

NOTCH

IN BODY

FOR LOCATING CARTRIDGE PROPERLY

IMPORTANT: Pipe chips, sand, stones and other solids found in new and renovated plumbing can damage the sealing surfaces of the cartridge and cause a leak. To avoid damage, DO NOT TURN ON SUPPLY VALVES until instructed below.

1.After installing and connecting your new faucet, open both hot and cold cartridges.

2.Turn on both hot and cold water supply valves and allow the water to run for 15 seconds.

3.Turn off the hot and cold cartridges, unscrew the aerator from the end of the spout and clean any debris from the aerator screen.

4.Replace the aerator and check the system for leaks.

MT143B

Page 2
Image 2
Moen 4934, 8963 installation instructions Installation Instructions, Disassembly, Reassembly, Flushing Instructions

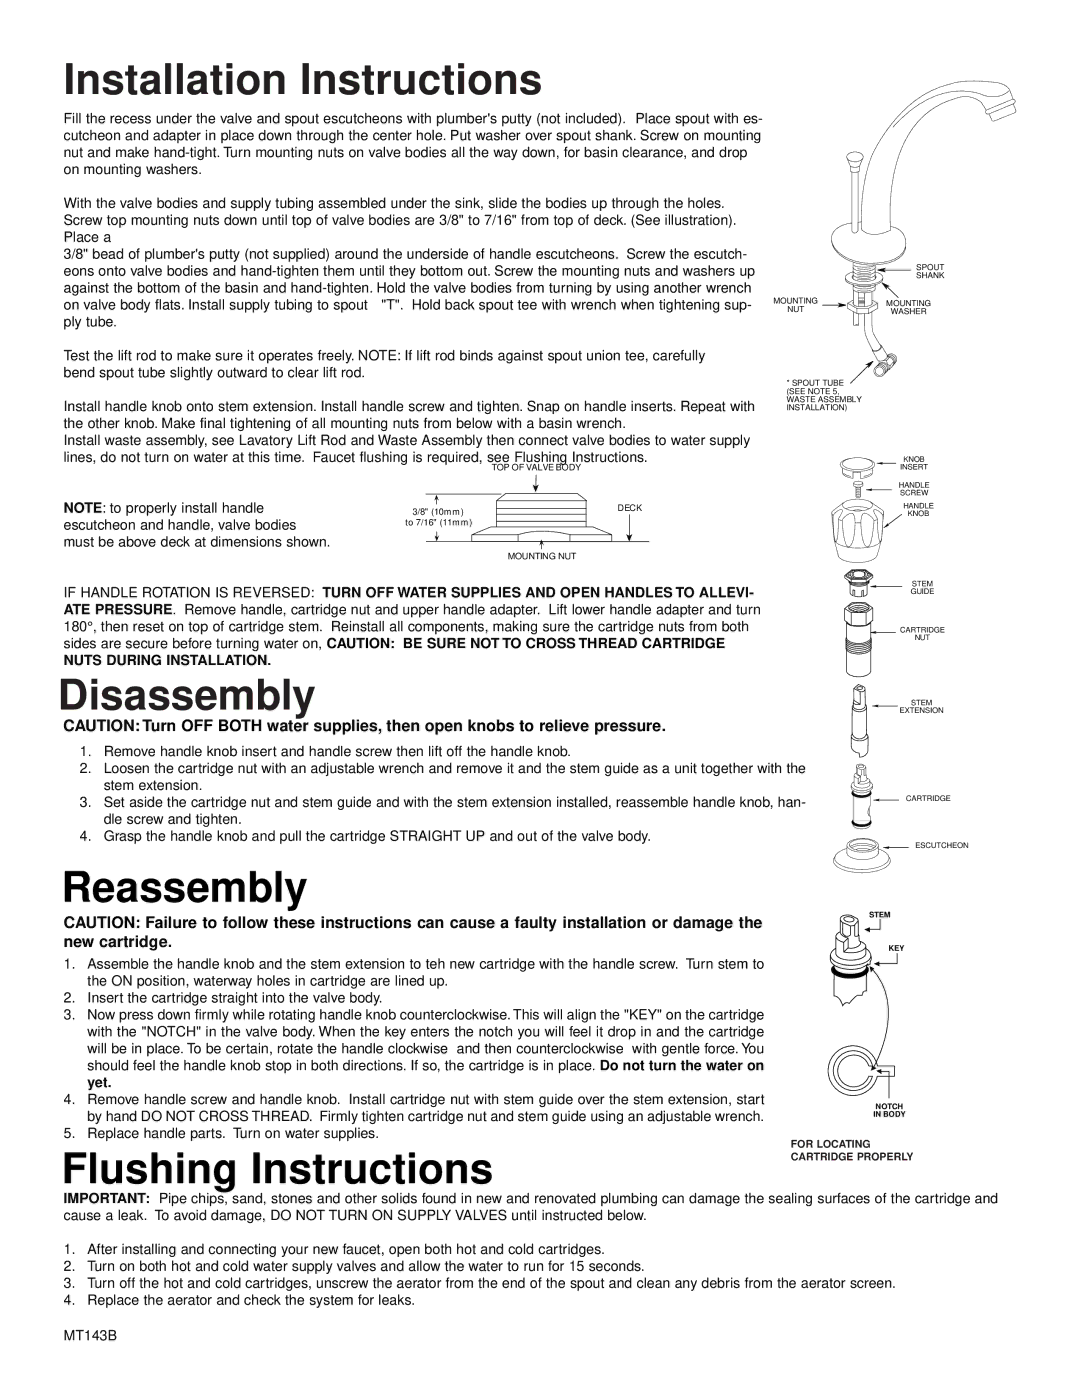
4934, 8963 specifications

The Moen 4934 and Moen 8963 are two standout products in the realm of kitchen faucets, combining elegant design with advanced technology to elevate the culinary experience. Both models exhibit Moen's commitment to quality and user satisfaction, ensuring functionality meets style in the modern kitchen.

One of the main features of the Moen 4934 is its unique pull-down faucet design. This model offers a high arc that provides maximum clearance for large pots and pans, making it an excellent choice for busy kitchens. The pull-down spray head comes equipped with two spray modes: a powerful stream for heavy-duty tasks and a splash-free aerated flow for everyday tasks. Users can easily switch between the two modes, enhancing versatility during food preparation and cleanup.

Moen's 8963 model, on the other hand, features a sleek and contemporary design that seamlessly fits into various kitchen aesthetics. This faucet also boasts a pull-down spout, allowing for ease of use when washing vegetables or filling large containers. The innovative Reflex system provides smooth operation and secure docking of the spray head, ensuring that it retracts smoothly after each use. This feature diminishes the likelihood of wear and tear over time.

Both models incorporate Moen's Spot Resist Stainless finish, which resists fingerprints and water spots, maintaining a clean and polished look with minimal effort. In terms of installation, Moen 4934 and 8963 are designed with ease in mind. The Duralast cartridge ensures longevity and durability, while the Quick Connect system simplifies the installation process for homeowners and professionals alike.

Another defining characteristic of these faucets is their water efficiency. Both the Moen 4934 and 8963 meet WaterSense criteria, providing significant savings on water usage without sacrificing performance. With features such as the pause function, users can conveniently interrupt the flow of water while transitioning between tasks, enhancing efficiency in a busy kitchen environment.

In conclusion, the Moen 4934 and Moen 8963 are exemplary kitchen faucets that blend versatile functionality, stylish design, and water efficiency. Their innovative features, such as the pull-down sprayer and easy installation, make them ideal choices for anyone looking to upgrade their kitchen fixtures and enjoy a more streamlined cooking experience.