Home Care Technical Specification
Tool Free Transfer Bench
DN7065![]()
![]()
Stock Numbers:
DN7065 –
White
Materials:
WARNING
TO PREVENT SERIOUS OR FATAL INJURY: Insure product is assembled, adjusted and used properly. FOR USE ONLY BY PERSONS WEIGHING LESS THAN 250 POUNDS. Failure to follow correct assembly and/or adjustment procedures can make the seat unstable. ALL FOUR LEGS MUST BE LOCKED IN PLACE AT THE SAME HEIGHT . DO NOT jump on, stand on or tilt. Contact CSI immediately at
FOR QUESTIONS OR ASSISTANCE WITH ASSEMBLY CONTACT CSI AT
instructions specific to user’s needs before use.
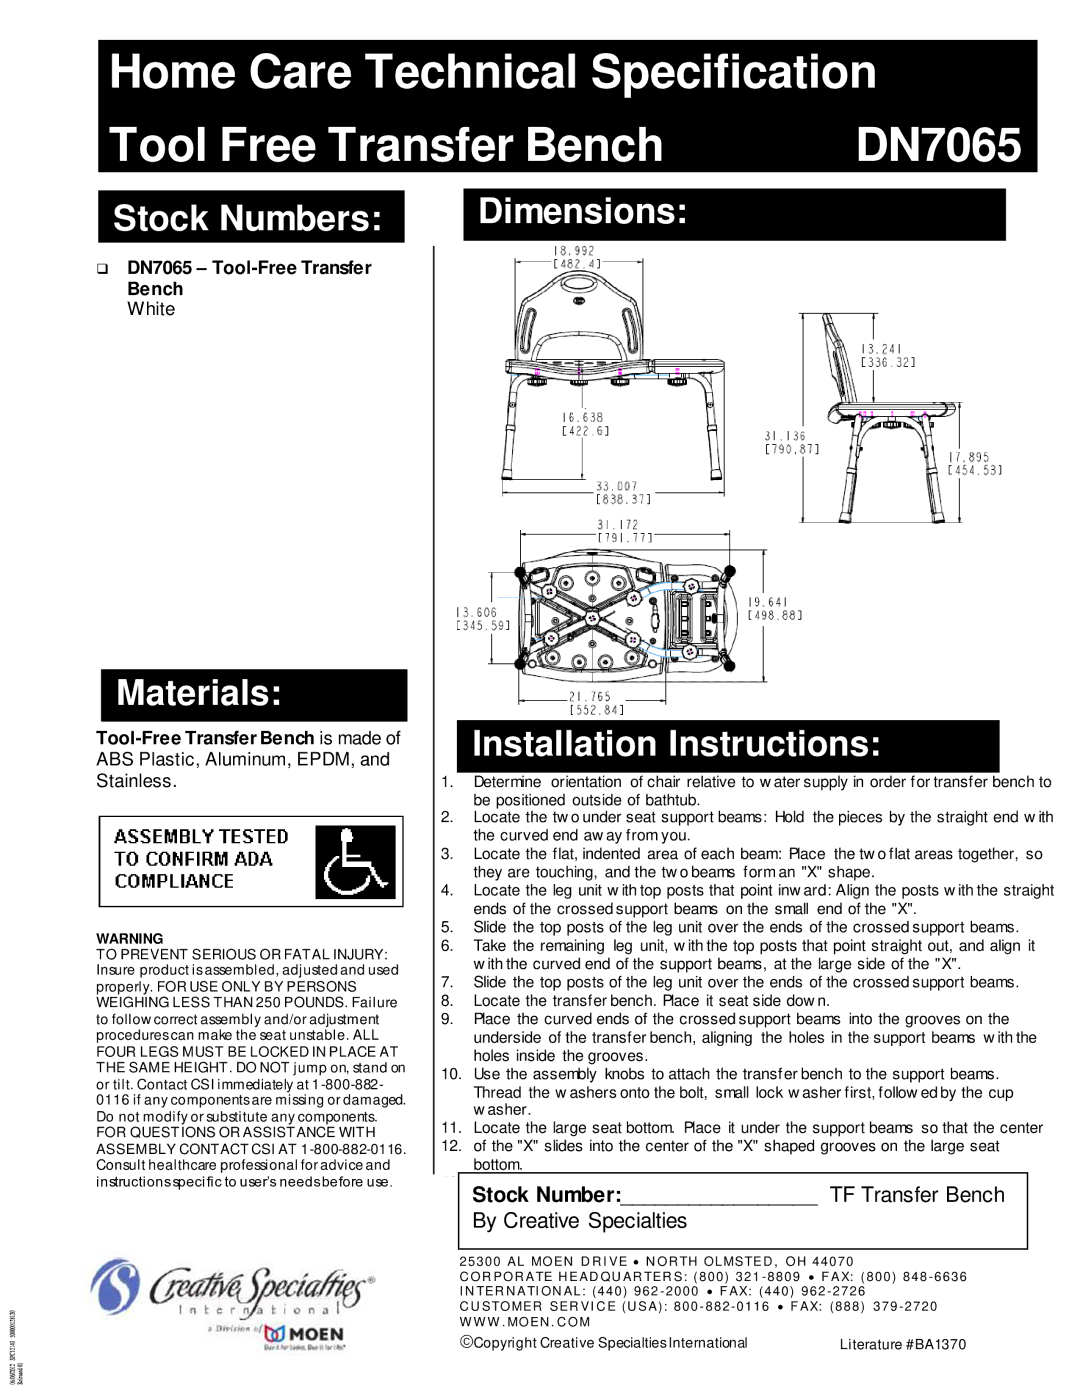
Dimensions:
Installation Instructions:
1.Determine orientation of chair relative to w ater supply in order for transfer bench to be positioned outside of bathtub.
2.Locate the tw o under seat support beams: Hold the pieces by the straight end w ith the curved end aw ay from you.
3.Locate the flat, indented area of each beam: Place the tw o flat areas together, so they are touching, and the tw o beams form an "X" shape.
4.Locate the leg unit w ith top posts that point inw ard: Align the posts w ith the straight ends of the crossed support beams on the small end of the "X".
5.Slide the top posts of the leg unit over the ends of the crossed support beams.
6. Take the remaining leg unit, w ith the top posts that point straight out, and align it w ith the curved end of the support beams, at the large side of the "X".
7.Slide the top posts of the leg unit over the ends of the crossed support beams.
8.Locate the transfer bench. Place it seat side dow n.
9.Place the curved ends of the crossed support beams into the grooves on the underside of the transfer bench, aligning the holes in the support beams w ith the holes inside the grooves.
10.Use the assembly knobs to attach the transfer bench to the support beams. Thread the w ashers onto the bolt, small lock w asher first, follow ed by the cup w asher.
11.Locate the large seat bottom. Place it under the support beams so that the center
12.of the "X" slides into the center of the "X" shaped grooves on the large seat
bottom.
13
Stock Number:_________________ TF Transfer Bench
By Creative Specialties
25300 AL MOEN D R I VE ∙ N OR TH OLMSTED , OH 44070 |
|
C OR POR ATE H EAD QU AR TER S: (800) 321 - 8 8 0 9 ∙ F AX: | (800) 848 - 6 6 3 6 |
I N TER N ATI ON AL: (440) 962 - 2 0 0 0 ∙ F AX: (440) 962 - 2 7 2 6 | |
C U STOMER SER VI C E (U SA): 800 - 8 8 2 - 0 1 1 6 | ∙ F AX: (888) 379 - 2 7 2 0 |
W W W . MOEN . C OM |
|
©Copyright Creative Specialties International | Literature #BA1370 |