19

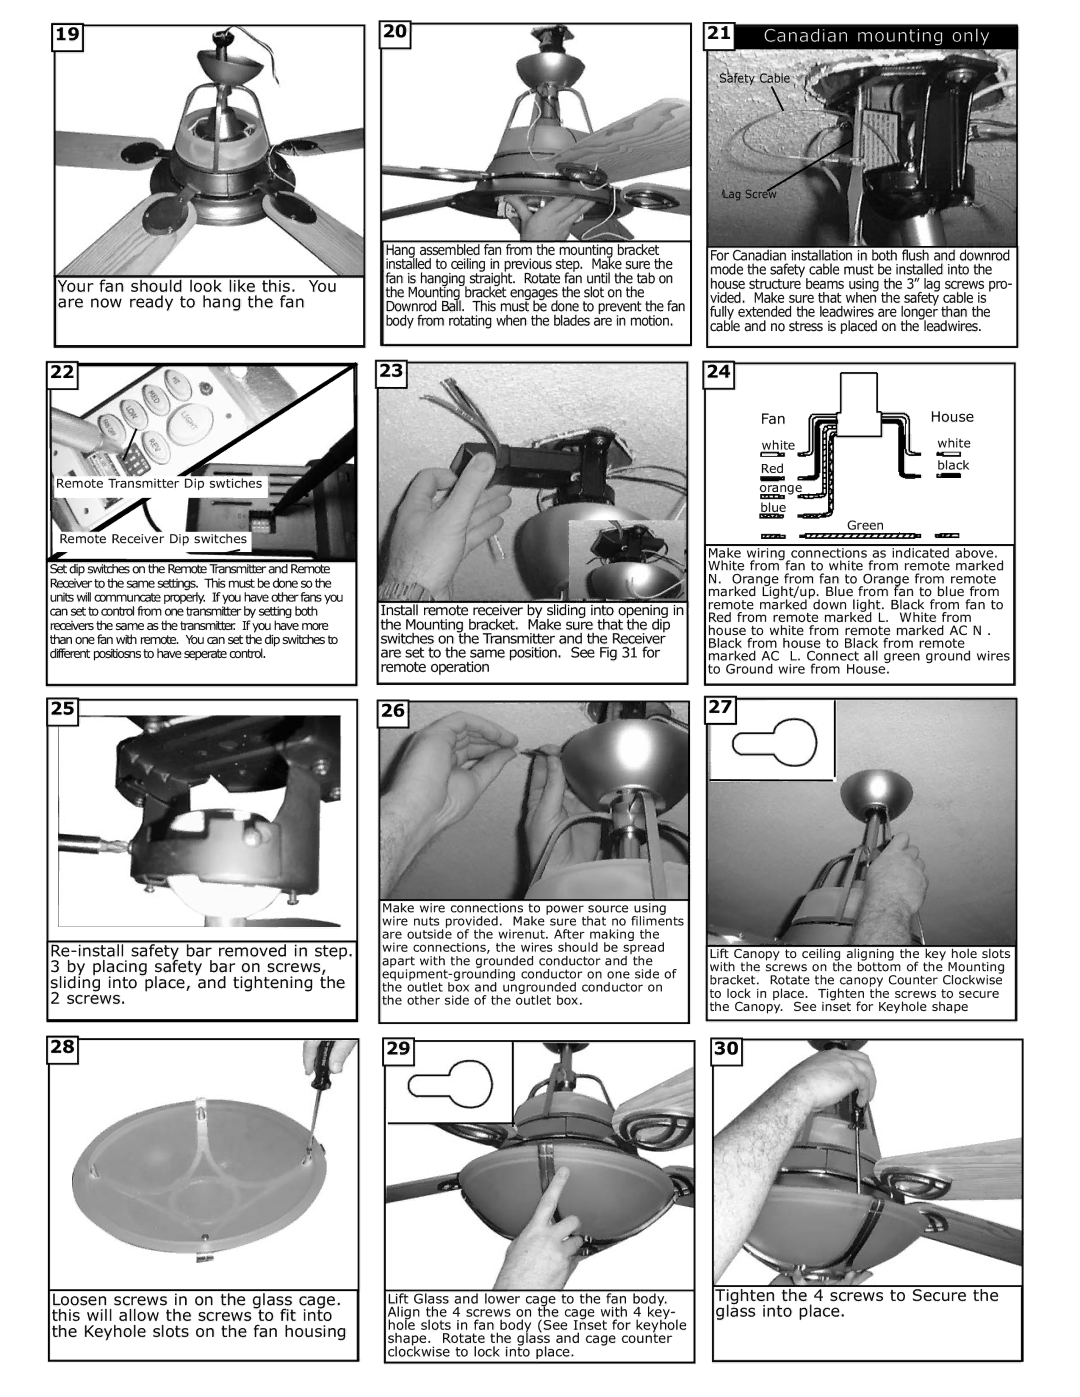
Your fan should look like this. You are now ready to hang the fan

22

Remote Transmitter Dip swtiches

Remote Receiver Dip switches

Set dip switches on the Remote Transmitter and Remote Receiver to the same settings. This must be done so the units will communcate properly. If you have other fans you can set to control from one transmitter by setting both receivers the same as the transmitter. If you have more than one fan with remote. You can set the dip switches to different positiosns to have seperate control.

25

Re-install safety bar removed in step. 3 by placing safety bar on screws, sliding into place, and tightening the 2 screws.

28

Loosen screws in on the glass cage. this will allow the screws to fit into the Keyhole slots on the fan housing

20

Hang assembled fan from the mounting bracket installed to ceiling in previous step. Make sure the fan is hanging straight. Rotate fan until the tab on the Mounting bracket engages the slot on the Downrod Ball. This must be done to prevent the fan body from rotating when the blades are in motion.

23

Install remote receiver by sliding into opening in the Mounting bracket. Make sure that the dip switches on the Transmitter and the Receiver are set to the same position. See Fig 31 for remote operation

26

Make wire connections to power source using wire nuts provided. Make sure that no filiments are outside of the wirenut. After making the wire connections, the wires should be spread apart with the grounded conductor and the equipment-grounding conductor on one side of the outlet box and ungrounded conductor on the other side of the outlet box.

29

Lift Glass and lower cage to the fan body. Align the 4 screws on the cage with 4 key- hole slots in fan body (See Inset for keyhole shape. Rotate the glass and cage counter clockwise to lock into place.

21Canadian mounting only

Safety Cable

Lag Screw

For Canadian installation in both flush and downrod mode the safety cable must be installed into the house structure beams using the 3” lag screws pro- vided. Make sure that when the safety cable is fully extended the leadwires are longer than the cable and no stress is placed on the leadwires.

24

Fan

House

white

white

Red

black

orange


blue

Green


Make wiring connections as indicated above. White from fan to white from remote marked N. Orange from fan to Orange from remote marked Light/up. Blue from fan to blue from remote marked down light. Black from fan to Red from remote marked L. White from house to white from remote marked AC N . Black from house to Black from remote marked AC L. Connect all green ground wires to Ground wire from House.

27

Lift Canopy to ceiling aligning the key hole slots with the screws on the bottom of the Mounting bracket. Rotate the canopy Counter Clockwise to lock in place. Tighten the screws to secure the Canopy. See inset for Keyhole shape

30

Tighten the 4 screws to Secure the glass into place.

Page 4
Image 4
Monte Carlo Fan Company 5ALR56 Tighten the 4 screws to Secure the glass into place, Fan House, Safety Cable Lag Screw

5ALR56 specifications

Monte Carlo Fan Company has established itself as a leading brand in the ceiling fan industry, known for creating stylish and efficient ceiling fans for both residential and commercial use. One of their standout models is the Monte Carlo 5ALR56, which combines modern design with advanced technologies for an effective cooling solution.

The Monte Carlo 5ALR56 features a sleek, contemporary design that is sure to complement any interior décor. With a blade span of 56 inches, it is well-suited for medium to large rooms, offering impressive airflow while maintaining a subtle presence in your living space. The fan is available in various finishes including matte black, oil-rubbed bronze, and brushed nickel, ensuring that homeowners can find a look that fits their aesthetic preferences.

One of the key characteristics of the Monte Carlo 5ALR56 is its high-performance motor, which operates quietly yet efficiently. This fan features a powerful DC motor that not only provides an optimal airflow of up to 6,500 cubic feet per minute (CFM) but also consumes significantly less energy compared to traditional AC motors. This results in lower utility bills and a reduced carbon footprint, making it an eco-friendly choice.

In addition to its efficient motor, the Monte Carlo 5ALR56 is equipped with three sleek, aerodynamic blades designed to enhance air circulation. The fan's blades are thoughtfully engineered to maximize performance while minimizing noise levels, providing a serene environment in any room.

The fan also incorporates a variety of modern technologies for added convenience. It comes with a remote control that allows users to adjust the fan speed and light settings from anywhere in the room. The 5ALR56 is also compatible with smart home systems, enabling users to control it through voice commands or smartphone apps, integrating seamlessly into a smart home setup.

Installation is made easy with the fan’s flush mount capability, allowing it to fit snugly against the ceiling for rooms with lower ceiling heights. Additionally, its lightweight design aids in simplifying the mounting process.

In summary, the Monte Carlo 5ALR56 ceiling fan showcases a perfect blend of style, efficiency, and technological innovation. Its modern design, powerful DC motor, and user-friendly features make it a top choice for anyone looking to enhance their indoor environment while benefiting from reduced energy consumption.