Stereo cd alarm clock radio
29003 | OPERATING INSTRUCTIONS |
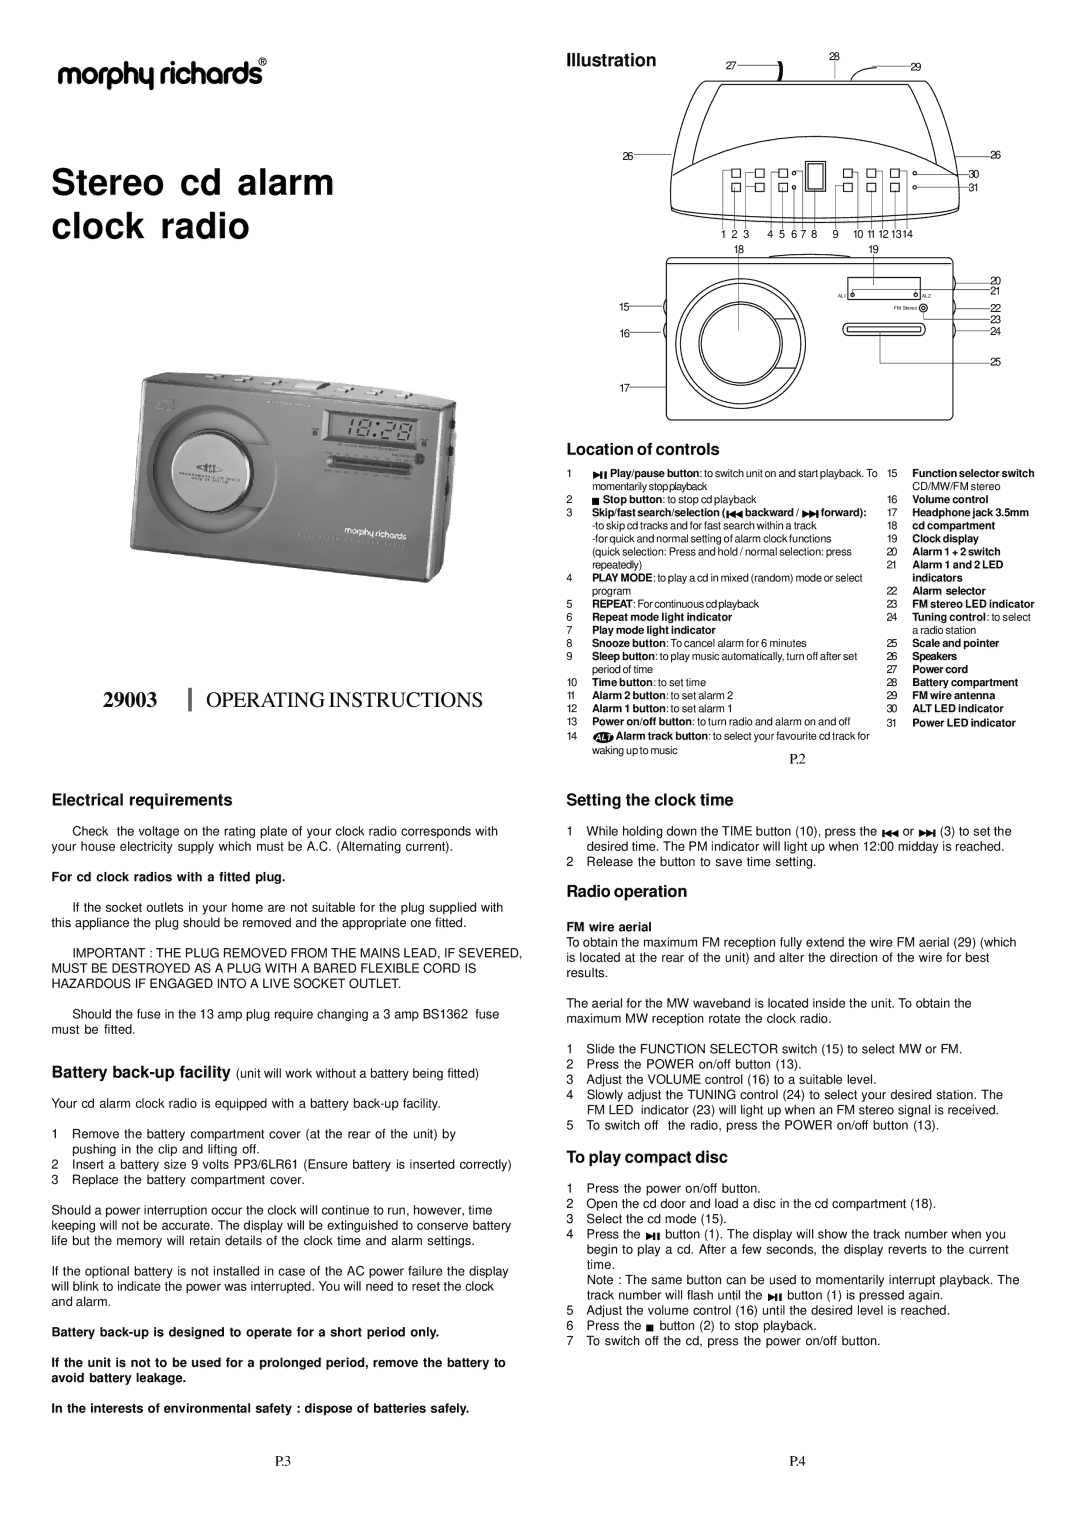
Illustration | 27 | 28 |
| 29 | ||
|
|
|
| |||
|
|
| ||||
|
|
|
|
|
|
|
26 |
|
|
|
|
|
| 26 |
|
|
|
|
|
|
| 30 |
|
|
|
|
|
|
| 31 |
1 2 | 3 | 4 | 5 | 6 7 8 | 9 | 10 11 12 1314 |
|
18 |
|
|
|
| 19 |
| |
|
|
|
|
|
|
| 20 |
15 |
|
|
|
| AL1 | AL2 | 21 |
|
|
|
|
| FM Stereo | 22 | |
|
|
|
|
|
|
| 23 |
16 |
|
|
|
|
|
| 24 |
|
|
|
|
|
|
| 25 |
17 |
|
|
|
|
|
|
|
Location of controls
1 |
|
|
|
|
| Play/pause button: to switch unit on and start playback. To | 15 | Function selector switch | ||||
|
|
|
| |||||||||
| momentarily stopplayback |
|
|
|
| CD/MW/FM stereo | ||||||
2 |
|
|
| Stop button: to stop cd playback |
|
| 16 | Volume control | ||||
|
|
|
|
| ||||||||
3 | Skip/fast search/selection ( |
| backward / |
| forward): | 17 | Headphone jack 3.5mm | |||||
|
| |||||||||||
|
|
| 18 | cd compartment | ||||||||
| 19 | Clock display | ||||||||||
| (quick selection: Press and hold / normal selection: press | 20 | Alarm 1 + 2 switch | |||||||||
| repeatedly) |
|
|
| 21 | Alarm 1 and 2 LED | ||||||
4 | PLAY MODE: to play a cd in mixed (random) mode or select |
| indicators | |||||||||
| program |
|
|
| 22 | Alarm selector | ||||||
5 | REPEAT: For continuous cd playback |
|
| 23 | FM stereo LED indicator | |||||||
6 | Repeat mode light indicator |
|
|
| 24 | Tuning control: to select | ||||||
7 | Play mode light indicator |
|
|
|
| a radio station | ||||||
8 | Snooze button: To cancel alarm for 6 minutes |
|
| 25 | Scale and pointer | |||||||
9 | Sleep button: to play music automatically, turn off after set | 26 | Speakers | |||||||||
| period of time |
|
|
| 27 | Power cord | ||||||
10 | Time button: to set time |
|
|
| 28 | Battery compartment | ||||||
11 | Alarm 2 button: to set alarm 2 |
|
|
| 29 | FM wire antenna | ||||||
12 | Alarm 1 button: to set alarm 1 |
|
|
| 30 | ALT LED indicator | ||||||
13 | Power on/off button: to turn radio and alarm on and off | 31 | Power LED indicator | |||||||||
14 |
| ALT Alarm track button: to select your favourite cd track for |
|
| ||||||||
| waking up to music | P.2 |
|
|
|
| ||||||
|
|
|
|
|
|
|
|
|
|
|
| |
Electrical requirements
Check the voltage on the rating plate of your clock radio corresponds with your house electricity supply which must be A.C. (Alternating current).
For cd clock radios with a fitted plug.
If the socket outlets in your home are not suitable for the plug supplied with this appliance the plug should be removed and the appropriate one fitted.
IMPORTANT : THE PLUG REMOVED FROM THE MAINS LEAD, IF SEVERED, MUST BE DESTROYED AS A PLUG WITH A BARED FLEXIBLE CORD IS HAZARDOUS IF ENGAGED INTO A LIVE SOCKET OUTLET.
Should the fuse in the 13 amp plug require changing a 3 amp BS1362 fuse must be fitted.
Battery
Your cd alarm clock radio is equipped with a battery
1Remove the battery compartment cover (at the rear of the unit) by pushing in the clip and lifting off.
2Insert a battery size 9 volts PP3/6LR61 (Ensure battery is inserted correctly)
3Replace the battery compartment cover.
Should a power interruption occur the clock will continue to run, however, time keeping will not be accurate. The display will be extinguished to conserve battery life but the memory will retain details of the clock time and alarm settings.
If the optional battery is not installed in case of the AC power failure the display will blink to indicate the power was interrupted. You will need to reset the clock and alarm.
Battery
If the unit is not to be used for a prolonged period, remove the battery to avoid battery leakage.
In the interests of environmental safety : dispose of batteries safely.
Setting the clock time
1While holding down the TIME button (10), press the ![]()
![]() or
or ![]()
![]() (3) to set the desired time. The PM indicator will light up when 12:00 midday is reached.
(3) to set the desired time. The PM indicator will light up when 12:00 midday is reached.
2Release the button to save time setting.
Radio operation
FM wire aerial
To obtain the maximum FM reception fully extend the wire FM aerial (29) (which is located at the rear of the unit) and alter the direction of the wire for best results.
The aerial for the MW waveband is located inside the unit. To obtain the maximum MW reception rotate the clock radio.
1Slide the FUNCTION SELECTOR switch (15) to select MW or FM.
2Press the POWER on/off button (13).
3Adjust the VOLUME control (16) to a suitable level.
4Slowly adjust the TUNING control (24) to select your desired station. The FM LED indicator (23) will light up when an FM stereo signal is received.
5To switch off the radio, press the POWER on/off button (13).
To play compact disc
1Press the power on/off button.
2Open the cd door and load a disc in the cd compartment (18).
3Select the cd mode (15).
4Press the ![]()
![]()
![]() button (1). The display will show the track number when you begin to play a cd. After a few seconds, the display reverts to the current time.
button (1). The display will show the track number when you begin to play a cd. After a few seconds, the display reverts to the current time.
Note : The same button can be used to momentarily interrupt playback. The
track number will flash until the ![]()
![]()
![]() button (1) is pressed again.
button (1) is pressed again.
5Adjust the volume control (16) until the desired level is reached.
6Press the ![]() button (2) to stop playback.
button (2) to stop playback.
7To switch off the cd, press the power on/off button.
P.3 | P.4 |