| ⁄ |
|
|
|
| ¤ |
|
|
|
|
|
|
| Í |
‹ |
|
|
|
|
› |
| Î | È | Ë |
| fi | ‚ |
|
|
fl |
|
|
| |
|
|
|
| |
|
|
| Ï |
|
‡ |
|
|
| Á |
|
|
| ‰ |
|
· | „ | Â | Ê |
|
|
|
| ||
|
|
|
| |
Features |
| OPERATING THE | ||
|
| APPLIANCE |
| |
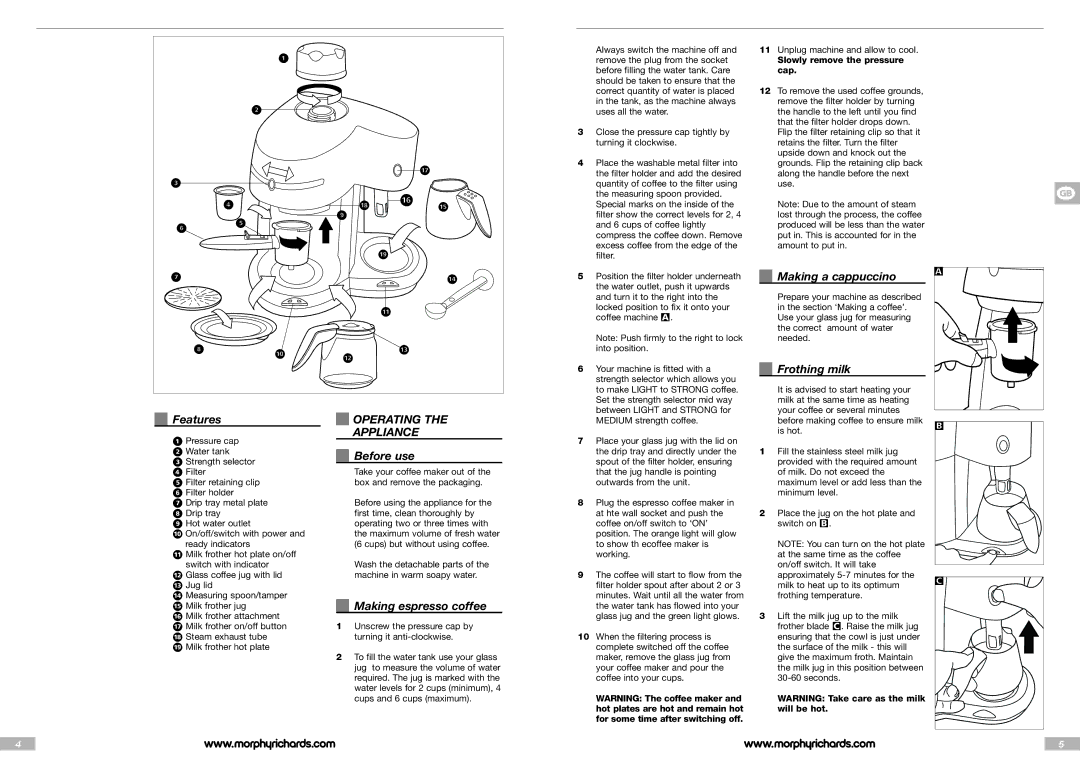
⁄Pressure cap
¤ Water tank |
| Before use |
| ||
‹ Strength selector |
| |
|
| |
› Filter |
| Take your coffee maker out of the |
fi Filter retaining clip |
| box and remove the packaging. |
flFilter holder
‡ Drip tray metal plate | Before using the appliance for the |
· Drip tray | first time, clean thoroughly by |
‚ Hot water outlet | operating two or three times with |
„ On/off/switch with power and | the maximum volume of fresh water |
ready indicators | (6 cups) but without using coffee. |
‰Milk frother hot plate on/off
switch with indicator | Wash the detachable parts of the |
 Glass coffee jug with lid | machine in warm soapy water. |
ÊJug lid
ÁMeasuring spoon/tamper
Ë Milk frother jug |
| Making espresso coffee |
ÈMilk frother attachment
Í Milk frother on/off button | 1 Unscrew the pressure cap by |
Î Steam exhaust tube | turning it |
ÏMilk frother hot plate
2 To fill the water tank use your glass jug to measure the volume of water required. The jug is marked with the water levels for 2 cups (minimum), 4 cups and 6 cups (maximum).
Always switch the machine off and remove the plug from the socket before filling the water tank. Care should be taken to ensure that the correct quantity of water is placed in the tank, as the machine always uses all the water.
3Close the pressure cap tightly by turning it clockwise.
4Place the washable metal filter into the filter holder and add the desired quantity of coffee to the filter using the measuring spoon provided.
Special marks on the inside of the filter show the correct levels for 2, 4 and 6 cups of coffee lightly compress the coffee down. Remove excess coffee from the edge of the filter.
5Position the filter holder underneath the water outlet, push it upwards and turn it to the right into the locked position to fix it onto your coffee machine A.
Note: Push firmly to the right to lock into position.
6Your machine is fitted with a strength selector which allows you to make LIGHT to STRONG coffee. Set the strength selector mid way between LIGHT and STRONG for MEDIUM strength coffee.
7Place your glass jug with the lid on the drip tray and directly under the spout of the filter holder, ensuring that the jug handle is pointing outwards from the unit.
8Plug the espresso coffee maker in at hte wall socket and push the coffee on/off switch to ‘ON’ position. The orange light will glow to show th ecoffee maker is working.
9The coffee will start to flow from the filter holder spout after about 2 or 3 minutes. Wait until all the water from the water tank has flowed into your glass jug and the green light glows.
10When the filtering process is complete switched off the coffee maker, remove the glass jug from your coffee maker and pour the coffee into your cups.
WARNING: The coffee maker and hot plates are hot and remain hot for some time after switching off.
11Unplug machine and allow to cool.
Slowly remove the pressure cap.
12To remove the used coffee grounds, remove the filter holder by turning the handle to the left until you find that the filter holder drops down. Flip the filter retaining clip so that it retains the filter. Turn the filter upside down and knock out the grounds. Flip the retaining clip back along the handle before the next use.
Note: Due to the amount of steam lost through the process, the coffee produced will be less than the water put in. This is accounted for in the amount to put in.
Making a cappuccino
Prepare your machine as described in the section ‘Making a coffee’. Use your glass jug for measuring the correct amount of water needed.
Frothing milk
It is advised to start heating your milk at the same time as heating your coffee or several minutes before making coffee to ensure milk is hot.
1Fill the stainless steel milk jug provided with the required amount of milk. Do not exceed the maximum level or add less than the minimum level.
2Place the jug on the hot plate and switch on B.
NOTE: You can turn on the hot plate at the same time as the coffee on/off switch. It will take approximately
3Lift the milk jug up to the milk frother blade C. Raise the milk jug ensuring that the cowl is just under the surface of the milk - this will give the maximum froth. Maintain the milk jug in this position between
WARNING: Take care as the milk will be hot.
g
A
B
C
4
5
