MA351SYS
Cordless Phone User Guide
FCC COMPLIANCE CLASS B DIGITAL DEVICE
This equipment has been tested and found to comply with the limits for a Class B digital device, pursuant to Part 15 of the FCC Rules. These limits are designed to provide reasonable protection against harmful interference in a residential environment. This equipment generates, uses, and can radiate ra- dio frequency energy and, if not installed and used in accordance with the in- structions, may cause harmful interference to radio communications. Howev- er, there is no guarantee that interference will not occur in a particular installa- tion. If this equipment does cause harmful interference to radio or television reception, which can be determined by turning the equipment off and on, the user is encouraged to try to correct the interference by one of the following measures:
•
•Increase the separation between the equipment and receiver.
•Connect the equipment into an outlet on a circuit different from that to which the receiver is connected.
•Consult the dealer or an experienced radio/TV technician for help.
CAUTION: Changes or modifications not expressly approved by Motorola for compliance could void the user’s authority to operate the equipment.
FCC DECLARATION OF CONFORMITY
Motorola, Inc., Connected Home Solutions, 101 Tournament Drive, Horsham, PA 19044,
CANADIAN COMPLIANCE
This Class B digital apparatus meets all requirements of the Canadian Interfer-
Cet appareil numérique de la classe B est conforme la norme
FEDERAL COMMUNICATIONS COMMISSION (FCC) PART 68 STATEMENT
The Motorola M351S complies with Part 68 of the FCC rules and the require- ments adopted by the Administrative Council for Terminal Attachments (ACTA). On the bottom of this equipment is a label that contains, among other informa- tion, a product identifier in format US: AAAEQ##TXXXX. If requested, this infor- mation must be provided to the telephone company.
The Ringer Equivalence Number (REN) is used to determine the number of de- vices that may be connected to the telephone line. Excessive RENs on the tele- phone line may result in the devices not ringing in response to an incoming call. In most, but not all areas, the sum of the RENs should not exceed five. To be certain of the number of devices that may be connected to the line, as deter- mined by the total RENs, contact your local telephone company.
For products approved after July 23, 2001, the REN for this product is part of the product identifier that has the format US: AAAEQ##TXXXX. The digits repre- sented by ## are the REN without a decimal point (e.g., 02 is a REN of 0.2). For earlier products, the REN is separately shown on the label.This equipment uses the following USOC jack: RJ11C. A plug and jack used to connect this equip- ment to the premises wiring and telephone network must comply with the ap- plicable FCC Part 68 rules and requirements adopted by the ACTA. A compliant telephone cord and modular plug is provided with this product. It is designed to be connected to a compatible modular jack that is also compliant. See installa- tion instructions for details.
Connection to Party Line Service is subject to state tariffs. Contact the state public utility commission, public service commission, or corporation commis- sion for information.
If this equipment causes harm to the telephone network, the telephone compa- ny will notify you in advance that the temporary discontinuance of services may be required. If advance notice is not practical, the telephone company will notify the customer as soon as possible. Also, you will be advised of your right to file a complaint with the FCC if you believe it is necessary.
The telephone company may make changes in its facilities, equipment, opera- tions, or procedures that could affect the operation of the equipment. If this happens, the telephone company will provide advance notice in order for you to make necessary modifications to maintain uninterrupted service.
If trouble is experienced with this equipment, for repair or warranty information, please contact Motorola, Inc. at
This equipment is hearing aid compatible.
If your home has specially wired alarm equipment connected to the telephone line, ensure the installation of the M351S does not disable your alarm equip- ment. If you have questions about what will disable alarm equipment, consult your telephone company or a qualified installer.
INDUSTRY CANADA CS-03 STATEMENT
This product meets the applicable Industry Canada technical specifications. The Ringer Equivalence Number (REN) is an indication of the maximum number of devices allowed to be connected to a telephone interface.The termination on an interface may consist of any combination of devices subject only to the re- quirement that the sum of the RENs of all the devices does not exceed five.
CANADA—INDUSTRY CANADA (IC)
This Class B digital apparatus complies with Canadian
Cet appareil numérique de la classe B est conforme à la norme
IMPORTANT SAFETY INSTRUCTIONS
Follow these safety precautions when using your cordless phone to reduce the risk of fire, electric shock and injury to persons or property:
To reduce the risk of fire and shock:
Keep all slits and openings of the phone unblocked. Do not set the phone on a heating register or over a radiator. Ensure that proper ventilation is provided at the installation site.
Do not use while wet or while standing in water.
Do not use this product near water (for example, near a bath tub, kitchen sink, or swimming pool).
Do not allow anything to rest on the power cord. Place the power cord so that it will not be walked on.
Never insert objects of any kind into the product slits as that may result in fire or shock.
Unplug this product from the wall outlet before cleaning. Do not use liquid cleaners or aerosol cleaners. Use a damp cloth for cleaning.
Do not disassemble this product. If service or repair work is required, contact the Motorola address found in the back of this user guide.
Do not overload wall outlets and extension cords.
Avoid using during an electrical storm. Use a surge protector to protect the equipment.
Do not use this cordless phone to report a gas leak, especially if you are in the vicinity of the gas line.
CAUTION: To reduce the risk of fire, use only No. 26 AWG or larger UL listed or CSA Certified Telecommunication Line Cord.Unplug this cordless phone im-
mediately from an outlet if:
The power cord or plug is damaged or frayed. Liquid has been spilled into the product.
The product has been exposed to rain or water. Do not retrieve the handset or base until after you have unplugged the power and phone from the wall. Then retrieve the unit by the unplugged cords.
The product has been dropped or the cabinet has been damaged. The product exhibits a distinct change in performance.
Installation Guidelines
Read and understand all instructions and save them for future reference. Follow all warnings and instructions marked on the product.
Do not install this product near a bath tub, sink, or shower.
Operate this phone using only the power source that is indicated on the marking label. If you are unsure of the power supply to your home, consult your dealer or local power company.
Do not place this product on an unstable cart, stand, or table. This product may fall, causing serious damage to the product.
Adjust only those controls that are covered by the operating instructions. Im- proper adjustment of other controls may result in damage and will often require extensive work to restore the product to normal operation.
Clean this product with a soft, damp cloth. Do not use chemicals or cleaning agents.
Use only the power supply that came with this unit. Using other power supplies may damage the unit.
Because cordless phones operate on electricity, you should have at least one phone in your home that isn’t cordless, in case the power in your home goes out.
To avoid interference to nearby appliances, do not place the base of the cordless phone on or near a TV, microwave oven, refrigerator, or VCR.
To maintain compliance with the FCC’s RF exposure guidelines, place the base unit at least 20 cm from nearby persons.
BATTERY SAFETY PRECAUTIONS
•Do not burn, disassemble, mutilate, or puncture. Like other batteries of this type, toxic materials could be released which can cause injury.
•To reduce the risk of fire or personal injury, use only the battery listed in the User's Guide.
•Keep batteries out of the reach of children.
•Remove batteries if storing over 30 days.
INTRODUCTION
CAUTION: When using telephone equipment, there are basic safety in- structions that should always be followed. Refer to the “Important Safety Instructions”section of this manual for further information on safely oper- ating your cordless phone.
Your cordless telephone system with Caller ID and Call Waiting is designed to give you flexibility in use and
•View the name and telephone number of a caller (Call Waiting Caller ID)
•Identify callers before you answer the phone
•View the time and date of each incoming call
•Record up to 40 Caller ID messages sequentially
•Know who called while you are on the other line or when you were away.
•Screen unwanted calls, eliminate harassment from annoying calls, or prepare before answering a call
IMPORTANT: In order to use all of the features of this telephone, you must sub- scribe to two separate services available from your local telephone company: the standard Name/Number Caller ID Service to know who is callingwhen the phone rings and Caller ID with Call Waiting Service to know who is calling while you are on the phone.
Because cordless phones operate on electricity, you should have at least one phone in your home that isn't cordless, in case the power in your home goes out.
BEFOREYOU BEGIN
PARTS CHECKLIST
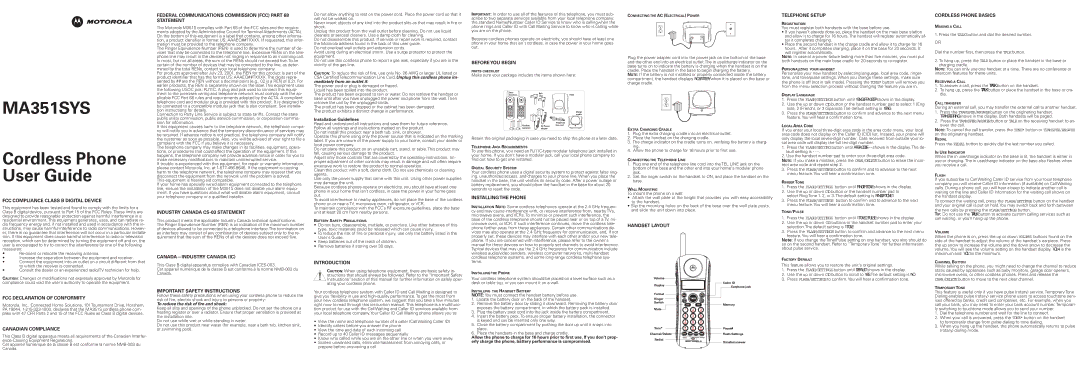
Make sure your package includes the items shown here:
Retain the original packaging in case you need to ship the phone at a later date.
TELEPHONE JACK REQUIREMENTS
To use this phone, you need an
DIGITAL SECURITY SYSTEM
Your cordless phone uses a digital security system to protect against false ring- ing, unauthorized access, and charges to your phone line. When you place the handset in the base, the unit verifies its security code. After a power outage or battery replacement, you should place the handset in the base for about 20 seconds to reset the code.
INSTALLINGTHE PHONE
INSTALLATION NOTE: Some cordless telephones operate at the 2.4 GHz frequen- cy and may cause interference with, or receive interference from, nearby TVs, microwave ovens, and VCRs. To minimize or prevent such interference, the base of the cordless telephone should not be placed near or on top of a TV, mi- crowave oven, or VCR. If such interference continues, move the cordless tele- phone farther away from these appliances. Certain other communications de- vices may also operate at the 2.4 GHz frequency for communication, and, if not properly set, these devices may interfere with each other and/or your new tele- phone. If you are concerned with interference, please refer to the owner's manual for these devices on how to properly set channels to avoid interference. Typical devices that may use the 2.4 GHz frequency for communication include wireless audio/video senders, wireless computer networks,
INSTALLING THE PHONE
Your cordless telephone system should be placed on a level surface such as a desk or table top, or you can mount it on a wall.
INSTALLING THE HANDSET BATTERY
NOTE: You must connect the handset battery before use.
1.Locate the battery door on the back of the handset.
2.Remove the battery door by sliding it downward. Removing the battery door exposes the battery compartment, in which the battery pack is installed.
3.Plug the battery pack cord into the jack inside the battery compartment.
4.Insert the battery pack. To ensure proper battery installation, the connector is keyed and can be inserted only one way.
5.Close the battery compartment by pushing the door up until it snaps into place.
6.Place the handsets in the base and charge cradle.
Allow the phone to charge for 16 hours prior to first use. If you don't prop- erly charge the phone, battery performance is compromised.
CONNECTING THE AC (ELECTRICAL) POWER
Plug the power adapter cord into the power jack on the bottom of the base and the other end into an electrical outlet.The in use/charge indicator on the base turns on to indicate the battery is charging when the handset is on the cradle. Place the handset in the base to begin charging the battery.
NOTE: If the battery is not installed or properly connected inside the battery compartment, the handset displays NO BATTERY when it is placed on the base or charge cradle.
EXTRA CHARGING CRADLE
1.Plug the extra charging cradle into an electrical outlet.
2.Place the handset on the charging cradle.
3.The charge indicator on the cradle turns on, verifying the battery is charg- ing.
4.Allow the phone to charge for 16 hours prior to first use.
CONNECTING THE TELEPHONE LINE
1.Plug one end of the telephone line cord into the TEL LINE jack on the bottom of the base and the other end into your home's modular phone jack.
2.Set the ringer switch on the handset to ON, and place the handset on the base.
WALL MOUNTING
To mount the phone on a wall:
•Attach the wall plate at the height that provides you with easy accessibility to the handset.
•Slip the mounting holes on the back of the base over the wall plate posts, and slide the unit down into place.
HANDSET LAYOUT
TELEPHONE SETUP
REGISTRATION
You must register both handsets with the base before use.
•If you haven’t already done so, place the handset on the main base station and allow it to charge for 16 hours. The handset will register automatically af- ter it completes charging.
•Place the second handset in the charge cradle and allow it to charge for 16 hours. After it completes charging, place it on the base for 20 seconds. It
will register automatically.
NOTE: In case of a power failure lasting more than five minutes, you must put both handsets on the main base cradle for 20 seconds to
PERSONALIZING YOUR HANDSET
Personalize your new handset by selecting language, local area code, ringer- tone, and tone/pulse settings. When you change these settings, make sure
the phone is off (not in talk mode). Pressing the TONE* button will remove you from the menu selection process without changing the feature you are in.
DISPLAY LANGUAGE
1.Press the FLASH/SETTINGSbutton until 1 ENG 2FRA 3ESP shows in the display.
2.Use the up or down CIDbutton or the handset number pad to select 1 (Eng lish), 2 (French), or 3 (Spanish).The default setting is 1 ENG.
3.Press the FLASH/SETTINGSbutton to confirm and advance to the next menu feature. You will hear a confirmation tone.
LOCAL AREA CODE
If you enter your local
1.Press the FLASH/SETTINGbutton until AREA CODE- - - shows in the display. The de- fault setting is - -
2.Use the handset number pad to enter your
NOTE: If you make a mistake, press the CHAN/DELETEbutton to erase the incor- rect area code and repeat step 2.
3.Press the FLASH/SETTINGSbutton to confirm and to advance to the next menu feature. You will hear a confirmation tone.
RINGER TONE
1.Press the FLASH/SETTINGS button until RINGER TONE shows in the display.
2.Use the up or down CIDbutton or the handset number pad to select Ring Tone 1. 2, or 3. The default setting is RINGER TONE 1.
3.Press the FLASH/SETTINGS button to confirm and to advance to the next menu feature. You will hear a confirmation tone.
TONE/PULSE
1.Press the FLASH/SETTINGS button until 1 TONE 2 PULSE shows in the display.
2.Use the up or down CIDbuttons or the handset number pad to enter your selection.The default setting is 1 TONE.
3.Press the FLASH/SETTINGSbutton to confirm and advance to the next menu feature. You will hear a confirmation tone.
Note: If you change the Tone/Pulse setting on one handset, you also should do so on the second handset. Refer to “Temporary Tone” for further information about pulse service.
FACTORY DEFAULT
This feature allows you to restore the unit's original settings.
1.Press the FLASH/SETTINGSbutton until DEFAULT shows in the display.
2.Use the up or down CIDbutton to scroll to YES. The default setting is NO.
3.Press FLASH/SETTINGSto confirm. You will hear a confirmation tone.
CORDLESS PHONE BASICS
MAKING A CALL
1.Press the TALKbutton and dial the desired number.
OR
Dial the number first, then press the TALKbutton.
2. To hang up, press the TALK button or place the handset in the base or charging cradle.
NOTE: You can only use one handset at a time. There are no conference or intercom features for these units.
RECEIVING A CALL
1.To answer a call, press the TALK button on the handset.
2.To hang up, press the TALK button or place the handset in the base or cra- dle.
CALL TRANSFER
During an external call, you may transfer the external call to another handset.
1.Press the TRANSFER/ANSWERbutton on the originating handset. TRANSFERRING shows in the display. Both handsets will be paged.
2.Press the TRANSFER/ANSWERbutton or TALKon the receiving handset to an- swer the call.
NOTE: To cancel the call transfer, press the TONE* button or TRANSFER/ANSWER on the originating handset.
REDIAL
Press the REDIAL button to quickly dial the last number you called.
IN USE INDICATOR
When the in use/charge indicator on the base is lit, the handset is either in use or charging. The in use/charge indicator on the base also flashes when you receive a call.
FLASH
If you subscribe to Call Waiting Caller ID service from your local telephone company you will receive Caller ID information (if available) on Call Waiting calls. During a phone call, you will hear a beep to indicate another call is waiting on the line and Caller ID information for the waiting call shows on the handset display.
To connect the waiting call, press the FLASH/SETTINGS button on the handset and your original call is put on hold.You may switch back and forth between
the two calls by pressing the FLASH/SETTINGS button.
TIP: Do not use the TALK button to activate custom calling services such as call waiting, or you'll hang up the phone.
VOLUME
When the phone is on, press the up or down VOLUME buttons found on the side of the handset to adjust the volume of the handset's earpiece. Press the up arrow to increase the volume and the down arrow to decrease the volume. You will see the volume setting on the handset display. VOL 4 is the maximum and VOL 1 is the minimum.
CHANNEL BUTTON
While talking on the phone, you might need to change the channel to reduce static caused by appliances such as baby monitors, garage door openers, microwave ovens, or other cordless phones. Press and release the
CHAN/DELETEbutton to move to the next clear channel.
TEMPORARY TONE
This feature is useful only if you have pulse (rotary) service. Temporary Tone Dialing enables pulse (rotary) service phone users to access touchtone serv- ices offered by banks, credit card companies, etc. For example, when you call your bank, you may need to enter your bank account number. Temporari- ly switching to touchtone mode allows you to send your number.
1.Dial the telephone number and wait for the line to connect.
2.When your call is answered, press the TONE* button on the handset to temporarily change from pulse dialing to tone dialing.
3.When you hang up the handset, the phone automatically returns to pulse (rotary) dialing mode.