•The extension cord size is 18 AWG for lengths up to 100 feet, and 16 AWG for lengths up to 150 feet.
9.The supply cord of the AC adaptor cannot be replaced. If the cord is damaged, call customer service at 1-800-638-5119 (U.S. and Canada) or e-mail us at giantintl@callcenter.com.
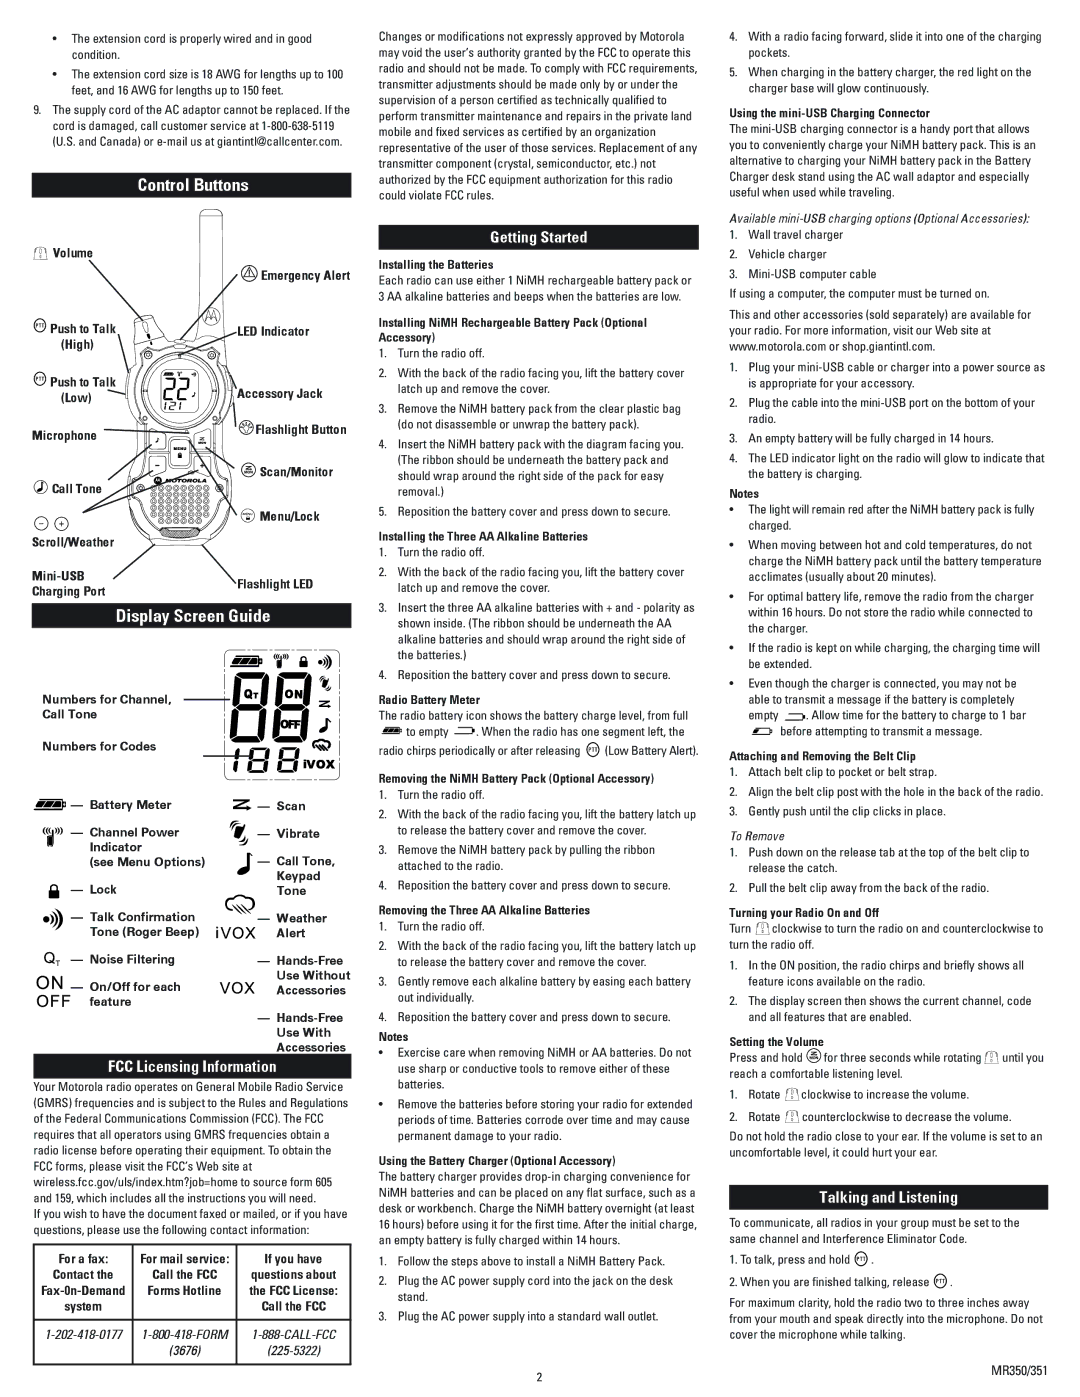
 Volume
| | Emergency Alert |
| Push to Talk | LED Indicator |
| (High) | |
| Push to Talk | Accessory Jack |
| (Low) |
| |
| Microphone | Flashlight Button |
| |
| | Scan/Monitor |
| Call Tone | |
| | Menu/Lock |
| Scroll/Weather | |
| Mini-USB | Flashlight LED |
| Charging Port |
| |
Numbers for Channel,
Call Tone
Numbers for Codes
— Battery Meter | — Scan |
— Channel Power | — Vibrate |
Indicator | — Call Tone, |
(see Menu Options) |
— Lock | Keypad |
Tone |
— Talk Confirmation | — Weather |
Tone (Roger Beep) | Alert |
— Noise Filtering | — Hands-Free |
— On/Off for each | Use Without |
Accessories |
feature | |
| — Hands-Free |
| Use With |
| Accessories |
Your Motorola radio operate son General Mobile Radio Service (GMRS) frequencies and is subject to the Rules and Regulations of the Federal Communications Commission (FCC). The FCC requires that all operators using GMRS frequencies obtain a radio license before operating their equipment. To obtain the FCC forms, please visit the FCC’s Web site at wireless.fcc.gov/uls/index.htm?job=home to source form 605 and 159, which includes all the instructions you will need.
If you wish to have the document faxed or mailed, or if you have questions, please use the following contact information:
For a fax: | For mail service: | |
Contact the | Call the FCC | questions about |
Fax-0n-Demand | Forms Hotline | the FCC License: |
system | | Call the FCC |
| | |
1-202-418-0177 | | |
| | |
| | |
Changes or modifications not expressly approved by Motorola may void the user’s authority granted by the FCC to operate this radio and should not be made. To comply with FCC requirements, transmitter adjustments should be made only by or under the supervision of a person certified as technically qualified to perform transmitter maintenance and repairs in the private land mobile and fixed services as certified by an organization representative of the user of those services. Replacement of any transmitter component (crystal, semiconductor, etc.) not authorized by the FCC equipment authorization for this radio could violate FCC rules.
Each radio can use either 1 NiMH rechargeable battery pack or 3 AA alkaline batteries and beeps when the batteries are low.
Installing NiMH Rechargeable Battery Pack (Optional Accessory)
1.Turn the radio off.
2.With the back of the radio facing you, lift the battery cover latch up and remove the cover.
3.Remove the NiMH battery pack from the clear plastic bag (do not disassemble or unwrap the battery pack).
4.Insert the NiMH battery pack with the diagram facing you. (The ribbon should be underneath the battery pack and should wrap around the right side of the pack for easy removal.)
5.Reposition the battery cover and press down to secure.
1.Turn the radio off.
2.With the back of the radio facing you, lift the battery cover latch up and remove the cover.
3.Insert the three AA alkaline batteries with + and - polarity as shown inside. (The ribbon should be underneath the AA alkaline batteries and should wrap around the right side of the batteries.)
4.Reposition the battery cover and press down to secure.
The radio battery icon shows the battery charge level, from full
to empty | . When the radio has one segment left, the |
radio chirps periodically or after releasing  (Low Battery Alert).
2.With the back of the radio facing you, lift the battery latch up to release the battery cover and remove the cover.
3.Remove the NiMH battery pack by pulling the ribbon attached to the radio.
4.Reposition the battery cover and press down to secure.
1.Turn the radio off.
2.With the back of the radio facing you, lift the battery latch up to release the battery cover and remove the cover.
3.Gently remove each alkaline battery by easing each battery out individually.
4.Reposition the battery cover and press down to secure.
Notes
• Exercise care when removing NiMH or AA batteries. Do not use sharp or conductive tools to remove either of these batteries.
•Remove the batteries before storing your radio for extended periods of time. Batteries corrode over time and may cause permanent damage to your radio.
The battery charger provides drop-in charging convenience for NiMH batteries and can be placed on any flat surface, such as a desk or workbench. Charge the NiMH battery overnight (at least 16 hours) before using it for the first time. After the initial charge, an empty battery is fully charged within 14 hours.
1.Follow the steps above to install a NiMH Battery Pack.
2.Plug the AC power supply cord into the jack on the desk stand.
3.Plug the AC power supply into a standard wall outlet.
2
4.With a radio facing forward, slide it into one of the charging pockets.
5.When charging in the battery charger, the red light on the charger base will glow continuously.
The mini-USB charging connector is a handy port that allows you to conveniently charge your NiMH battery pack. This is an alternative to charging your NiMH battery pack in the Battery Charger desk stand using the AC wall adaptor and especially useful when used while traveling.
1.Wall travel charger
2.Vehicle charger
3.Mini-USB computer cable
If using a computer, the computer must be turned on.
This and other accessories (sold separately) are available for your radio. For more information, visit our Web site at www.motorola.com or shop.giantintl.com.
1.Plug your mini-USB cable or charger into a power source as is appropriate for your accessory.
2.Plug the cable into the mini-USB port on the bottom of your radio.
3.An empty battery will be fully charged in 14 hours.
4.The LED indicator light on the radio will glow to indicate that the battery is charging.
Notes
•The light will remain red after the NiMH battery pack is fully charged.
•When moving between hot and cold temperatures, do not charge the NiMH battery pack until the battery temperature acclimates (usually about 20 minutes).
•For optimal battery life, remove the radio from the charger within 16 hours. Do not store the radio while connected to the charger.
•If the radio is kept on while charging, the charging time will be extended.
•Even though the charger is connected, you may not be able to transmit a message if the battery is completely
empty  . Allow time for the battery to charge to 1 bar before attempting to transmit a message.
1.Attach belt clip to pocket or belt strap.
2.Align the belt clip post with the hole in the back of the radio.
3.Gently push until the clip clicks in place.
1.Push down on the release tab at the top of the belt clip to release the catch.
2.Pull the belt clip away from the back of the radio.
Turn  clockwise to turn the radio on and counterclockwise to turn the radio off.
1.In the ON position, the radio chirps and briefly shows all feature icons available on the radio.
2.The display screen then shows the current channel, code and all features that are enabled.
Setting the Volume | | |
Press and hold | for three seconds while rotating | until you |
reach a comfortable listening level. | |
1.Rotate  clockwise to increase the volume.
2.Rotate  counterclockwise to decrease the volume.
Do not hold the radio close to your ear. If the volume is set to an uncomfortable level, it could hurt your ear.
To communicate, all radios in your group must be set to the same channel and Interference Eliminator Code.
1.To talk, press and hold  .
.
2.When you are finished talking, release  .
.
For maximum clarity, hold the radio two to three inches away from your mouth and speak directly into the microphone. Do not cover the microphone while talking.