U S I N G Y O U R H O M E C A F É ® C O F F E E M A K E R
Make sure you have completed the “Preparing Your Home Café® Coffeemaker before first Use” steps.
1.Remove and fill the Water Reservoir with water and replace it in the unit. (Picture 1)
2. Plug in the unit. | 1 |
3.Open the lid by pushing the Open Button on the right front of the appliance. (Picture 2)
4.Insert a Folgers® or Millstone® pod or Lipton® Tea pod with the flat side up in the appropriate pod holder. (Picture 3) Use the
Single Pod Holder with 1 pod, Double Pod Holder for 2 pods
and the Specialty Pod Holder for specialty pods. Refer to 2 “Coffee Pods Measurement Chart” to help determine how
many pods you may want to use.
5.Close the lid and push down firmly to lock in place.
6.Center your favorite cup or mug under the Dispensing Spout.
7. Adjust the Dispensing Spout by sliding it up or down to fit | 3 | |
| ||
your mug height. (Picture 4) |
|
|
|
| |
8.Push the Brew Button corresponding to the amount of coffee/tea you want to brew ( ![]() 7 oz.,
7 oz., ![]() 9 oz.,
9 oz., ![]() 14 oz.
14 oz.
or ![]() Specialty). The
Specialty). The ![]() 7oz. Brew Button is recommended when using tea pods. Remove the drip tray to accommodate
7oz. Brew Button is recommended when using tea pods. Remove the drip tray to accommodate
UP
tall mugs. The green Brew Button Indicator Light will blink 4DOWN while the unit heats to the proper brewing temperature. The
unit will begin brewing, the pump will turn on and the green indicator light will remain lit while the coffee is brewing. During the Specialty brew cycle the coffeemaker produces more noise than during other brewing selections. (Picture 5)
9. You can stop the brewing process at any time by pressing the | 5 |
Stop Button. |
10.When the brew is complete a signal will sound. You may remove your mug and enjoy!
11.After hearing the signal, wait one minute until the red STOP Indicator light turns on again before opening the Coffeemaker Lid. Open the lid and remove the Pod Holder and with the pod in place, dispose of the used pod and replace the Pod Holder. Pod and Pod Holder are hot after brewing: HANDLE WITH
CARE.
Note: The Red Indicator Light will stay on to indicate the unit is plugged in and ready to brew.
Note: Use the ![]() 7oz. Brew Button and flush with water in between tea and coffee brewing to avoid coffee tasting tea.
7oz. Brew Button and flush with water in between tea and coffee brewing to avoid coffee tasting tea.
WARNING! The lid is designed to stay locked until the brewing cycle is complete, however if for any reason the lid is managed to be opened during the brew cycle it will stop the brew cycle. Closing the lid and restarting will initiate a new cycle. We recommend replacing the pod and starting over.
U S I N G Y O U R H O M E C A F É ® C O F F E E M A K E R W I T H S P E C I A L T Y P O D S
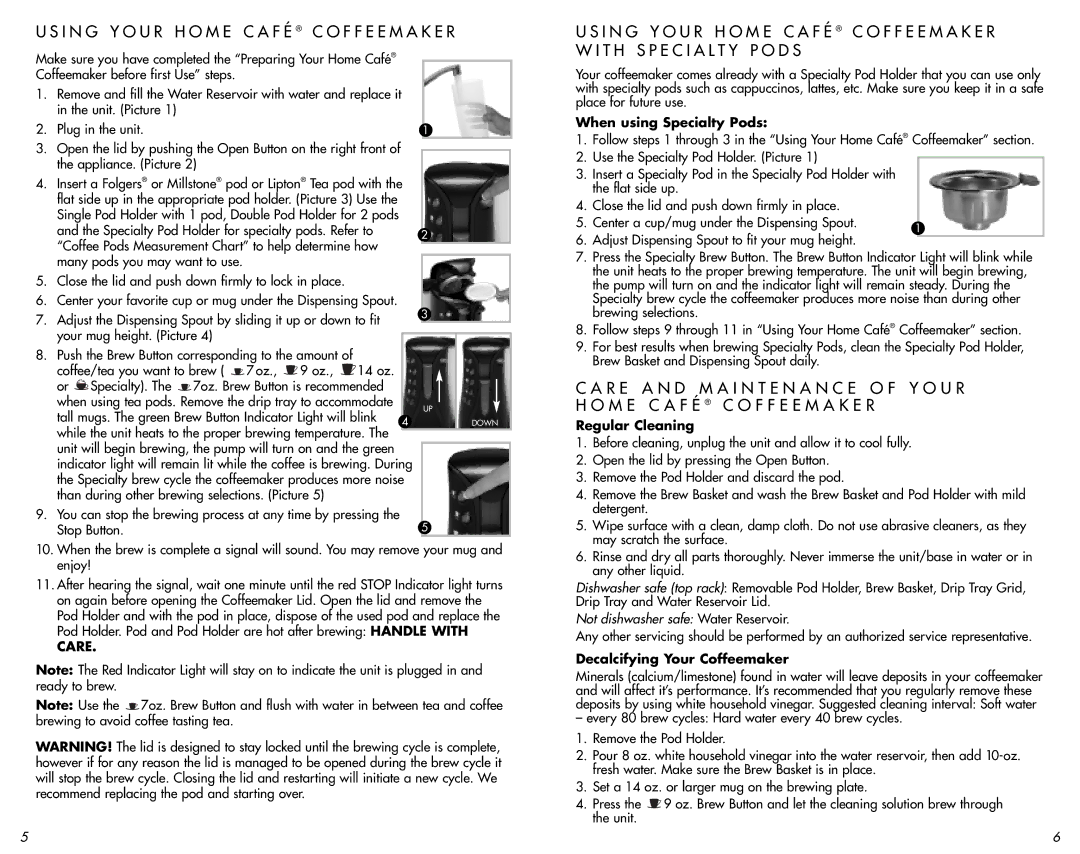
Your coffeemaker comes already with a Specialty Pod Holder that you can use only with specialty pods such as cappuccinos, lattes, etc. Make sure you keep it in a safe place for future use.
When using Specialty Pods:
1.Follow steps 1 through 3 in the “Using Your Home Café® Coffeemaker” section.
2.Use the Specialty Pod Holder. (Picture 1)
3.Insert a Specialty Pod in the Specialty Pod Holder with the flat side up.
4.Close the lid and push down firmly in place.
5. Center a cup/mug under the Dispensing Spout. | 1 |
6.Adjust Dispensing Spout to fit your mug height.
7.Press the Specialty Brew Button. The Brew Button Indicator Light will blink while the unit heats to the proper brewing temperature. The unit will begin brewing, the pump will turn on and the indicator light will remain steady. During the Specialty brew cycle the coffeemaker produces more noise than during other brewing selections.
8.Follow steps 9 through 11 in “Using Your Home Café® Coffeemaker” section.
9.For best results when brewing Specialty Pods, clean the Specialty Pod Holder, Brew Basket and Dispensing Spout daily.
C A R E A N D M A I N T E N A N C E O F Y O U R H O M E C A F É ® C O F F E E M A K E R
Regular Cleaning
1.Before cleaning, unplug the unit and allow it to cool fully.
2.Open the lid by pressing the Open Button.
3.Remove the Pod Holder and discard the pod.
4.Remove the Brew Basket and wash the Brew Basket and Pod Holder with mild detergent.
5.Wipe surface with a clean, damp cloth. Do not use abrasive cleaners, as they may scratch the surface.
6.Rinse and dry all parts thoroughly. Never immerse the unit/base in water or in any other liquid.
Dishwasher safe (top rack): Removable Pod Holder, Brew Basket, Drip Tray Grid, Drip Tray and Water Reservoir Lid.
Not dishwasher safe: Water Reservoir.
Any other servicing should be performed by an authorized service representative.
Decalcifying Your Coffeemaker
Minerals (calcium/limestone) found in water will leave deposits in your coffeemaker and will affect it’s performance. It’s recommended that you regularly remove these deposits by using white household vinegar. Suggested cleaning interval: Soft water
– every 80 brew cycles: Hard water every 40 brew cycles.
1.Remove the Pod Holder.
2.Pour 8 oz. white household vinegar into the water reservoir, then add
3.Set a 14 oz. or larger mug on the brewing plate.
4.Press the ![]() 9 oz. Brew Button and let the cleaning solution brew through the unit.
9 oz. Brew Button and let the cleaning solution brew through the unit.
5 | 6 |