SECTION 2: ASSEMBLING YOUR LAWN MOWER
Removing Unit From Carton
•Remove staples, break glue on top flaps, or cut tape at carton end and peel along top flap to open.
•Remove loose parts if included with unit (i.e., operator’s manual, grass bag, safety glasses etc.)
•Cut along corners, lay carton down flat, and remove packing material and bottle of oil, if any.
•Roll or slide unit out of carton and check carton thoroughly for loose parts.
Loose Parts In Carton
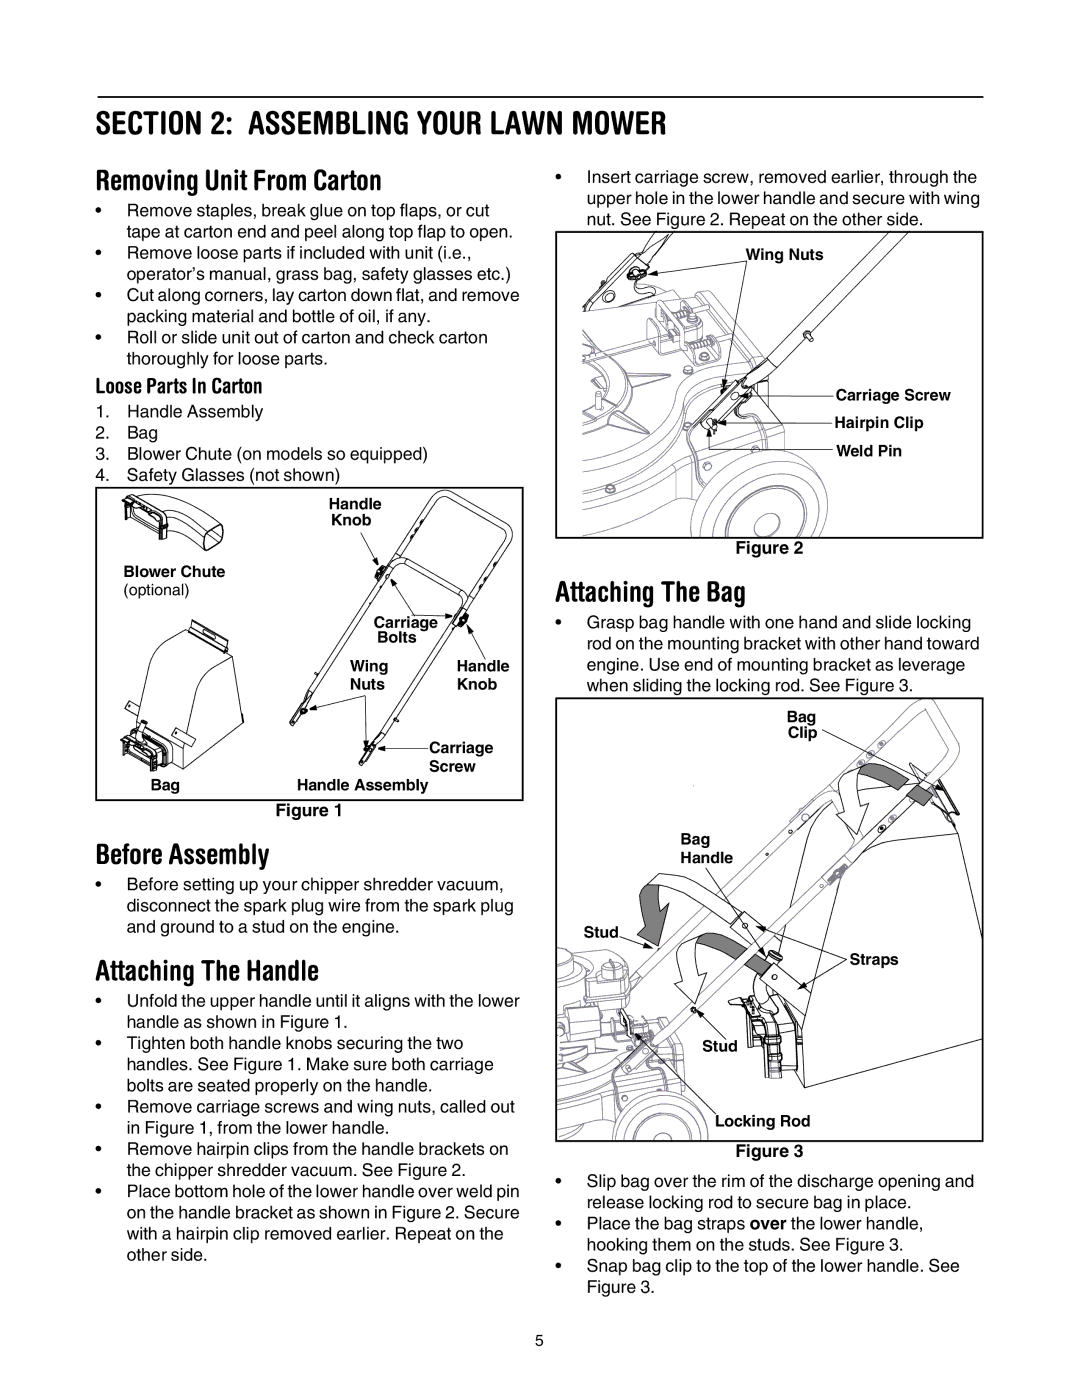
1.Handle Assembly
2.Bag
3.Blower Chute (on models so equipped)
4.Safety Glasses (not shown)
| Handle |
|
| Knob |
|
Blower Chute |
|
|
(optional) |
|
|
| Carriage | |
| Bolts |
|
| Wing | Handle |
| Nuts | Knob |
|
| Carriage |
Bag | Handle Assembly | Screw |
| ||
Figure 1
Before Assembly
•Before setting up your chipper shredder vacuum, disconnect the spark plug wire from the spark plug and ground to a stud on the engine.
Attaching The Handle
•Unfold the upper handle until it aligns with the lower handle as shown in Figure 1.
•Tighten both handle knobs securing the two handles. See Figure 1. Make sure both carriage bolts are seated properly on the handle.
•Remove carriage screws and wing nuts, called out in Figure 1, from the lower handle.
•Remove hairpin clips from the handle brackets on the chipper shredder vacuum. See Figure 2.
•Place bottom hole of the lower handle over weld pin on the handle bracket as shown in Figure 2. Secure with a hairpin clip removed earlier. Repeat on the other side.
•Insert carriage screw, removed earlier, through the upper hole in the lower handle and secure with wing nut. See Figure 2. Repeat on the other side.
Wing Nuts |
Carriage Screw |
Hairpin Clip |
Weld Pin |
Figure 2
Attaching The Bag
•Grasp bag handle with one hand and slide locking rod on the mounting bracket with other hand toward engine. Use end of mounting bracket as leverage when sliding the locking rod. See Figure 3.
Bag |
Clip |
Bag |
Handle |
Stud |
Straps |
Stud |
Locking Rod |
Figure 3
•Slip bag over the rim of the discharge opening and release locking rod to secure bag in place.
•Place the bag straps over the lower handle, hooking them on the studs. See Figure 3.
•Snap bag clip to the top of the lower handle. See Figure 3.
5
