Warnings

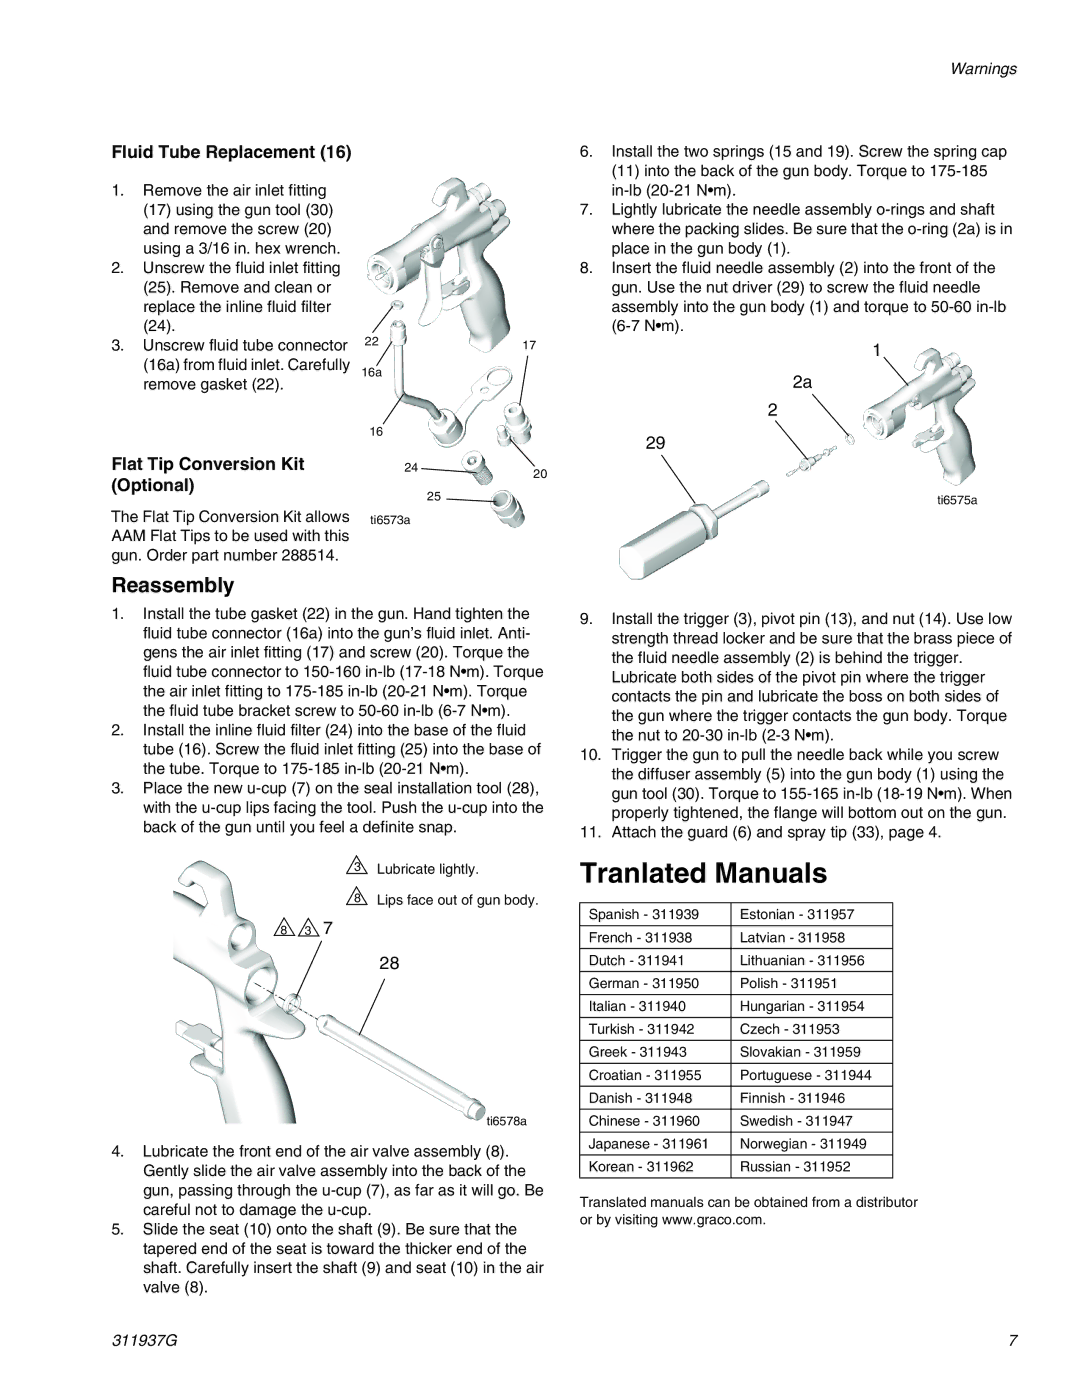
Fluid Tube Replacement (16)

6.Install the two springs (15 and 19). Screw the spring cap (11) into the back of the gun body. Torque to 175-185

1.Remove the air inlet fitting

(17)using the gun tool (30) and remove the screw (20) using a 3/16 in. hex wrench.

2.Unscrew the fluid inlet fitting

(25).Remove and clean or replace the inline fluid filter

3.Unscrew fluid tube connector (16a) from fluid inlet. Carefully remove gasket (22).

2217

16a

16

in-lb (20-21 N•m).

7.Lightly lubricate the needle assembly o-rings and shaft where the packing slides. Be sure that the o-ring (2a) is in place in the gun body (1).

8.Insert the fluid needle assembly (2) into the front of the gun. Use the nut driver (29) to screw the fluid needle assembly into the gun body (1) and torque to 50-60 in-lb (6-7 N•m).

1

2a

2

29

Flat Tip Conversion Kit

24

20

(Optional)


25


The Flat Tip Conversion Kit allows

ti6573a


AAM Flat Tips to be used with this


gun. Order part number 288514.


Reassembly

1.Install the tube gasket (22) in the gun. Hand tighten the fluid tube connector (16a) into the gun’s fluid inlet. Anti- gens the air inlet fitting (17) and screw (20). Torque the fluid tube connector to 150-160 in-lb (17-18 N•m). Torque the air inlet fitting to 175-185 in-lb (20-21 N•m). Torque the fluid tube bracket screw to 50-60 in-lb (6-7 N•m).

2.Install the inline fluid filter (24) into the base of the fluid tube (16). Screw the fluid inlet fitting (25) into the base of the tube. Torque to 175-185 in-lb (20-21 N•m).

3.Place the new u-cup (7) on the seal installation tool (28), with the u-cup lips facing the tool. Push the u-cup into the back of the gun until you feel a definite snap.

3

Lubricate lightly.

8

Lips face out of gun body.

8 3 7

28

ti6578a

4.Lubricate the front end of the air valve assembly (8). Gently slide the air valve assembly into the back of the gun, passing through the u-cup (7), as far as it will go. Be careful not to damage the u-cup.

5.Slide the seat (10) onto the shaft (9). Be sure that the tapered end of the seat is toward the thicker end of the shaft. Carefully insert the shaft (9) and seat (10) in the air valve (8).

ti6575a

9.Install the trigger (3), pivot pin (13), and nut (14). Use low strength thread locker and be sure that the brass piece of the fluid needle assembly (2) is behind the trigger.

Lubricate both sides of the pivot pin where the trigger contacts the pin and lubricate the boss on both sides of the gun where the trigger contacts the gun body. Torque the nut to 20-30 in-lb (2-3 N•m).

10.Trigger the gun to pull the needle back while you screw the diffuser assembly (5) into the gun body (1) using the gun tool (30). Torque to 155-165 in-lb (18-19 N•m). When properly tightened, the flange will bottom out on the gun.

11.Attach the guard (6) and spray tip (33), page 4.

Tranlated Manuals

Spanish - 311939

Estonian - 311957


French - 311938

Latvian - 311958


Dutch - 311941

Lithuanian - 311956


German - 311950

Polish - 311951


Italian - 311940

Hungarian - 311954


Turkish - 311942

Czech - 311953


Greek - 311943

Slovakian - 311959


Croatian - 311955

Portuguese - 311944


Danish - 311948

Finnish - 311946


Chinese - 311960

Swedish - 311947


Japanese - 311961

Norwegian - 311949


Korean - 311962

Russian - 311952


Translated manuals can be obtained from a distributor or by visiting www.graco.com.

311937G

7

Page 7
Image 7
Graco 288513, 289604 important safety instructions Tranlated Manuals, Reassembly

288513, 289604 specifications

Graco is renowned for producing high-quality paint sprayers, and among their notable offerings are the Graco 289604 and 288513 models. These sprayers are designed for both professional contractors and DIY enthusiasts looking for efficiency and precision in their paint applications.

The Graco 289604 features a next-generation design that ensures durability while maintaining a lightweight profile. One of its standout technologies is the FlexLiner bag system, which allows for easy cleaning and prevents material waste by enabling users to spray all the contents without needing to switch containers. The model is also compatible with various paint types, including latex, oil-based paints, and stains, making it a versatile choice for any project.

This sprayer offers a powerful motor that delivers a consistent spray pattern at various speeds, allowing users to cover large surfaces quickly without sacrificing quality. The pressure control knob provides the ability to adjust the flow of paint, ensuring that intricate projects can also be tackled with precision. Additionally, the Graco 289604 includes a reversible spray tip, which dramatically reduces clogs and enhances the sprayer’s overall efficiency.

On the other hand, the Graco 288513 is equally impressive, focusing mainly on airless spraying technology. Its robust design makes it ideal for larger projects, significantly reducing the time required to complete tasks. The EasyPrime feature ensures that users can quickly start painting with minimal setup. Like its counterpart, the 288513 boasts the FlexLiner bag system, ensuring ease of use and reduced cleanup time.

Both models are equipped with a user-friendly interface, making them accessible for both novice and experienced painters alike. The lightweight design of both sprayers contributes to easier maneuverability and reduced fatigue during extended use. Moreover, Graco’s commitment to safety is evident in these sprayers, which come with built-in safety features to prevent malfunction and misuse.

In conclusion, the Graco 289604 and 288513 paint sprayers are excellent choices for anyone serious about achieving a professional finish. With cutting-edge technologies, superior design characteristics, and user-friendly features, these models stand out in the competitive world of paint application tools, ensuring that every project can be completed efficiently and effectively.