Blade Care

WARNING: When removing the cutting blade for sharpening or replacement, protect your hands with a pair of heavy gloves or use a heavy rag to hold the blade.

Periodically inspect the blade adapter for cracks, especially if you strike a foreign object. Replace when necessary. Follow the steps below for blade service:

1.Disconnect spark plug wire from spark plug.

2.Tip mower as specified in separate engine manual. If it does not specify turn mower on its side making sure that the air filter and the carburetor are up.

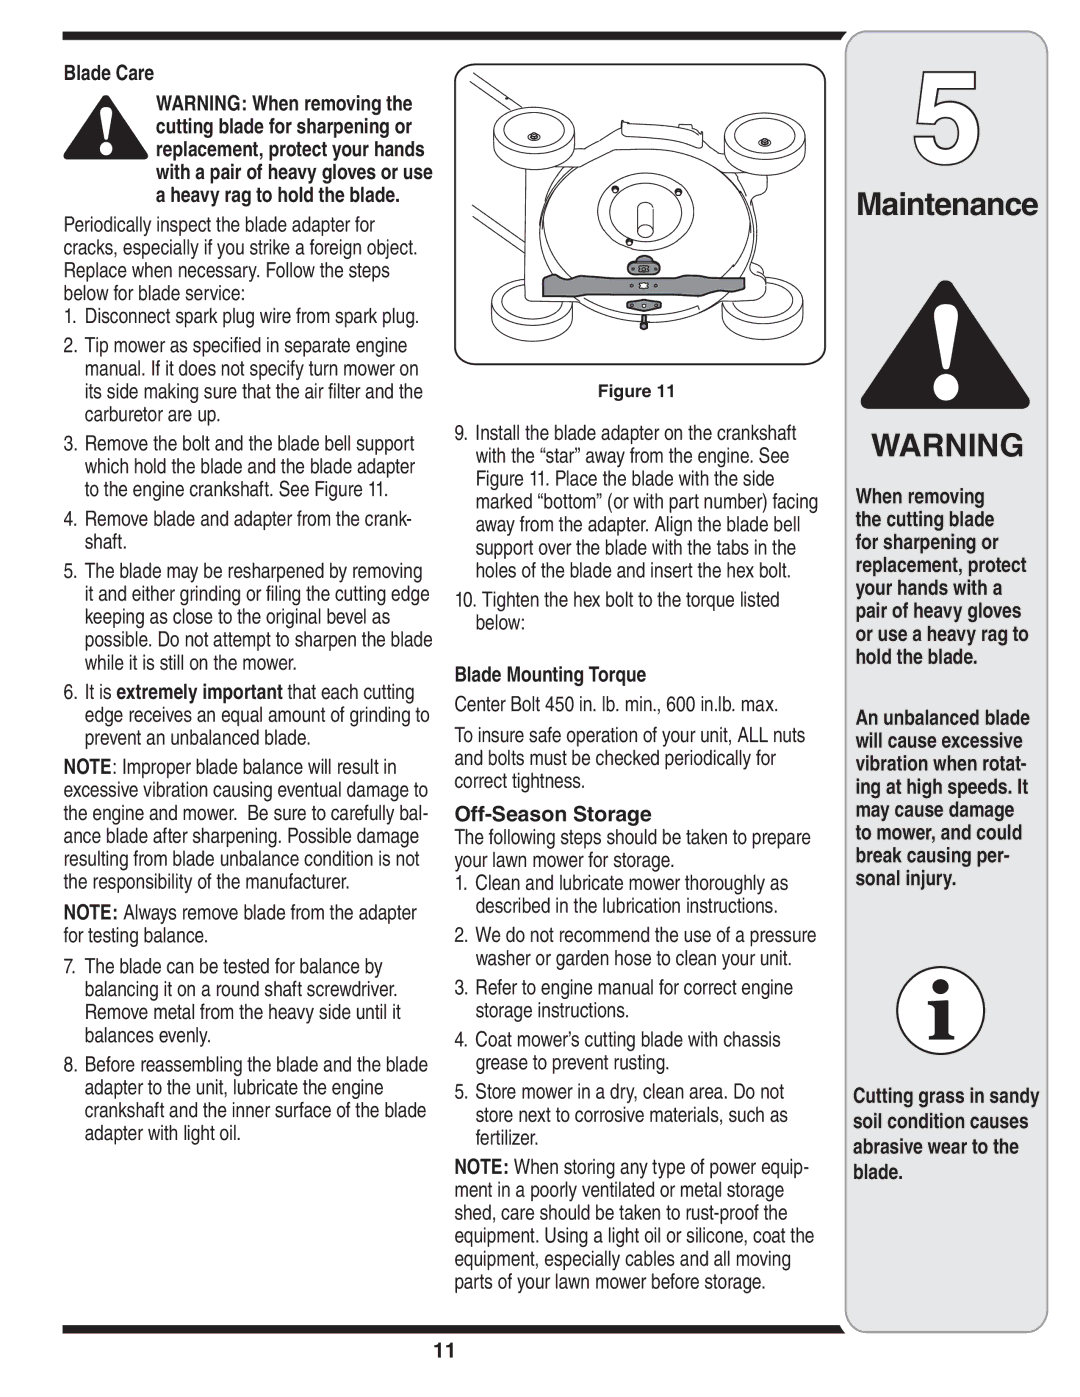
3.Remove the bolt and the blade bell support which hold the blade and the blade adapter to the engine crankshaft. See Figure 11.

4.Remove blade and adapter from the crank- shaft.

5.The blade may be resharpened by removing it and either grinding or filing the cutting edge keeping as close to the original bevel as possible. Do not attempt to sharpen the blade while it is still on the mower.

6.It is extremely important that each cutting edge receives an equal amount of grinding to prevent an unbalanced blade.

NOTE: Improper blade balance will result in excessive vibration causing eventual damage to the engine and mower. Be sure to carefully bal- ance blade after sharpening. Possible damage resulting from blade unbalance condition is not the responsibility of the manufacturer.

NOTE: Always remove blade from the adapter for testing balance.

7.The blade can be tested for balance by balancing it on a round shaft screwdriver. Remove metal from the heavy side until it balances evenly.

8.Before reassembling the blade and the blade adapter to the unit, lubricate the engine crankshaft and the inner surface of the blade adapter with light oil.

Figure 11

9.Install the blade adapter on the crankshaft with the “star” away from the engine. See Figure 11. Place the blade with the side marked “bottom” (or with part number) facing away from the adapter. Align the blade bell support over the blade with the tabs in the holes of the blade and insert the hex bolt.

10.Tighten the hex bolt to the torque listed below:

Blade Mounting Torque

Center Bolt 450 in. lb. min., 600 in.lb. max.

To insure safe operation of your unit, ALL nuts and bolts must be checked periodically for correct tightness.

Off-Season Storage

The following steps should be taken to prepare your lawn mower for storage.

1.Clean and lubricate mower thoroughly as described in the lubrication instructions.

2.We do not recommend the use of a pressure washer or garden hose to clean your unit.

3.Refer to engine manual for correct engine storage instructions.

4.Coat mower’s cutting blade with chassis grease to prevent rusting.

5.Store mower in a dry, clean area. Do not store next to corrosive materials, such as fertilizer.

NOTE: When storing any type of power equip- ment in a poorly ventilated or metal storage shed, care should be taken to rust-proof the equipment. Using a light oil or silicone, coat the equipment, especially cables and all moving parts of your lawn mower before storage.

5

Maintenance

WARNING

When removing the cutting blade for sharpening or replacement, protect your hands with a pair of heavy gloves or use a heavy rag to hold the blade.

An unbalanced blade will cause excessive vibration when rotat- ing at high speeds. It may cause damage to mower, and could break causing per- sonal injury.

Cutting grass in sandy soil condition causes abrasive wear to the blade.

11

Page 11
Image 11
MTD 100 Series Blade Care, Remove blade and adapter from the crank- shaft, Tighten the hex bolt to the torque listed below

100 Series specifications

The MTD 100 Series represents an innovative leap in outdoor power equipment, specifically designed for homeowners who seek efficiency, reliability, and cutting-edge performance. These machines are tailored for a variety of tasks, including mowing, snow removal, and gardening, making them versatile companions for seasonal outdoor chores.

One of the standout features of the MTD 100 Series is its robust engine technology. The series is equipped with powerful and efficient engines that offer impressive torque and reduced emissions. This technology not only enhances the machine's performance but also aligns with modern environmental standards, making it a greener choice for backyard enthusiasts.

The design of the MTD 100 Series is another hallmark of its quality. Each unit is constructed with durable materials that are built to withstand the elements and the rigors of regular use. The chassis is designed for maximum stability and maneuverability, ensuring that users can tackle their tasks with ease. Furthermore, the intuitive controls and ergonomic handles enhance user comfort, reducing fatigue during longer work sessions.

In terms of cutting technology, the MTD 100 Series features advanced blade design that promotes effective cutting while minimizing clumping. The adjustable cutting height allows users to customize their mowing experience, addressing different types of grass and terrains. The series also boasts an option for mulching, which not only improves the health of lawns but also reduces the need for bagging clippings.

The safety features embedded within the MTD 100 Series provide peace of mind for users. These include automatic shut-off systems and blade brake mechanisms designed to stop the blade quickly when needed. Such features are essential for ensuring that both the operator and bystanders remain safe during operation.

Additionally, the MTD 100 Series incorporates user-friendly technology options such as electric start capability and fuel-efficient operation modes. These features simplify the startup process and promote longer run times while conserving fuel.

Overall, the MTD 100 Series is an embodiment of reliability, performance, and user-centric design. Whether tackling a sprawling lawn or navigating snowy walkways, the machines in this series empower homeowners to manage their outdoor spaces with confidence and efficiency. With a blend of advanced technology and practical features, the MTD 100 Series proves to be an indispensable tool for every household.